After doing a video testing different external GPUs on a Raspberry Pi last week, I realized two things:
- Compiling the Linux kernel on a Raspberry Pi is slow. It took 54 minutes, and I ended up doing it 7 times during the course of testing for that video.
- If you ever want to figure out a better way to do something, write a blog post or create a video showing the less optimal way of doing it.
To the second point, about every fifth comment was telling me to cross-compile Linux on a faster machine instead of doing it on the Pi itself. For example:

And on the Pi Forums, it seems like nobody worth their salt compiles the kernel on the Pi either, so I figured—since I'm probably going to have to do it again another thousand times in my life—I might as well put together a guide for how to do it on a Mac.
And my first attempt was to use Docker for Mac, but that attempt faltered once I realized there's no way to mount a microSD card ('device') into Docker for Mac, unless you hack things through VirtualBox with Docker inside or use Docker Machine. And that's a lotta layers of abstraction.
And my second attempt was to see if osxfuse could be made to help (I've used osxfuse to mount Raspberry Pi microSD cards before...). That didn't pan out, and I didn't want to rely on something that used paid ext4 software that may or may not work with virtualization, so ultimately I went back to my old faithful, Vagrant + VirtualBox.
I wanted to compile the Raspberry Pi OS kernel with support for 9000 MTU on the built-in Gigabit network interface for some ethernet benchmarking I was doing (it only supports 1500 MTU out of the box, and the driver doesn't allow changing MTU on the fly), and I had to put that kernel on four Pi 4 model Bs, so this was the perfect time to start cross-compiling on my fast Core i9 Mac.
Setting up a Debian VM
I wanted my cross-compile environment to be close to the Pi OS, and work with the Raspberry Pi Kernel Building directions out of the box, so I created a Vagrantfile that used the debian/buster64 base box.
See the entire Vagrantfile using the link in the previous paragraph, but one of the more important bits is the enabling of the XHCI USB 3.0 interface in the VM, so you can attach USB devices—and thus access and mount the fat32 and ext4 partitions on a microSD card directly within the VM:
    vb.customize ["modifyvm", :id, "--usb", "on"]
    vb.customize ["modifyvm", :id, "--usbxhci", "on"]
I initially tried using the USB 2.0 EHCI option instead of USB 3.0 and xHCI, but when I did that, and tried attaching my card reader (detailed later in this post), I got the error message VERR_PDM_NO_USB_PORTS:
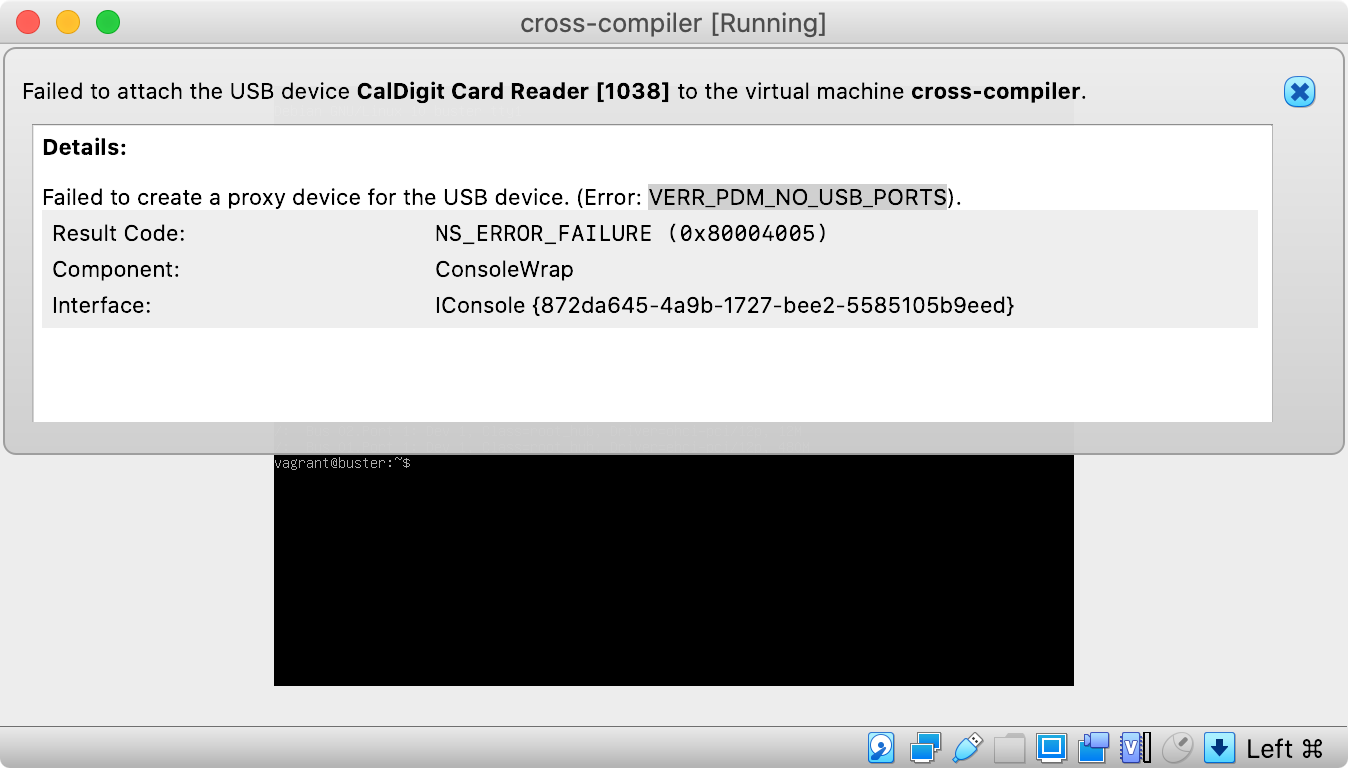
So if you get that error, try out the USB 3.0 XHCI option instead.
I also put in an inline shell provisioner in the Vagrantfile that installs all the build dependencies:
  config.vm.provision "shell", inline: <<-SHELL
    apt-get update
    apt-get install -y git bc bison flex libssl-dev make libc6-dev libncurses5-dev crossbuild-essential-armhf crossbuild-essential-arm64
  SHELL
Again, check out the linked Vagrantfile in my GitHub repo to find the whole thing.
With that Vagrantfile, assuming you have Vagrant and VirtualBox installed on your computer, along with the VirtualBox Extension Pack (required for USB support), you can run vagrant up, and you'll end up with a VM ready to cross-compile ARM Linux!
Getting USB working
The next step for me was to get my external USB card reader (in my case, built into my CalDigit TS3 Plus ThunderBolt hub) attached to the VM so when I put in a microSD card, it would show up inside Debian.
To do this, I shut down the VM with vagrant halt, then I opened VirtualBox, went into the Settings for the new 'cross-compile' VM, then to 'Ports', then 'USB', then in the 'USB Device Filters' section, I added my 'CalDigit Card Reader [1038]'.
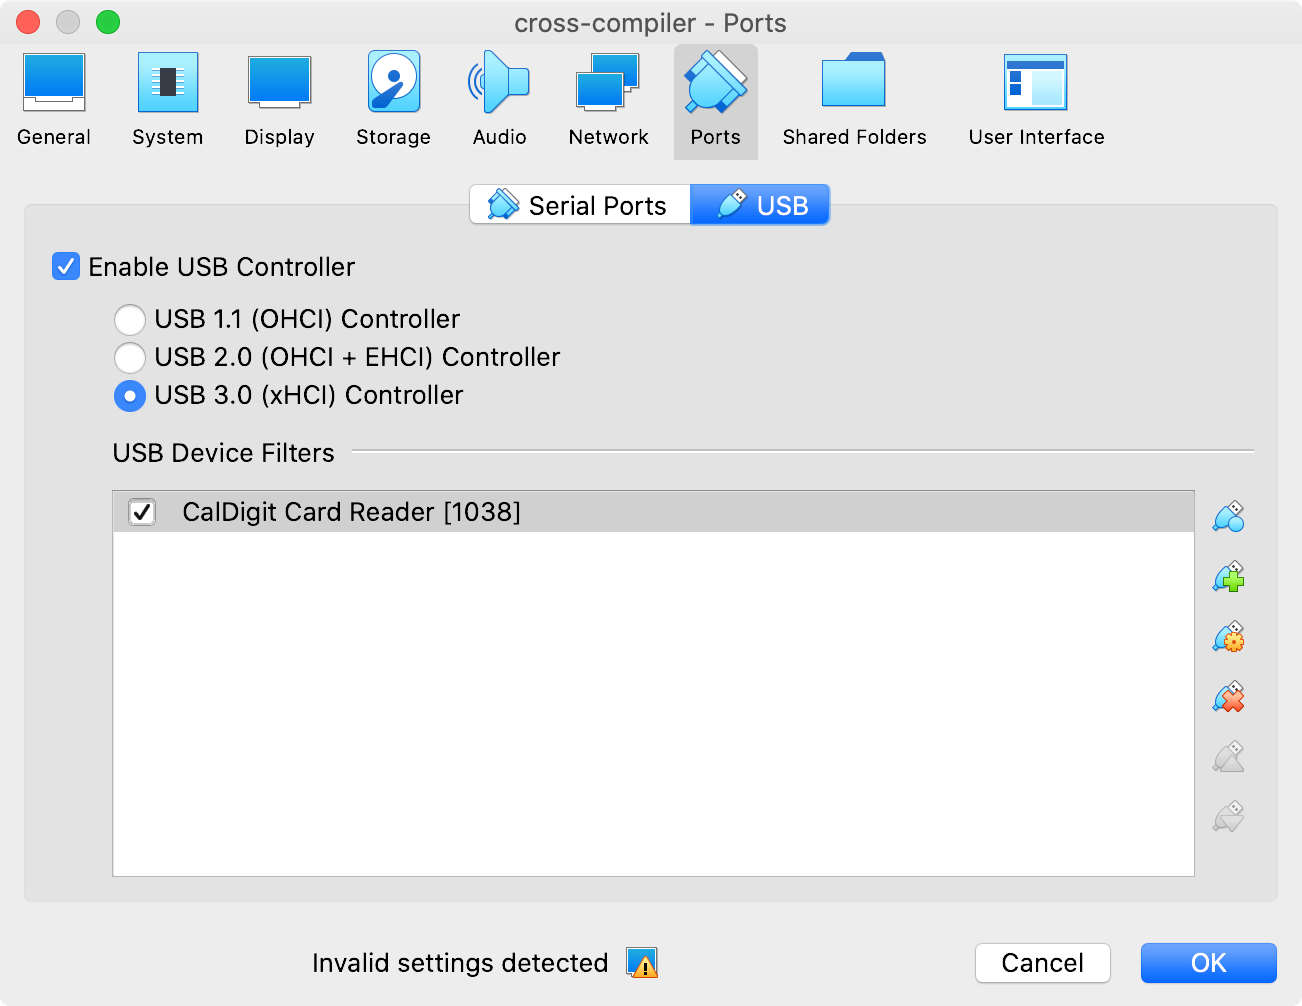
You can specify USB device directly in the Vagrantfile (see the comments on this older blog post), but since I move my Mac between different locations, with different card readers, I didn't want to hardcode anything in the Vagrantfile.
Now that the card reader is attached, I started up the VM again, with vagrant up.
Logging in and compiling the Linux kernel
For the rest of this blog post, I'm assuming you'll be building Linux for the Raspberry Pi 4 (or Compute Module 4, or Pi 400), and for 64-bit ARM, not 32-bit. If you need to build for 32-bit, or for a different Pi model, please make sure you use the right environment variables and build args as outlined in the Kernel building cross-compiling documentation.
Log into the VM using vagrant ssh, then start the process of compiling Linux and copying everything to your microSD card or USB drive:
Clone the linux repo (or clone a fork or a different branch):
git clone --depth=1 https://github.com/raspberrypi/linuxRun the following commands to make the .config file:
 cd linux
 KERNEL=kernel8
 make ARCH=arm64 CROSS_COMPILE=aarch64-linux-gnu- bcm2711_defconfig
(Optionally) Either edit the .config file by hand or use menuconfig:
make menuconfigCompile the Kernel:
make -j4 ARCH=arm64 CROSS_COMPILE=aarch64-linux-gnu- Image modules dtbs
For 32-bit Pi OS, use
KERNEL=kernel7l,ARCH=arm,CROSS_COMPILE=arm-linux-gnueabihf-, andzImageinstead ofImage.
Mounting the Pi microSD or USB drive
Mount the FAT and ext4 partitions of the USB card to the system. First, insert your microSD card into the reader you attached to the VM earlier, then run the following commands:
mkdir -p mnt/fat32
mkdir -p mnt/ext4
sudo mount /dev/sdb1 mnt/fat32
sudo mount /dev/sdb2 mnt/ext4
Installing modules and copying the built Kernel
Install the kernel modules onto the drive:
sudo env PATH=$PATH make ARCH=arm64 CROSS_COMPILE=aarch64-linux-gnu- INSTALL_MOD_PATH=mnt/ext4 modules_install
For 32-bit Pi OS, use
sudo env PATH=$PATH make ARCH=arm CROSS_COMPILE=arm-linux-gnueabihf- INSTALL_MOD_PATH=mnt/ext4 modules_install
Copy the kernel and DTBs onto the drive:
sudo cp mnt/fat32/$KERNEL.img mnt/fat32/$KERNEL-backup.img
sudo cp arch/arm64/boot/Image mnt/fat32/$KERNEL.img
sudo cp arch/arm64/boot/dts/broadcom/*.dtb mnt/fat32/
sudo cp arch/arm64/boot/dts/overlays/*.dtb* mnt/fat32/overlays/
sudo cp arch/arm64/boot/dts/overlays/README mnt/fat32/overlays/
Unmounting the drive
Unmount the disk before you remove it from the card reader or unplug it.
sudo umount mnt/fat32
sudo umount mnt/ext4
Now you can pull the card out of the reader, or disconnect your USB drive, and put it in the Pi!
Conclusion
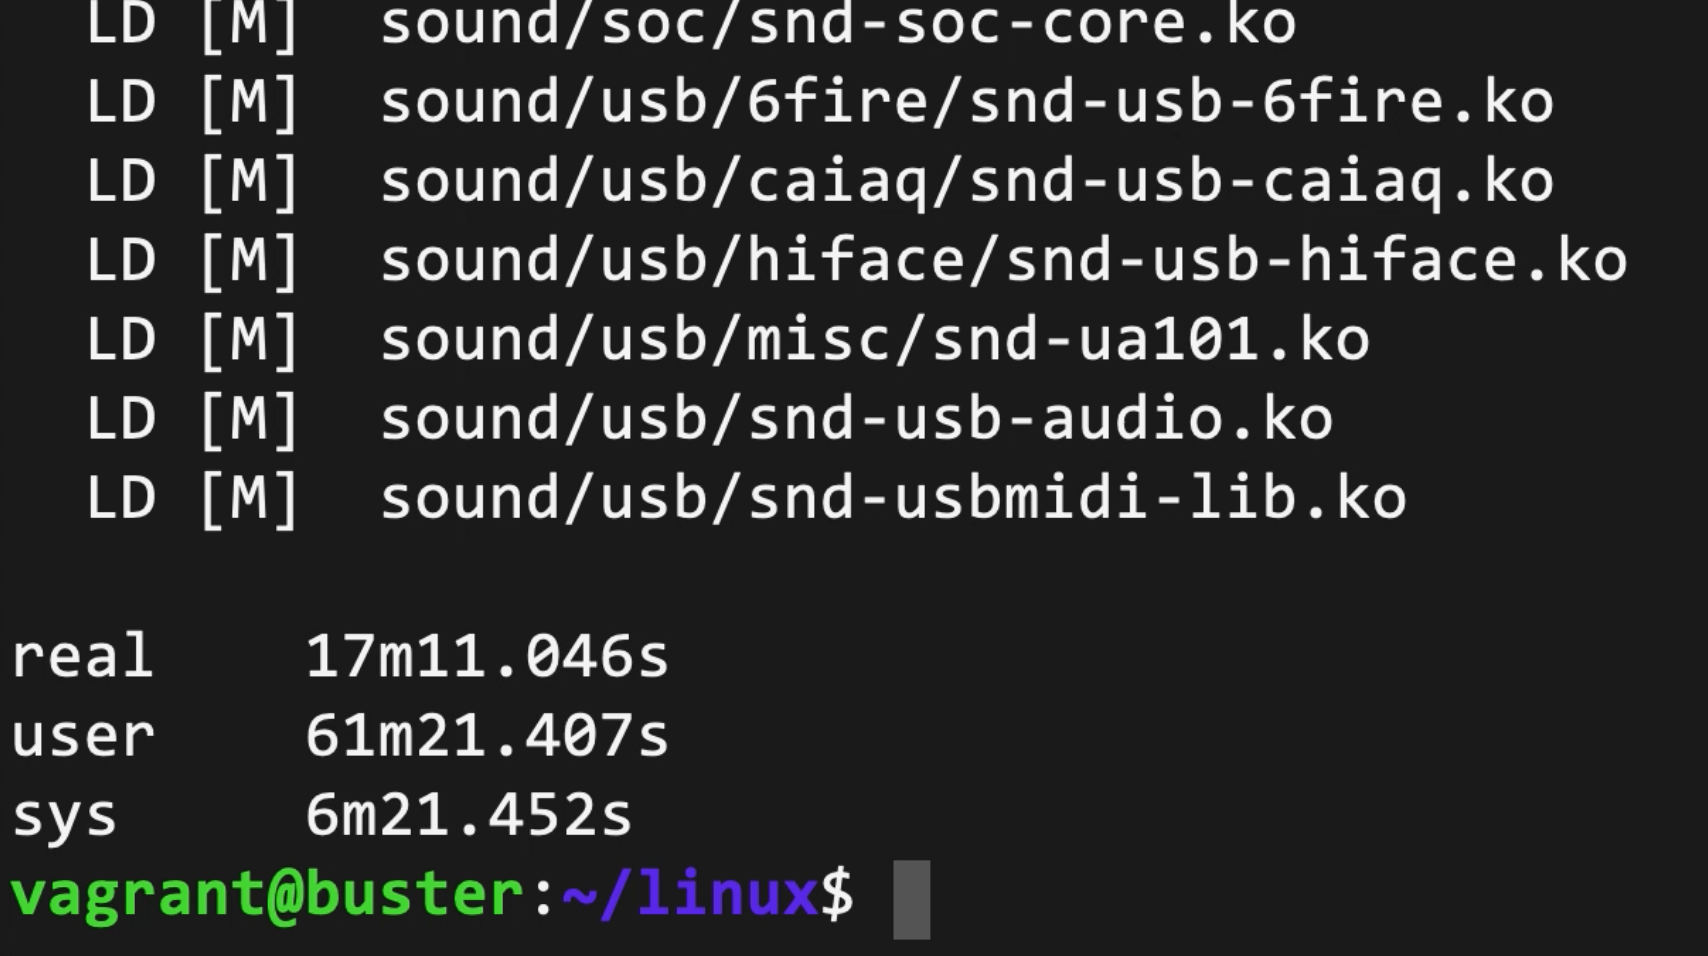
In total, compiling the kernel on my MacBook Pro only takes about 18-20 minutes (whereas it took over an hour on the Pi 4 model B). I can probably optimize the VM layout and CPU utilization better to bring that number down a bit more, and probably will at some point.
Since I'm making a lot of tweaks right now to multiple Pis at a time (and currently testing a new GPU, a 10 Gbps network adapter, and a 4x 1 Gbps network adapter on the Compute Module 4), this is a much more efficient way to build custom Pi kernels.
Please check out the Raspberry Pi PCI Express Card Database project for the latest configuration and documentation for everything mentioned in this blog post, in the cross-compile directory.
Comments
Nice, but what about running Linux directly on your Mac while doing the kernel builds? This will remove whatever overhead is introduced by running in VMs. Maybe you can boot your Mac from an external SSD containing Linux so you wouldn't have to wipe out the MacOS you have on your system disk. It would be interesting to see how much difference this makes.
I'm running Fedora 33 on a Mid-2014 MacBook Pro because my normal desktop machine runs Windows, and the MacBook Pro is the fastest machine I own. This is working great!
I could see why he would not want to do that, though. Rebooting and using a different OS would remove his "native environment" of the Mac, which he needs to use for other things. He's expressed difficulties using the Pi 4b with 8gb RAM more for it not being what he's used to. As someone who works with Linux (not dual boot, I run Windows in a VM), I often get agitated when tools are available "like Linux" but really aren't: like how Cygwin used to be. I recommended distcc in another comment, a distributed compiler, to make use of his existing Pi clusters, or perhaps whatever free Linonde stuff he's getting from one of his sponsors. Jeff may be "naaah" to that, too, but someone else might like to try.
Would this work with the pi 3
Yes, you'd just need to make sure to change any of the appropriate values like
KERNEL.Ty
Since you are recompiling a lot, has anyone recommended ccache to speed it up? https://ccache.dev
Another project you might want to try is using your Pi cluster to compile your stuff over multiple machines using distcc: a fast, free distributed C/C++ compiler.
https://distcc.github.io/
Greetings, I also live in #STL, just a quick shout there. I was able recently to get the going on Catalina without VirtualBox and Vagrant, only using Docker here is how I did it..
Requirements: Docker, osxfuse, fuse-ext2, e2fsprogs, m4, automake, autoconf, libtool, xcode-select, homebrew
You should now be able to follow the directions on: https://www.raspberrypi.org/documentation/linux/kernel/building.md
-> cd linux KERNEL=kernel8 make ARCH=arm64 CROSS_COMPILE=aarch64-linux-gnu- bcm2711_defconfig
Needs to be on two lines or like cd linux ; KERNEL=
My 20-core 40 Threads HP DL380 did the compile in:
real 3m24.113s
user 115m4.228s
sys 9m26.963s
Nice! And I fixed the formatting on that line. Thanks for catching that!
thanks for the informative blog post.
does someone here know a quick/automated way to write the results into a .img or .iso file instead of writing it directly to the sd card?
so one could do this on a fast server and download the iso file after that.
On a linux (Ubuntu focal e.g. in a VM) system just work with loop devices (losetup;kpartx) and create the two partition where you copy the compiled kernel and uboot stuff.
Like
www.raspberrypi.org -> /forums/viewtopic.php?t=268738
sudo losetup -Pf disk.img
superuser.com -> /questions/211338/how-to-mount-a-multi-partition-disk-image-in-linux
sudo kpartx -v -a file.iso
Good luck
Thanks for your really detailed post! I have a camera whose SDK only supports Ubuntu, and I needed to do the exact things as yours to increase the MTU. I tried to follow your instructions here with only one change which is cloning the ubuntu xenial repo instead of raspbian instead. However, the ubuntu xenial repo doesn't have bcm2711_defconfig so I got stuck in the step making .config. Could you suggest what is the correct way to implement your instructions for Ubuntu please? Thanks!!
Anyone know why I get this weird error
james@fedora linux]$ make -j4 ARCH=arm64 CROSS_COMPILE=aarch64-linux-gnu- Image modules dtbs
SYNC include/config/auto.conf.cmd
*
* Restart config...
*
*
* Platform selection
*
Actions Semi Platforms (ARCH_ACTIONS) [N/y/?] (NEW)
Using Fedora 34.
Did you run "make menuconfig" instead of "make ARCH=arm64 CROSS_COMPILE=aarch64-linux-gnu- menuconfig" ? I had the same problem and that was the issue.
Dear Jeff,
I followed your description on https://github.com/geerlingguy/raspberry-pi-pcie-devices/tree/master/ex… and came to the same point were I thought that I needed to build the kernel header files. However, it turned out that I just had to copy the "/build" folder from the VM to the root of the Raspberry Pi filesystem.
The "env PATH=$PATH make ARCH=arm64 CROSS_COMPILE=aarch64-linux-gnu- INSTALL_MOD_PATH=/mnt/pi-ext4 modules_install" will create a "lib/modules/" folder on the target with links for "build" to "/build/linux" which is just the original kernel source tree used to build the kernel.
At least in my case, I was able to compile kernel modules with this small change.
Best regards,
Sven