The Raspberry Pi Compute Module 4 comes in two main flavors: one with built-in eMMC storage, and one without it. If you opt for a Compute Module 4 with built-in eMMC storage, and you want to write a new OS image to the Compute Module, or manually edit files on the boot volume, you can do that just the same as you would a microSD card—but you need to first make the eMMC storage mountable on another computer.
This blog post shows how to mount the eMMC storage on another computer (in my case a Mac, but the process is very similar on Linux), and then how to flash a new OS image to it.
Video Instructions
In addition to the tutorial below, I published a video version of this post covering installation and usage of rpiboot for flashing the eMMC on Windows, Ubuntu, Raspberry Pi OS, or macOS:
Preparing the IO Board for mounting
Before you can set the eMMC storage into 'USB mass storage' mode, you have to put a jumper over the first set of pins on the 'J2' jumper—the jumper labeled "Fit jumper to disable eMMC boot":
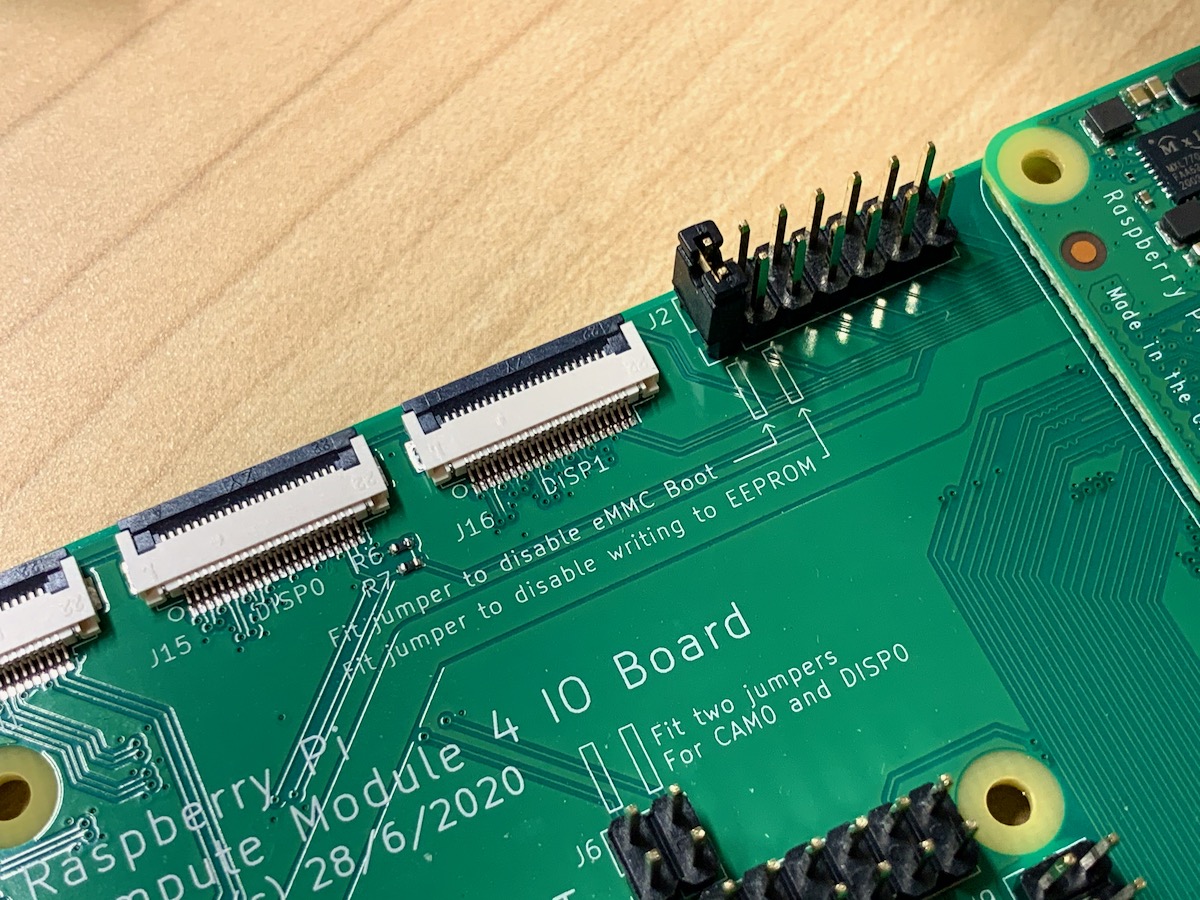
Don't have a jumper? I bought a huge pack of jumpers years ago, and grabbed one from that bag. You could also pop any kind of conductor between the two pins, like a female-to-female jumper.
Then, plug a USB cable from your computer (in my case, my Mac—but it could be a Windows or Linux computer too) into the 'USB Slave' micro USB port on the IO Board, and plug in power:
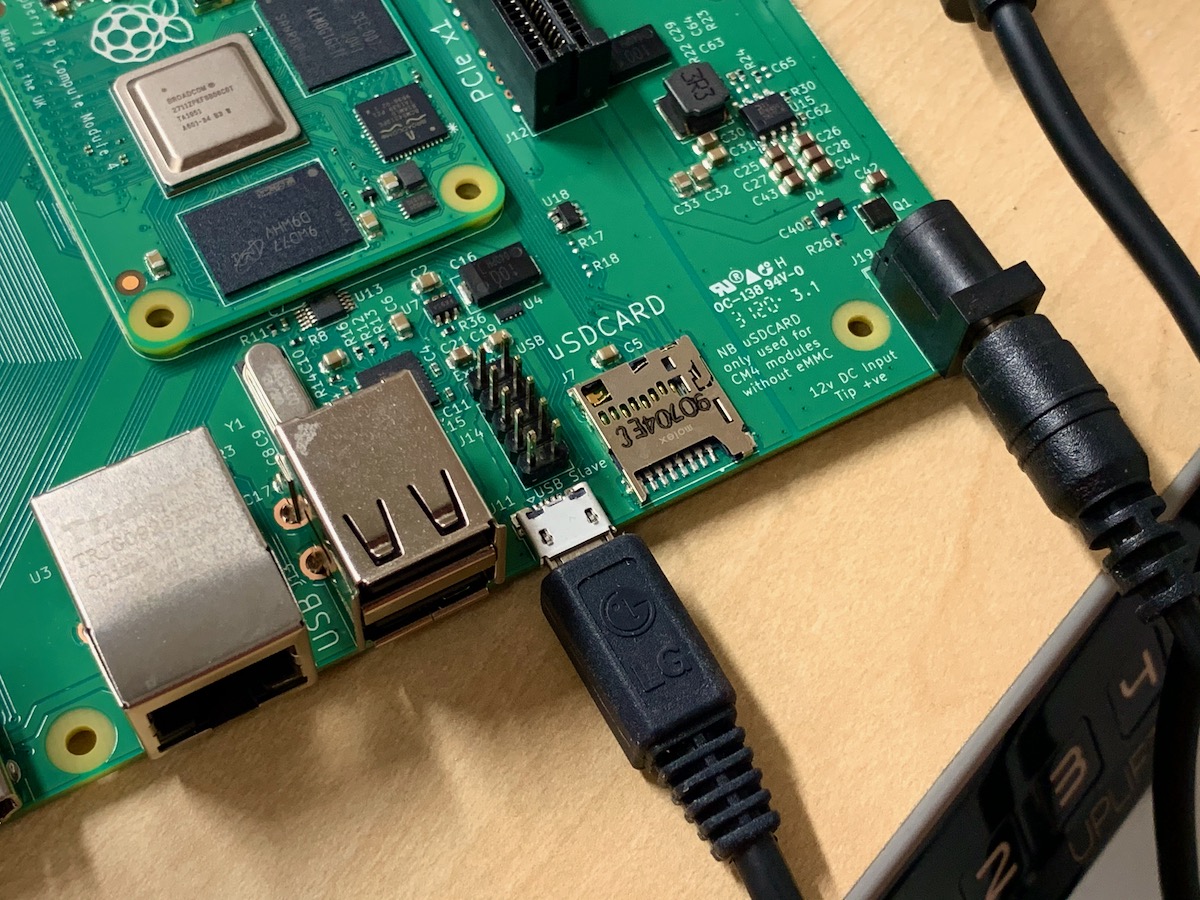
The board will power on, and you'll see the red 'D1' LED turn on, but the Compute Module won't boot. The eMMC module should now be ready for the next step.
Using usbboot to mount the eMMC storage
The next step is to download the Raspberry Pi usbboot repository, install a required USB library on your computer, and build the rpiboot executable, which you'll use to mount the storage on your computer. I did all of this in the Terminal application on my Mac.
First, make sure you have the libusb library installed:
- On my Mac, I have Homebrew installed, so I ran:
brew install pkgconfig libusb - On Linux (e.g. another Raspberry Pi), run:
sudo apt install libusb-1.0-0-dev
Second, clone the usbboot repository to your computer:
$ git clone --depth=1 https://github.com/raspberrypi/usbboot
Third, cd into the usbboot directory and build rpiboot:
$ cd usbboot
$ make
Now there should be an rpiboot executable in the directory. To mount the eMMC storage, run:
$ sudo ./rpiboot
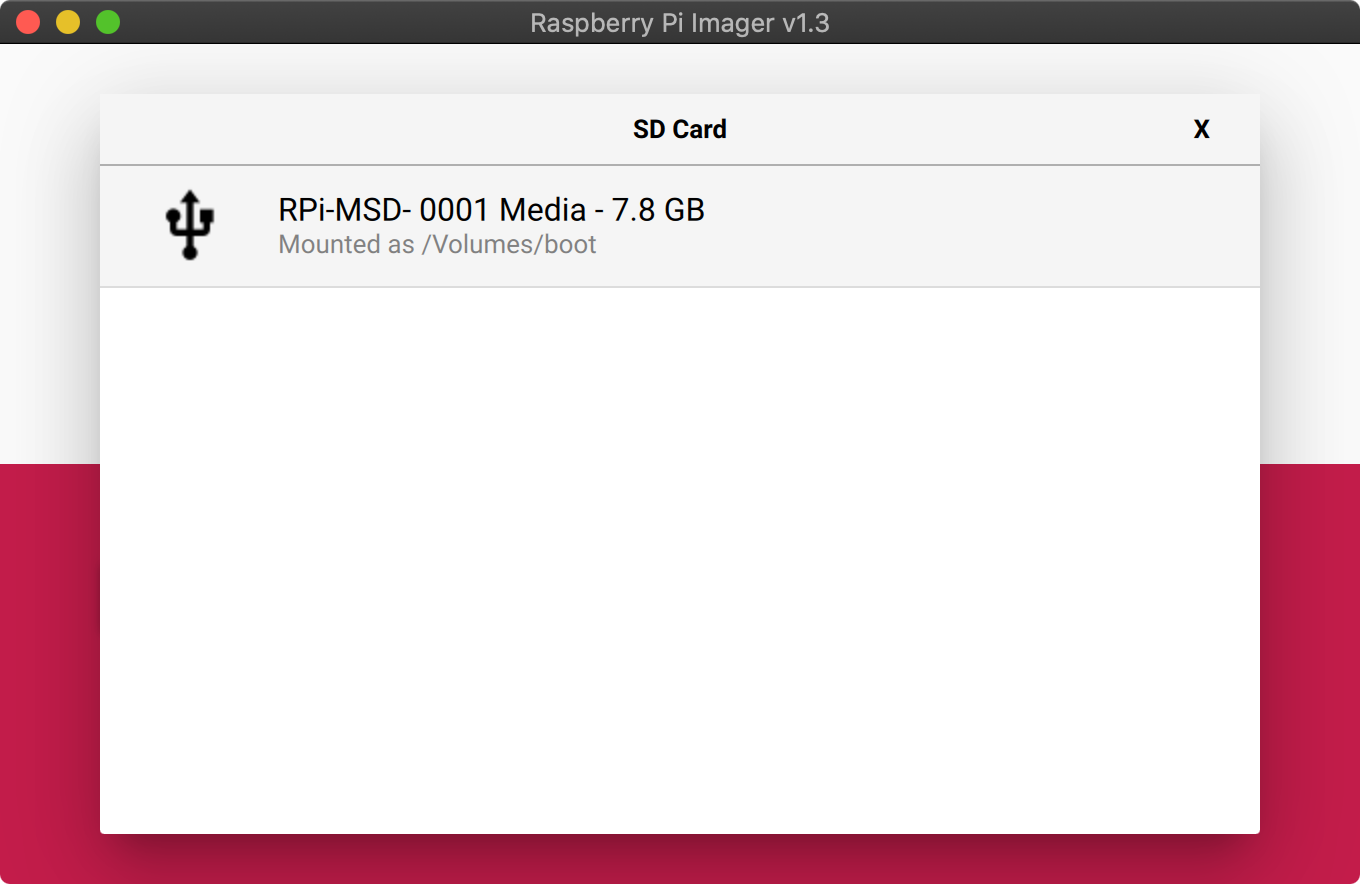
And a few seconds later, after it finishes doing its work, you should see the boot volume mounted on your Mac (or on whatever Linux computer you're using). You might also notice the D2 LED lighting up; that means there is disk read/write activity on the eMMC.
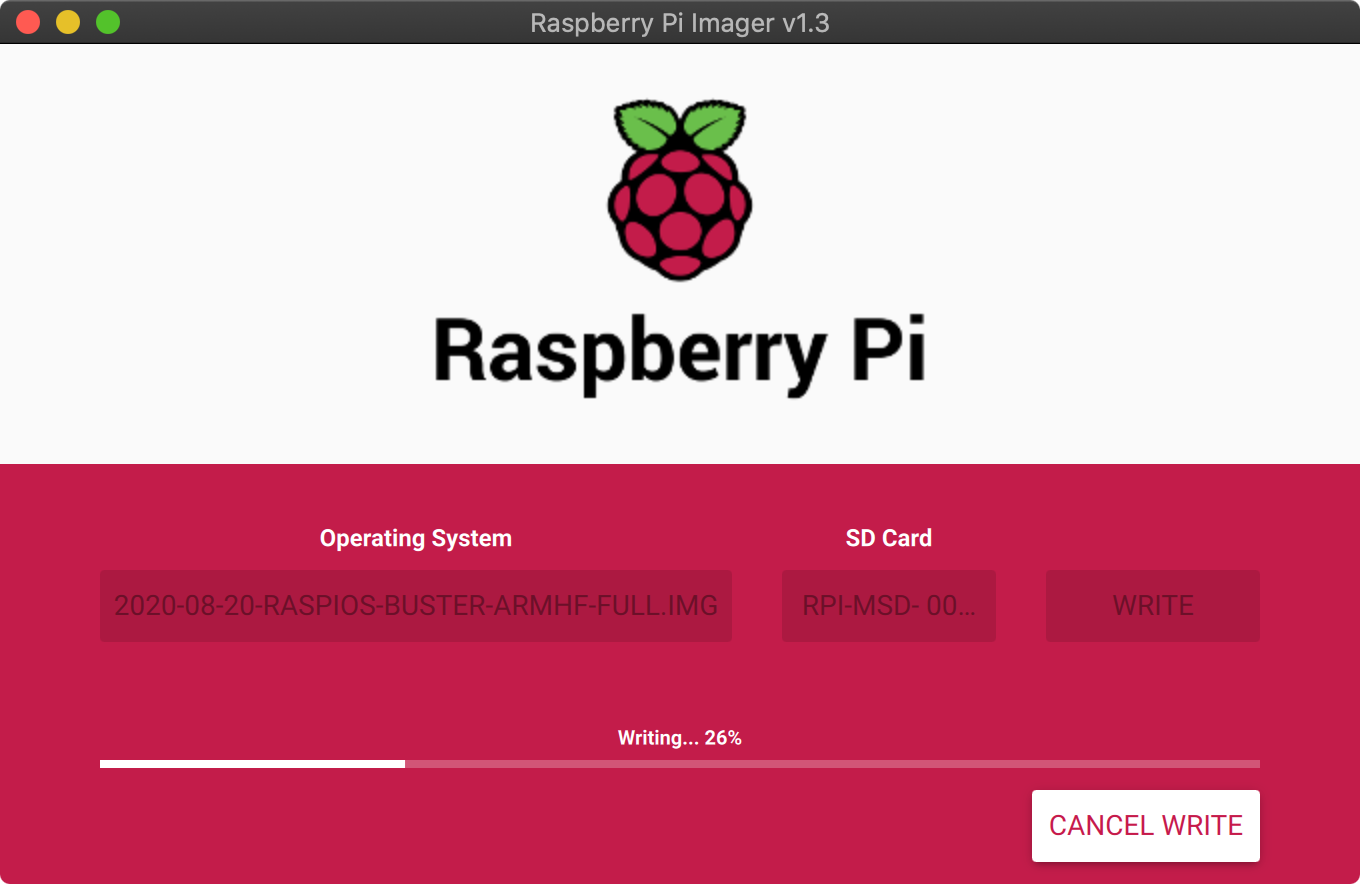
Flashing Raspberry Pi OS onto the eMMC
At this point, the eMMC storage behaves just like a microSD card or USB drive that you plugged into your computer. Use an application like the Raspberry Pi Imager to flash Raspberry Pi OS (or any OS of your choosing) to the eMMC:
At this point, if you don't need to make any modifications to the contents of the boot volume, you could disconnect the IO board (eject the boot volume if it's still mounted!) USB slave port connection, disconnect power, then remove the eMMC Boot disable jumper on J2.
Then plug power back in, and the CM4 should now boot off it's (freshly-flashed) eMMC storage!
If you ever need to mount the boot volume or re-flash the eMMC storage, just run sudo ./rpiboot again.
Comments
Nice post Jeff! One question: is it safe to provide 5V power to the module for this flashing task and for normal use through the floppy connector? Are there all the needed circuit protections like when powering the 12V barrel? (I understand that PCIe and fan will not be active when providing 5V only).
Yes, you can provide power through the fan connector or the barrel connector, and everything seems to function the same either way (in my limited testing, at least).
Ok thanks Jeff! Good to know ;)
Thanks Jeff, that worked a treat!
Interesting bootstrap thanks.
Can you USB boot a compute module ?
Hi Jeff, is there a way to flash the eMMC onto the Computer Module in parallel to reduce the unit cycle time? Thanks.
Thanks, nice tutorial and well explained!
Have you tried to install Fedora or Ubuntu onto the eMMC storage? I assume the process would be the same, correct?
Hi peeps. Can anyone sat what this is? It's happening when I run sudo ./rpiboot. Tried a few restarts and such.
OK, mea culpa. If you see this error, it may well mean you ordered the only module that was still available at the time which was the Lite version. Without EMMC. And then forgot. My thanks to Mr Geerling for comparing two boards - with and without - on the video, which illuminated my problem.
I hope this helps someone else
Im getting this error and I definitely have an eMMC chip.... :(
Any thoughts @jeff?
Dug into this a little more. I have tried a Mac (bigSur), a PC (Windows 10), and even a Raspberry Pi 4 and all have the exact same error. I've tried different USB cables, tried using usb3 and usb2 ports-- nothing seems to make a difference. Exact same error every time.
To note the official Raspberry Pi documentation notes an awareness of this bug:
"Note There is a bug in the BCM2835 (CM1) bootloader which returns a slightly incorrect USB packet to the host. Most USB hosts seem to ignore this benign bug and work fine; we do, however, see some USB ports that don't work due to this bug. We don't quite understand why some ports fail, as it doesn't seem to be correlated with whether they are USB2 or USB3 (we have seen both types working), but it's likely to be specific to the host controller and driver. This bug has been fixed in BCM2837."
However, it doesn't provide any solutions of how to approach it. I don't exactly have any BCM2837's lying around I can just solder to my CM4; XD.
I've sort of run out of ideas to try with this. Is there perhaps a way to just burn an SD card with my target image and then transfer that to the eMMC somehow?
Alright last post. I've figured it out but it was a little bit roundabout.
When I first tried to do this on my mac, I got the error above and an OS level warning saying the device I tried to attach isnt mountable. Great. I tried a few more times before moving on to my PC- where I saw the exact same error. However, I didn't bother to check if the device had actually mounted. If you carefully watch Jeff's video- he gets the exact same console error and it mounts fine.
I had the device plugged into and RP4 so I went over to check just now-- and sure enough, despite the error the device mounted fine.
TL;DR- Ignore this error regarding write length if you see it. Check if the device is actually mounted or not.
no matter how many times I unplugged / replugged, unplugged all the other devices in my Mac (and PC and Debian) system, the rpiboot would never recognize the CM4's on-board SSD.
I was using hobby cable jumpers; I switched to the standard PC board jumper plug.
I was using not-so-great microUSB cables, I switched to a high-quality one - eureka - it mounted
So if anyone is unsuccessful after following the above instructions, make sure you have a tight jumper and good quality microUSB cable.
Hi, tried different cables but did not work. After start rpbood.exe the drive was mounted
Hi Jeff.
I added this query to your Youtube site so apologies for the overkill.
I'm stuck. I was able to flash the Raspberry Emmc on Pi Compute Module 4 but its not detecting a keyboard. I am aware that you must add a line to the config.txt file to power the USB hub. This is where I become stuck. On rpiboot I can see a config.txt file which I have edited and included the txt to enable power to the USB hub. However, I think that it might be the wrong config.txt file as it's not working. I think I need to access the config.txt file in the boot folder but I am unable to access or view same from within windows 10.
I've loaded other Raspberry OS systems and the keyboard lights up but an error is showing on the screen that it doesn't detect the keyboard.
Thanks in advance.
See my article USB 2.0 ports not working on the Compute Module 4? Check your overlays!. You will need to edit the config.txt file inside the boot volume when you mount the eMMC drive on your Windows 10 machine (or another computer following the instructions in this blog post for mounting the eMMC drive).
Hi Jeff,
I followed this blog carefully not to miss a step, however rpiboot cannot find my CM4/IO Board. The D1 LED lights up, there's a faint buzzing sound (high pitch, not sure whether its coming from the module or the IO board), but nothing else happens after that.
The company I bought the module and board from sold me a 5V power supply, for powering from the 12V jack. I have since been back and swapped it to a 12V power supply, but was told that 5V couldn't damage it as it simply wouldn't have enough energy to run.
What do you suggest I do in this case? I am thinking either the board or module is damaged, but I don't have any way of testing which one has the problem. Also, would plugging 5V into the 12V jack cause an issue? The company also referred me to the RPi forums once I said it wasn't working, and won't respond to my request to replace or have the module looked at. It's upsetting, because this is expensive gear so I can't just drop in and buy a replacement board and module to check each, but if I don't, they'll very soon run out of stock and I'll have to wait months to try again. I will try to boot from USB this morning, but beyond that I don't know what else I can try. Any help would be so very appreciated. Thanks
Are you sure you have the jumper placed in the right spot? And absolutely sure the Pi is an eMMC model, and you have a good USB A to micro-USB cable plugged into the USB Slave port on the IO Board?
I'd at least try swapping out your A-to-micro USB cable and see if that helps.
Yep, jumper is definitely correctly placed, and it is the 8GB eMMC 2GB RAM Wireless Board. Working from macOS same as you, but also tried my other raspberry pi, same issue. I've tried two different micro usb cables, but admittedly they've only been used for charging so I'm not sure how good they are for data transfer. I'll buy a new microUSB cable to try, but beyond that I don't have any variables left to try. I wonder if the eMMC chip is damaged/faulty?
I managed to boot the module from USB though.
Weird. I do have one eMMC CM4 (the original prototype I got for testing way back when) that doesn't boot off eMMC anymore—but it does at least work in usbboot mode for flashing or for reading/writing to it...
With the combined powers of our two boards, maybe we could come up with one working CM4 :)
If you use the IO board and a CM4 module with MMC storage how do you boot from an SD card containing the standard raspbian? Setting the jumper to disable eMMc seems to not enable the sd boot.
If you have an eMMC CM4, it can only ever boot off eMMC; the physical wires are unique to either the eMMC or Lite configuration microSD card. You can't use a microSD card on a Pi with eMMC.
Hi Jeff,
thanks for the great article! Any clue how to switch to NVMe boot on Ubuntu 20.04 64-bit?
Kind regards
Markus
Thanks, Jeff! You saved me from asking Red Shirt Jeff to borrow his angle grinder to fix my reTerminal. Looking forward to your videos and insights on that product.
Hey Jeff!
I successfully flashed my eMMC CM4 using this guide (Thanks!)
Booted it successfully from the eMMC but realized I needed to enable the USB overlay so I could use a keyboard and mouse with it.
Tried to get it to show up as USB storage device by installing the jumper so that I can change the config file but can't get that to work. Tried running rpiboot again with the jumper installed. I get:
Loading embedded: bootcode4.bin
Loading embedded: bootcode4.bin
Loading embedded: bootcode4.bin
Loading embedded: bootcode4.bin
Loading embedded: bootcode4.bin
... on and on until I close the window.
I'm using Windows 10 to run rpiboot and I'm powering the CM4 IO board with 12V over the barrel jack. This is the same setup that I used to flash initially. I check some voltages on the 40 pin header and I'm getting proper voltages on the 3.3 and 5V pins so the 12V seems to be getting converted just fine. Kinda lost ¯\_(ツ)_/¯ ... maybe I just need to do a sleep and it'll come to me.
Any tips would be greatly appreciated!
I have the same exact problem.
Remove jumper AND unplug micro USB before restart RPi.
Sorry meant to update this a few days ago. I was able to successfully run rpiboot on my Raspberry Pi 4 to get the CM4 to show up as mass storage. Prior to this, I tried with a different PC to and ran into problems. Maybe its an issue with the rpiboot build for Windows?
Hi, I also ran into the problem getting mad.
Can you explain what exactely you did to get it running?
I tried like everything and it doesnt work instead of
I have no jumper or something else installed - as far as I know at least...
Loading embedded: bootcode4.bin
Loading embedded: bootcode4.bin
Loading embedded: bootcode4.bin
Loading embedded: bootcode4.bin
Loading embedded: bootcode4.bin
... on and on until I close the window.
Had the same problem. Just connect your USB cable to another USB port in your PC.
Did you manage to fix it?
Hi Jeff
Thanks for the post. Thanks to this and your post about enabling usb, I managed to get my cm4 booting. I chose to install Manjaro KDE on my 8GB of emmc and have no room left for anything, so I thought I would try again with something lightweight instead. Now I run into problems when I try to build rpiboot: after the make command, I get the following error:
cc -Wall -Wextra -g -o bin2c bin2c.c
bin2c.c:1:10: fatal error: stdio.h: No such file or directory
1 | #include
| ^~~~~~~~~
compilation terminated.
make: *** [Makefile:11: bin2c] Error 1
Jumping to the sudo ./rpiboot command gets me a command not found. I have deleted usbboot and downloaded it again, but I get the same problem. Any ideas, anyone?
In case it could help someone: I had an issue compiling rpiboot on Apple Silicon (for obvious reason) after trying several solution I simply created a copy of the Terminal app (called it Terminalx86) and set it to be started with Rosetta (right click -> get info -> check "Open using Rosetta") and it worked perfectly fine then.
Hello! Love these videos! I've got the CM4 8GB with emmc. I got the rpiboot app installed it sees the pi, then spits out an error:
Waiting for BCM2835/6/7/2711...
Loading embedded: bootcode4.bin
Sending bootcode.bin
Failed control transfer (-9,24)
Failed to write correct length, returned -9
Anyone else seen this happen? I've tried several USB A - micro cables and get the same result. I'm also running on a 12v 3A power supply that seems pretty good.
Thanks!
I wasn't able to work through the "Failed to write correct length, returned -9" error I was having on Windows so I gave this a shot on my M1 Mac Mini on MacOS 12.1. When running the "make" command I get a fatal error 'libusb.h' file not found. I'm not very experienced with MacOS (which is why I got the mini). Is this maybe just a path issue?
I tried the trick of creating a Rosetta emulated terminal but ran into the same issue with the missing libusb.h file. I would love to put this CM4 to use if anyone has the time to help.
Thank you so much!
I found it! I was missing pkg-config. If you hit this issue run: brew install pkg-config
Update: I think I've got a bad CM4. I got rpiboot working on my mac but now I'm getting "failed to write correct length, returned -1". Anyone know of a way to just bypass the eMMC altogether so I can just use a micro SD card?
Thanks,
On a CM4 with eMMC, the data lines are routed in a way that only eMMC will work, you can't use a microSD card with those models.
Thanks for this. Been using Pi since the 1st one but using my first Compute Module (4). Flashed Pi OS on an SD card and NOTHING. Then I figured out I have eMMC on my CM4. Flashing it as we speak. Your YouTube channel is awesome as well.
Hey Jeff,
I was wondering if there was anyway to bypass the emmc on the device and boot directly from sd card. My idea is to have the emmc loaded with my emulating system, but when it is on the compute module, I would like to load the OS from the sd card on the I/O board.
Thanks!
No simple way, I believe certain data lines are routed directly to the eMMC on those versions, and you would have to manually wire them up to an SD card. No easy task!
Wanted to add I received this error after using brew to install libusb:
main.c:1:10: fatal error: 'libusb.h' file not found
I was not able to correct it until I also installed brews pkgconfig. So to get the make to work for the rpiboot I had to run the following:
brew install pkgconfig
brew install libusb
To correct the earlier issues I removed libusb (brew remove libusb) before the above two commands and I still had to force the relink with:
brew link --overwrite libusb
since the first attempt failed.
Thanks! I've updated the install instructions to include
pkgconfigas well.Hey Jeff,
I had initially flashed my CM4 using this method with a build for a router carrier board. I am switching to a new board and am trying to mount eMMC on the new board and have set rPiBoot on and in windows CMD when I run rpiboot I just get endless "Loading embedded: bootcode4.bin". I have tried taking it back to the original carrier board and doing it there but with the same results. I'm guessing this has something to do with me already having flashed this unit. Thoughts?
Jeff, I have booting CM4 with Bullseye OS on 32 GB ECC but I want to start over and format the ECC again. When I run ./rpiboot from a Mac (as I did successfully to install the OS the first time) I am seeing endlessly over and over:
Is there some trick to erasing the CM4 ECC that RPi org is not telling us or is this a good old-fashioned bug in usbboot-master on the Mac?
There's a good chance it's the USB cable you're using—that seems to be the culprit very often in the case where you get a control transfer error. Do you have another cable you could try?
For the life of me I cannot get usb to work on the CM4 and the BTT Ras Pad 5. Any tips ? I have adde the overlay line in the config.txt to no avail.
[email protected]
Legend thank you as always Jeff
What is the time required to do this? 5 minutes? 20 minutes?
For a factory production environment (assuming we can get CM4 boards) is this the fastest method to flash the eMMC?
Could Ethernet be used instead of USB?
I have no idea how many times I've landed at this page by now, but this walkthrough is so nicely done and concise that it always takes the sting out of the fact that I've inevitably screwed something up on my cm4 and decided to start from scratch again.
Thanks so much for that, and keep up the great work Jeff! Always glad when a new vid of yours pops up in my feed!
Heh, I often pop back to it as well, since the official docs can be a little harder to parse through if you just want a step-by-step!
This guide has been great for so many builds that I have done using various machines to do them. However working on an M1 pro Macbook pro running Monterey 12.5 and I just can't get rpiboot to recognize the unit at all. The make built without errors. Things I have tried:
1: Using different USB cables.
2: Cloning Terminal and setting it to run with rosetta
3: Using different USB ports.
Curious if maybe running a usb-c dock that gives me a usb-A port might change anything?
This has been the case with multiple M1 machines.
Thanks for the post Jeff, most helpful!
I have a CM4 with eMMC. On a Windows 11 machine, using RaspberryPI Imager 1.7.5.
The imager fails to write the compressed image (.xs) to the mounted storage. Once the error message appears, the mounted drive keep popping up in my windows explorer, almost like it mounts and unmounts repeatedly.
Any suggestions?
Thanks a mil.
Morne
I had issues like a few others where I would simply get the constant "Loading... message" on my Win10 machine. To remedy, I did the following:
a. I reinstalled rpiboot_setup.exe
- The driver's loading shell window seems to stall... but it will eventually close after flickering a few times
- Only when the shell window closes will the app dialog will enable the "next" button to complete the installation
b. On my computer RPIBoot would not load the MSD driver using a USB 3.0 Port. In order to get RPIBoot to load the MSD, etc I had to use a USB 2.0 port.
c. Once RPIBoot was loaded and the virtual drive was available, I use then used the SDFormatter.exe app to format the virtual CM4 drive.
d. Once the format was complete, I downloaded the appropriate RPI OS image. The file has an extension ".xz". Double clicking on the image spawns the RPi installation Imager App (mine was version v1.7.4) and allows you to install the OS onto the CM4's eMMC
e. The process takes a while to write, then to verify... and then all is good to go!
Best of Luck!
Once I load an OS image to the EMMC storage is this permanent like with the SD cards where you basically cant reload another image because the computer wont read the card formatted for Raspberry Pi?
Hello Jeff, thanks for the tutorial. But it is not working for me. I tried to flash a Raspberry Pi 4 with an MO Board. I connected the 12V adapter, a micro USB cable to the port. The red light is on. I connected the jumper. When start the boot.exe nothing happens. I waited some time, but still nothing happens. There is written, that the boot.exe is waiting.
I am using Windows 11 and installed no library. Have you got any clue, what I can do?
Thanks!
James
I tried this on the latest release of mint xfce (21.2) and it fails b/c you apparently need to install libc6-dev
I did this by running:
$ sudo apt-get install libc6.dev
then :
$ make
The rest of the process works if you insert that step.