I edit videos non-stop nowadays. In a former life, I had a 2 TB backup volume and that stored my entire digital life—all my photos, family video clips, and every bit of code and text I'd ever written.
Video is a different beast, entirely.
Every minute of 4K ProRes LT footage (which is a very lightweight format, compared to RAW) is 3 GB of space. A typical video I produce has between 30-60 minutes of raw footage (which brings the total project size up to around 100-200 GB).
To edit footage well, the data not only needs to move fast (1 Gbps barely cuts it for a single stream), it also needs to have very low latency, otherwise Final Cut Pro (my editor of choice) lags quite a bit while scrubbing over dozens of video clips.
Therefore, I always used to edit videos off my local SSD drive. And sometimes over the network using macOS's built-in file sharing. But as my video workflow matures, I find myself needing a central storage solution disconnected from my main workstation.
Thus, the all-SSD high-performance edit NAS—on a budget.
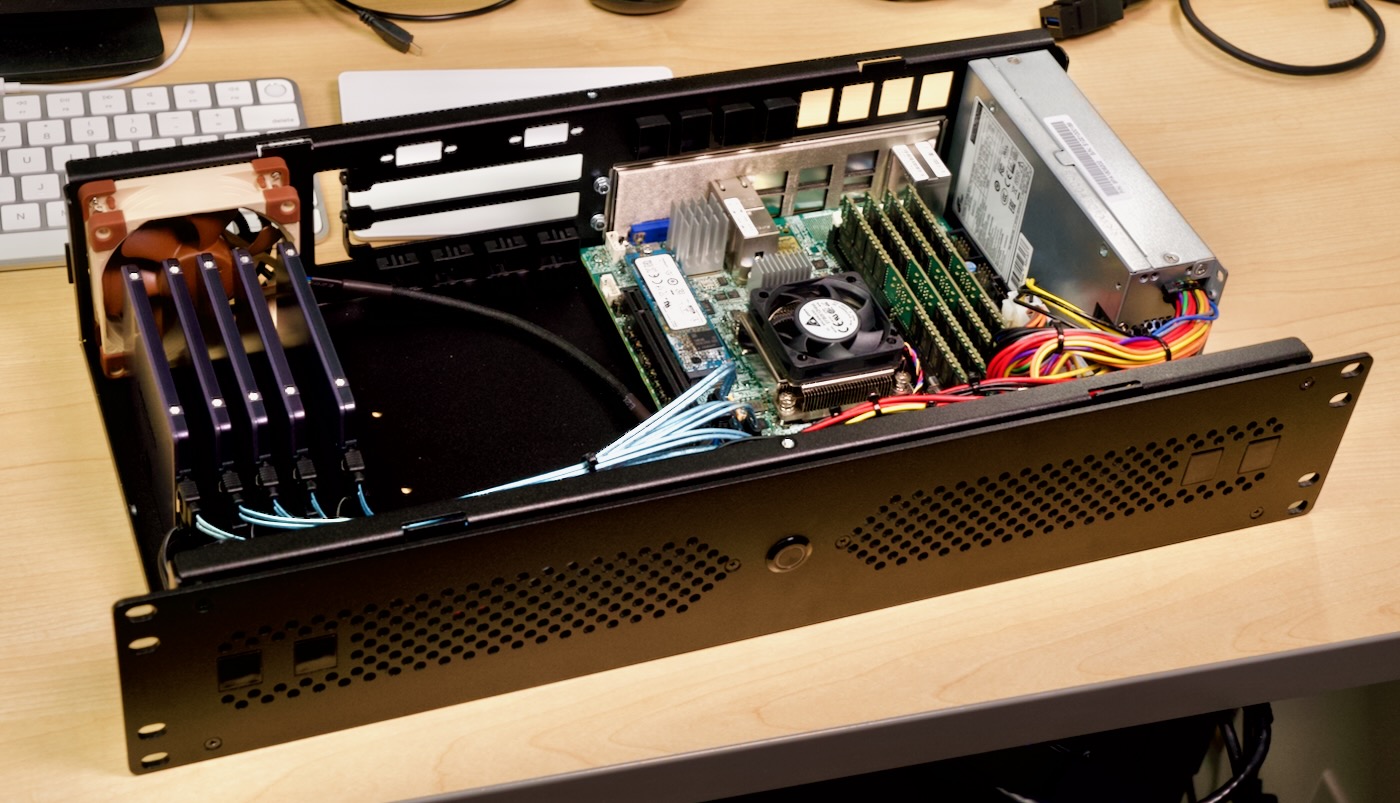
I had five 8TB Samsung QVO SSDs from my insane $5000 Raspberry Pi server build. Until now, I had them inside my 2.5 Gbps NAS. But I wanted to build my own NAS capable of saturating a 10 Gbps connection, and allowing extremely low latency data access over the network to my two Macs, both of which are connected to my wired 10 Gbps home network.
Used Server Parts
Summary
This server build can be done with just as much capability (but a lower storage amount) on a more stringent budget, or can go 'all out' maxing out the RAM and SSD storage space. I'll show a price comparison of both (noting that my needs—tons of RAM and tons of SSD space—may not match your own, if the main goal is 'very fast SSD NAS'):
| Part | Price (low) | Price (high - as built) |
|---|---|---|
| Supermicro X10SDV-4C-TLN2F motherboard / Xeon D / Dual 10 GbE (eBay) | $260 | $260 |
| DDR4-2133 ECC RAM (Didion Orf e-waste recycling) | $55 (32GB) | $220 (128GB) |
| Boot SSD | $50 (256GB USB Drive) | $125 (512GB XG6) |
| 2U Rackmount Case | $200 | $200 |
| 2x Noctua 80mm case fans | $34 | $34 |
| Storage SSDs | $180 (MX500 1TB x2) | $3490 (QVO 8TB x5) |
| Total | $779 | $4,329 |
When looking at the price discrepancy, you have to realize (a) I already had the 8TB SSDs, from some projects I tested last year... most people don't have those things laying around, and (b) I will actually use that much low-latency storage... most people probably don't and would be better off with less SSD storage and more spinning disks (which are much cheaper per TB).
Details
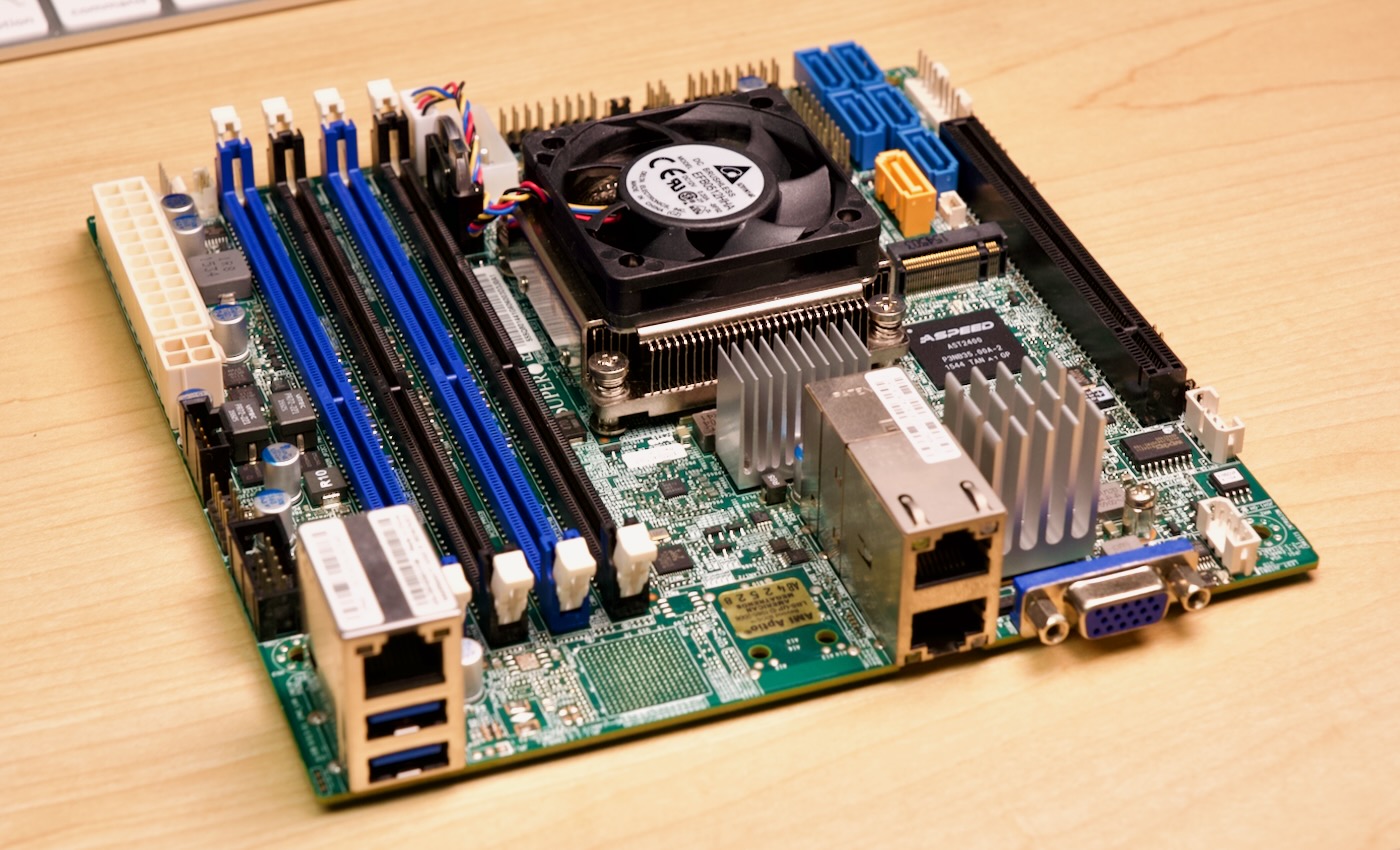
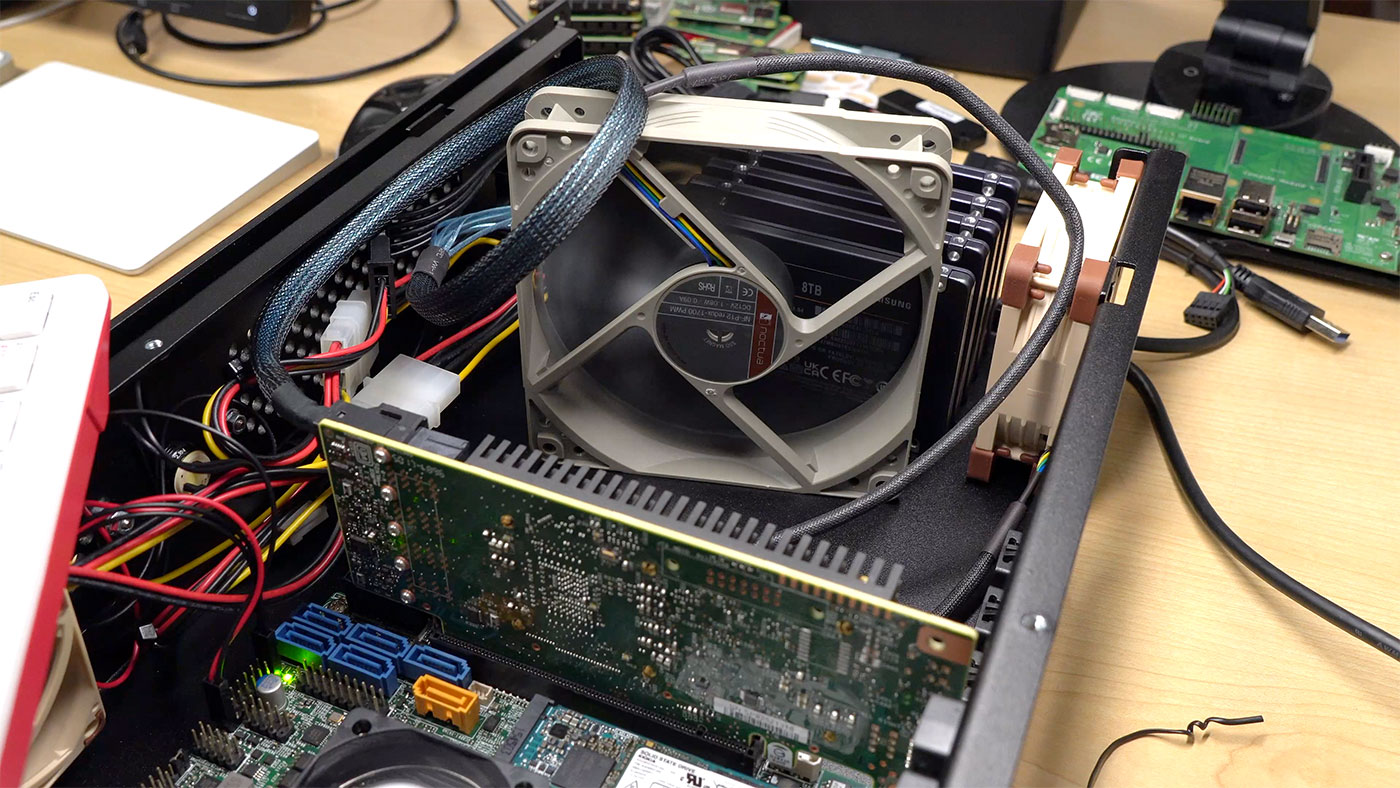
The motivation for this build came from finding this Supermicro X10SDV-4C-TLN2F Mini ITX motherboard. The price ($270 shipped) was low enough I could consider building with it, and it already included an older-but-not-too-power-hungry Xeon D SoC, two 10 Gbps Ethernet ports, and 5 SATA-III connectors, the basic components I needed for the build.
ServeTheHome gave this motherboard a good review when it came out, and as long as things were in working order, it should still be a good choice, though less efficient and performant than a more expensive 2020s-era board.
I needed to find a Mini ITX rackmount enclosure, and luckily I'd been in talks with MyElectronics after using their prototype 'blue' enclosure for a remote Pi cluster installation I was testing. They are working on a new 2U mini ITX short-depth enclosure, and they sent me an early revision to use in this build:
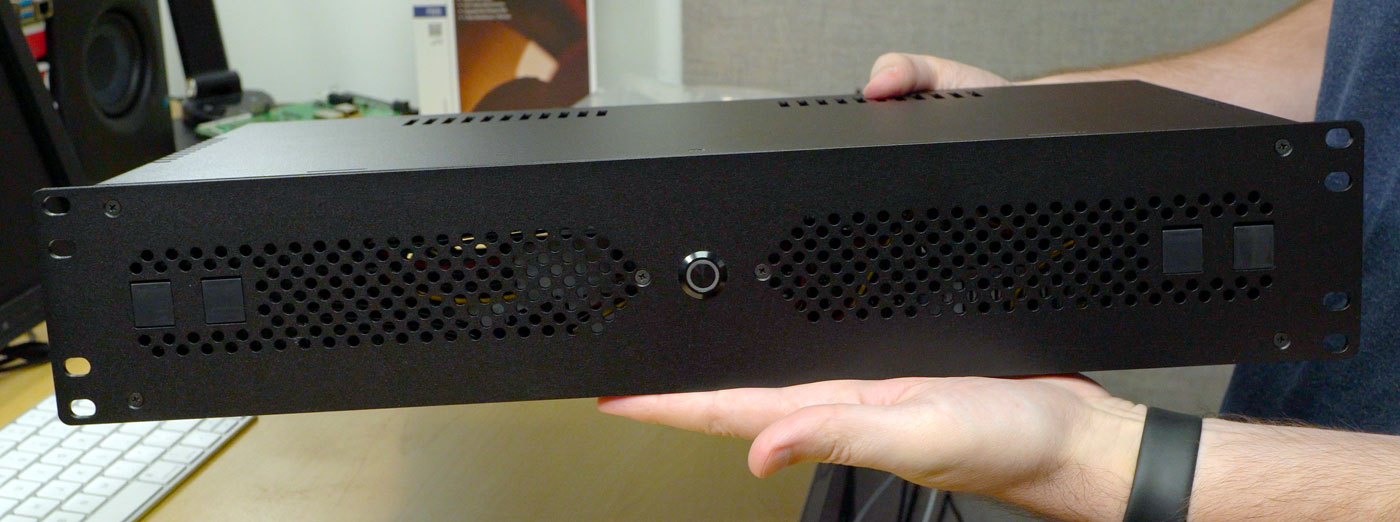
They said the enclosure should be available 'soon' for around $200, but they're still working out a few details with port placement, the power supply configuration, and PCIe slot layout.
I already had the SSDs on hand, and to be honest, you could use much less expensive SSDs if you don't need many TB of flash storage—heck, right now I'm only using a few percent of it! But those cost around $3500 new.
To round out the build, I bought a couple Noctua fans, and 128 GB of recycled ECC RAM from an e-waste recycler only a dozen miles from where I live. They sold me four sticks of 32GB ECC DDR4-2133 RAM (HP branded) for $220.
Yes there's a sponsor (for the SSD)
To help fund this build, I got Micro Center to sponsor the build video, and they contributed a Kioxia XG6, which is sold under Supermicro's name:
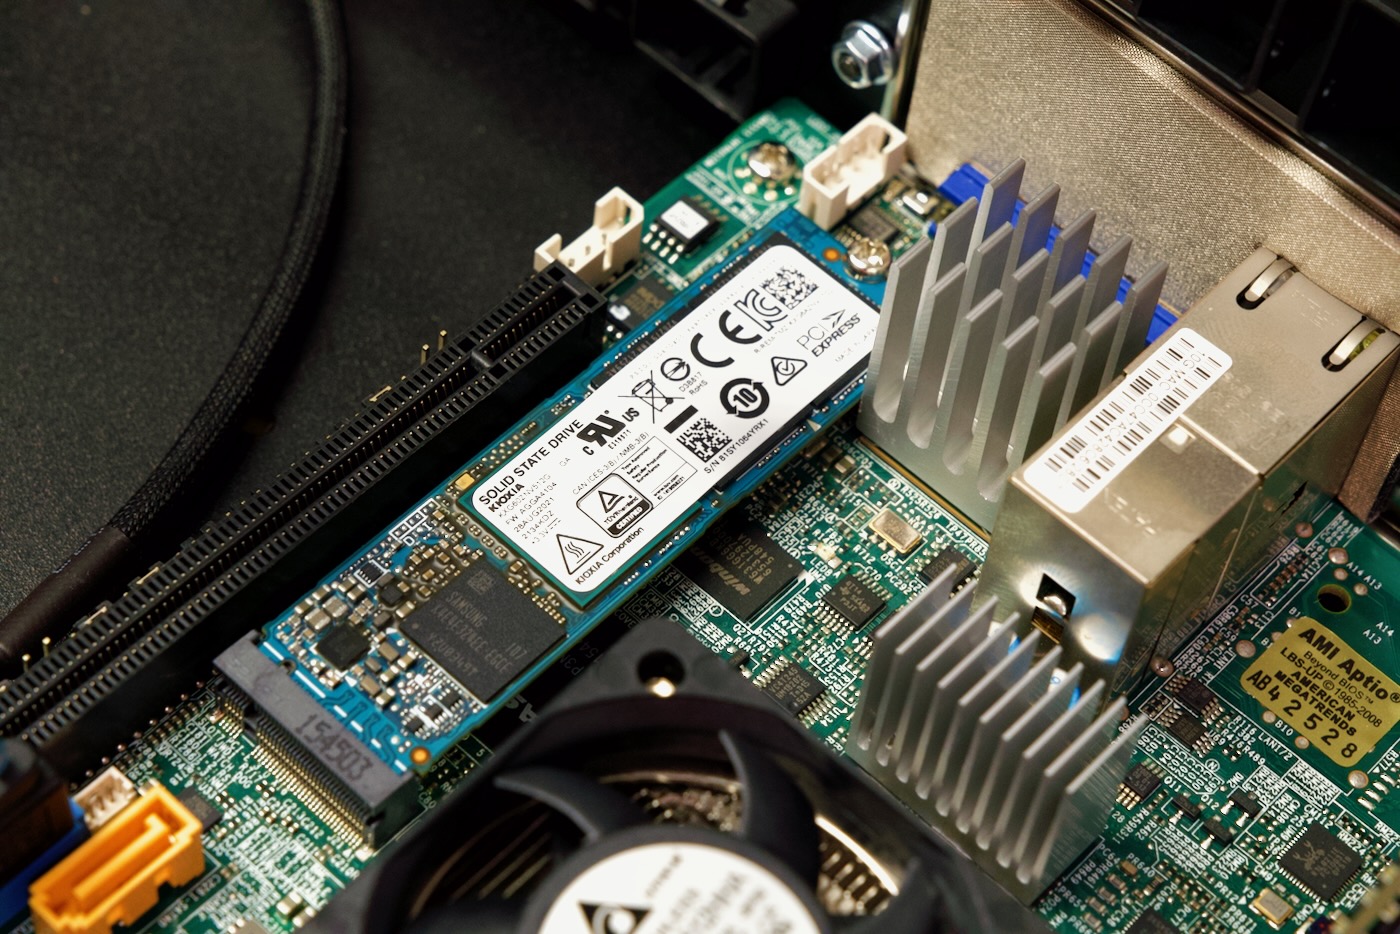
They sell the 512GB model I used for about $125—in store! I didn't realize they have some Supermicro (and sometimes Dell/EMC) server gear in stock at their stores in the US. I just wish they had more locations (both here and internationally!).
BIOS and UEFI
I put all the hardware together, and installed TrueNAS from a USB stick to the NVMe drive. If you're wondering why I chose TrueNAS core, check out the full video where I speak to Wendell from Level1Techs about performance considerations and the storage layout for this NAS.
But I had a problem: I couldn't get the Supermicro motherboard to boot off UEFI. I was getting errors about "CPU with APIC ID 0 is not enabled", and I spent an hour messing around in the BIOS before (temporarily) giving up and throwing in a SATA boot SSD.
This motherboard is from around 2015, an era when NVMe boot on servers wasn't commonplace. Couple that with the M.2 slot accepting either SATA or NVMe drives, and most people preferring to boot off a SuperDOM instead, and I knew I was kind of on my own debugging it.
With the SATA SSD installed, I was able to get consistent performance using a striped RAIDZ mirror pool with four SSDs and a hot spare—but that performance stayed around 320 MB/sec writes over long periods of time! That's only a third of the available bandwidth, and only a little better than the 200-250 MB/sec I was getting on my 2.5 Gigabit NAS.
After some more consulting with Wendell and talking to Patrick from ServeTheHome, I was able to figure out both the boot issue (just had to mess with the UEFI boot settings a bit more), and the performance issue (it... ended up going away after I replugged everything).
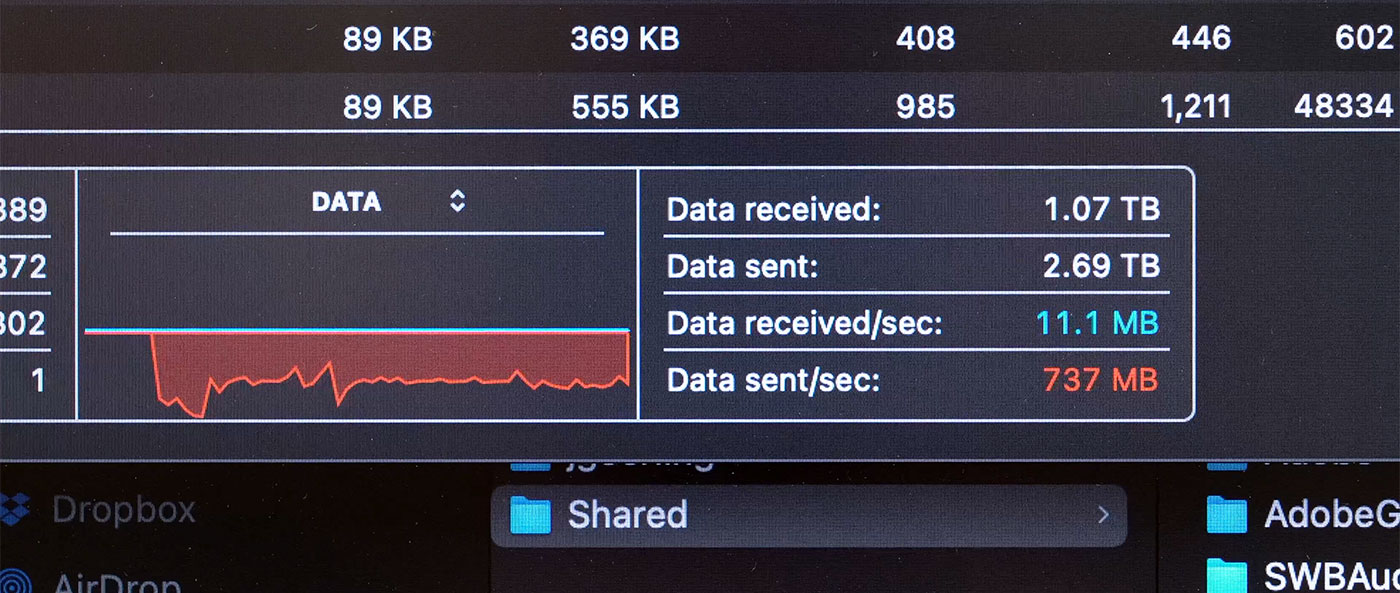
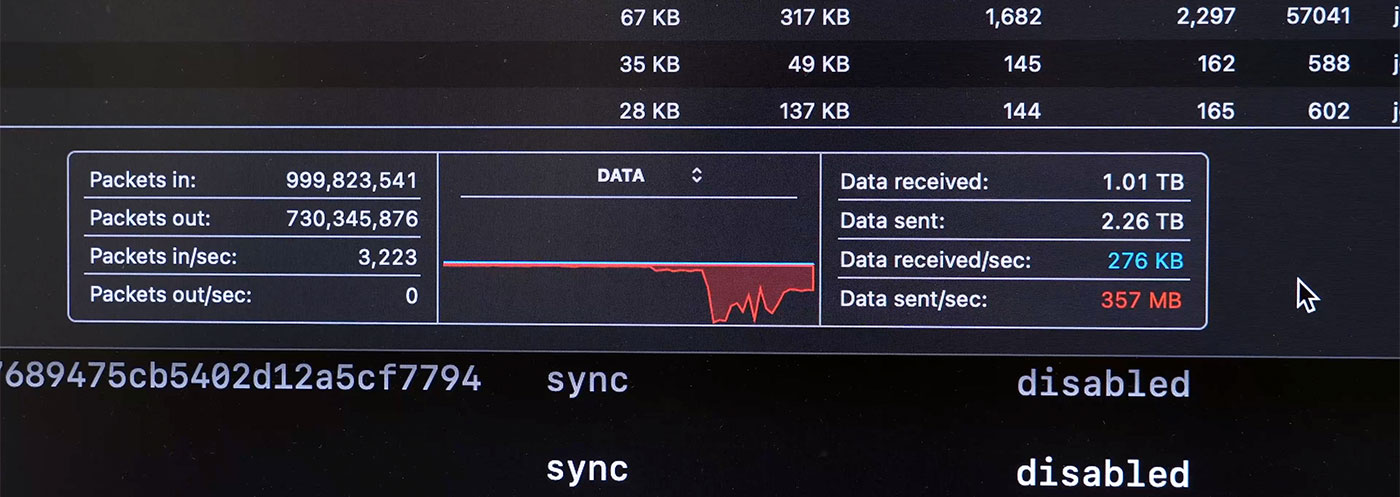
With the built-in SATA ports, I got around 700 MB/sec write speed over the network, and 1.1 GB/sec reads. Latency was great, and editing Final Cut Pro projects felt the same as if editing local.
Just to see what was possible, I also tossed in a MegaRAID 9405W-16i HBA, and re-tested, and could get 1.1 GB/sec both ways... but I went back to the onboard SATA when I measured 7-15W more power consumption using the HBA. A few hundred MB/sec isn't worth the extra power consumption—especially considering I'd need to figure out how to properly cool the HBA:
First time using ZFS in production
A few of the things I modified in my TrueNAS storage pool configuration, based on Wendell's recommendations:
- Sync: Disabled: I disabled ZFS's sync option, meaning ZFS would report back to the OS a file was written even before it's fully written to disk. This is risky, but since I'm always copying footage I have a golden copy of already, and since I'm running the NAS on a UPS, the risk is minimized. With the 'Standard' setting, ZFS would limp along for a period, then go fast (700+ MB/sec), then limp along again. Speed was very inconsistent.
- 1M Record Size: Since I'm mostly pushing video files (with tens of MB/sec) through the server, having a smaller block size would just result in more IO operations. If I were running a database on here, I would consider a smaller size, but this is optimized for video.
- Periodic maintenance: I set up nightly snapshots, weekly scrubs, and weekly S.M.A.R.T. scans, and made sure the server could email me a notification if anything went awry. One of the best benefits of an out-of-the-box solution like TrueNAS is the ease of setting these long-term automation tasks up.
The nightly snapshots (and indeed, ZFS/RAID itself) is NOT at all a substitution for a rigorous backup plan. For now I'll be rsyncing the volume to my main NAS nightly, and that's backed up offsite to Amazon Glacier weekly. Eventually I might use ZFS's sync functionality to synchronize snapshots to my backup server. We'll see.
For now, I'm happy having a server that can consistently write 700+ MB/sec, and read 1.1 GB/sec, with extremely low latency, over my 10 gigabit network.
Watch the full video to learn more about the thought process and some of the struggles I had.
Comments
Always informational and entertaining. FYI. There are several backup tools that simplify and automate zfs send based backups. I've been using Znapzend (https://github.com/oetiker/znapzend) for a while.
Everyone on reddit said you are a wanker because sponsored content and "budget" build are diametrally opposite things. Go look.
This is hilarious... everyone on Reddit *is* a wanker. You might try thinking for yourself once in a while.
Average room temperature IQ Reddit comment.
Use hdds and you can build this for a grand. This server cost over 5 grand and you called it a budget box. My car ain't worth 5 grand but this is somehow budget. Come on back to reality man.
HDDs don't provide the low latency access times that I need for scrubbing through video projects with a few thousand (often large file-size) assets, though. There are ways you can mitigate that if editing off hard drives, but it involves rendering proxy footage or using other compromises that slow down or hinder modern editing workflows (which I'd rather not do).
Been doin this kinda thing with hdds since the 90s. This just tells me you don't know much about video editing. Hdds get the job done just fine despite what you read or what your sponsor told you to say. I can build the same machine for $500, but you spent 5k AND called it a budget box. Dude reconsider.
It literally says in the title
Budget 'All-SSD '
Can you build a cheaper all ssd NAS?
Bigmell, sorry, but you have no idea what you are talking about, probably because you're old. HDDs in fact, cannot keep up with modern video scrubbing and editing remote files.
JohnG - Sorry but age has nothing to do with this, don't be a bigot, stick to technical details (Bigmell too).
Please don't start throwing around bigot accusations over this kind of stuff. He's literally using the old thing to prove the point that age DOESN'T matter, just because you worked with HDDs in the 90s, technology changes and has no real bearing on the reality of performance requirements today.
I've been a victim of racism, I lean left politically, but focusing on micro-aggressions or how it makes you feel or wtv is just minimizing the seriousness of actual bigotry that deeply affects people. It doesn't make sense to do that when the problems are still serious today. It fuels the other side, gives them plenty of material to work with when you conflate someone talking about age to make a point to bigotry. If 19 out of 20 bigotry claims are these kind of things, do you really think bigots see the error of their ways?
Maybe consider retiring old man?
Glad to see you aren't hogging all the pi's 😉
I'm interested if you use a full over-the-web email solution, or something internal using SMTP? It's for a local setup after all.
I’ve gone by Didion Orf’s place in St. Peter’s several times but Never paid attention so didn’t realize they handles e-waste and resell components from their recycling. Good to know.
Hi Jeff, anyway to mix SSD and HDD, so we work off SSD and HDD only spins up during maintenance window or older files were needed?
Jeff, thanks for the article and video. I have taken the plunge to replace an old hp server using the above motherboard and have a question re. the nvme issues you had, can you elaborate on what you did to resolve them? Where the issues hardware or software (freenas) related? I plan on installing proxmox so linux based is, so if it’s a freebsd issue hopefully I’ll be good to go… living on a hope and a prayer.
I think it was a combination of issues—the first install I might've chosen the 'BIOS' install method in the TrueNAS installer (can't remember at this point), but in the BIOS settings, I had to create a boot option for NVMe, and it wasn't very clear how to do that (and Supermicro's documentation seems to not have much mention of NVMe boot on this old a motherboard).
I had to fudge around with the UEFI settings in the BIOS boot menu, and add an option again after I reinstalled TrueNAS using the UEFI setting in the installer. To do that I had to pull the NVMe drive, put it in a USB adapter, plug it into my Mac, erase it with Disk Utility (so it wouldn't try booting off the broken half-UEFI/half-BIOS install), and then install TrueNAS from scratch again.
For write performance just avoid RAID5/6 or RAIDZ/Z2
RAID10 is write friendly. This is probably the reason the HBA was performing better.
An 3rd part HBA has an extremely high power consumption....the HBA properly use more power than than the whole server!
You should go a long way to prevent that. The build-in Intel SATA controller is very efficient power-wise......cheaper, product less heat, doesn't take up a PCIe slot, add an additional point-of-failure.
A really bad idea to use.
What are you using to test read/write speeds and visualize it? Thanks!
In this case it was mostly Apple's built-in Activity Monitor. But I typically use
iozoneand/orfio.Hallo Jeff,
I found today this article published by you and I don't understand anything anymore.
A couple of years ago you criticized the problems with True Nas!
I followed your projects and Dave Stephens with Ansible-NAs !
What to think now!?
What is your opinion about Ansible-Nas and True Nas now !?
Best Regards,
Peter
Hello
Very top and nice job. Many thanks
I have 2 questions :
1) This processor don't support Intel® Quick Sync Video. Do you confirm because I would like use Plex
2) I'm french and the shipment and VAT are very expensive (more than 100€) Any other solution to send to French country ?
Have a good day
Fred .
Hi Jeff.
Thanks for this very informative article. I’m thinking of mirroring this exact build (the budget version) how are things running a year later? And do you have any alternate recs for the case ( I’m in the US) and the the motherboard - hard to find.
Thanks.
What's your overall power consumption on this unit?
Has any one got any experience/opinions on using the following drives in a SSD NAS: Transcend 2.5“ 4TB SSD230S 3D NAND SATA III 6Gb/s SSD - TS4TSSD230S
when $4k+ is a budget NAS for home usage... eh, it seems I missed something in my life