June 6, 2018 Update: I've also posted a video of the SSD replacement process, embedded below:
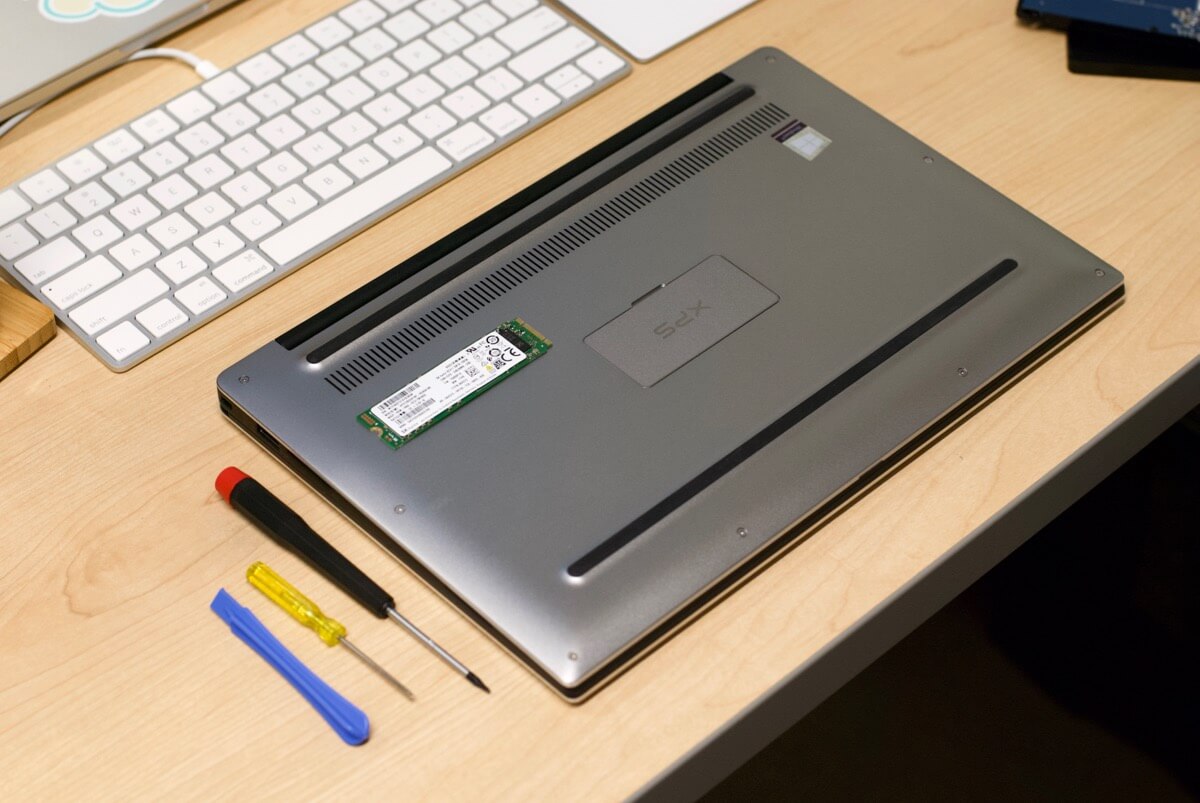
I recently purchased a used Dell XPS 13 (model 9360), and I chose to purchase the base option (with 128 GB SSD) since it was cheaper to do that and upgrade the SSD to a larger model (500 GB) aftermarket than to buy a higher model XPS (I bought this model: WD Blue 3D NAND 500GB PC SSD).
I've upgraded drives in many Macs and on Linux PCs over the years, and the process is pretty painless, with a plethora of freely available options for disk cloning (e.g. Disk Utility on macOS, dd on Linux or macOS, etc.). But on Windows, it seems there's nothing built-in for cloning or imaging a disk—instead you have to download and/or purchase a utility to help with this process. Annoying, but in the end it worked out, so I won't get too angry about it.
Tools used: Spudger, #000 phillips screwdriver, T5 Torx screwdriver.
I tried both Macrium Reflect Free and EaseUS Todo Backup, and found Macrium Reflect to be a little easier to work with. There are countless tutorials on the Internet for how to do a disk clone, but I wanted to point out the process I used since there were a few gotchas:
- I tried cloning the internal drive to my new M.2 SSD mounted inside an SATA-to-NVMe/M.2 adapter, which was then plugged into a USB 3.1-to-SATA adapter... apparently that was one adapter too many, because the clone seemed to fail at random places.
- I then cloned the internal drive to a second external USB 3.0 hard drive I had sitting around (this drive was larger than the internal SSD so it had enough space to clone all the partitions).
- I created a 'Restore Media' USB boot drive using Macrium Reflect, so I could boot the XPS 13 off of it once I replaced the SSD.
- I opened the XPS 13, replaced the NVMe SSD with the new one, and closed it back up.
- I plugged in the Restore Media I created in step 3, as well as the USB 3.0 external drive that had the internal drive clone (from step 2).
- I booted the XPS 13 and pressed the 'F12' key when the Dell logo appeared, to access the boot menu.
- I chose to boot from the Restore Media (a SanDisk USB flash drive).
- This booted into Macrium Reflect, where I cloned the USB 3.0 external drive to the new internal drive.
- I booted the Dell and let it do it's hardware checks (it seems to have detected that there was a hardware change, so it did some system integrity checks then made a really loud BEEP!).
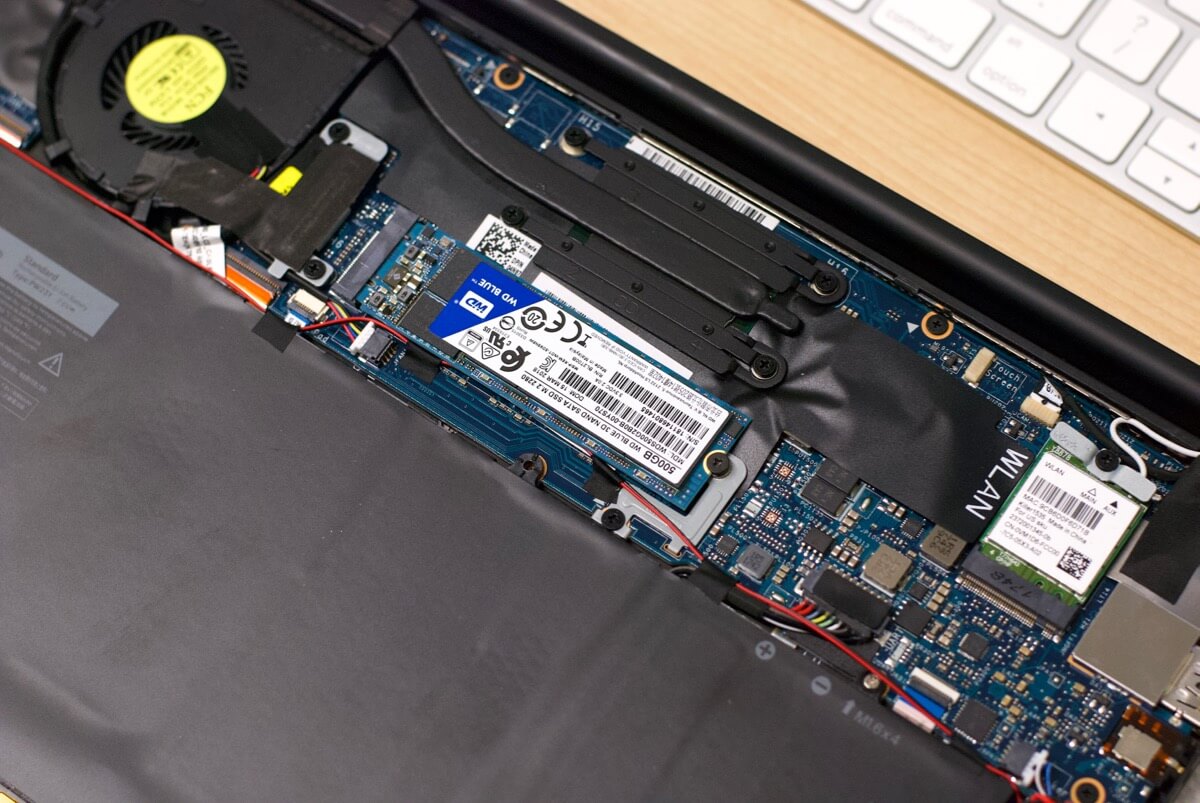
As an illustration of step 4, here's how easy it is to access the SSD once the back cover is removed:
At the end of this process, Windows 10 booted back up just like it was before—including showing me a 128 GB system boot drive!
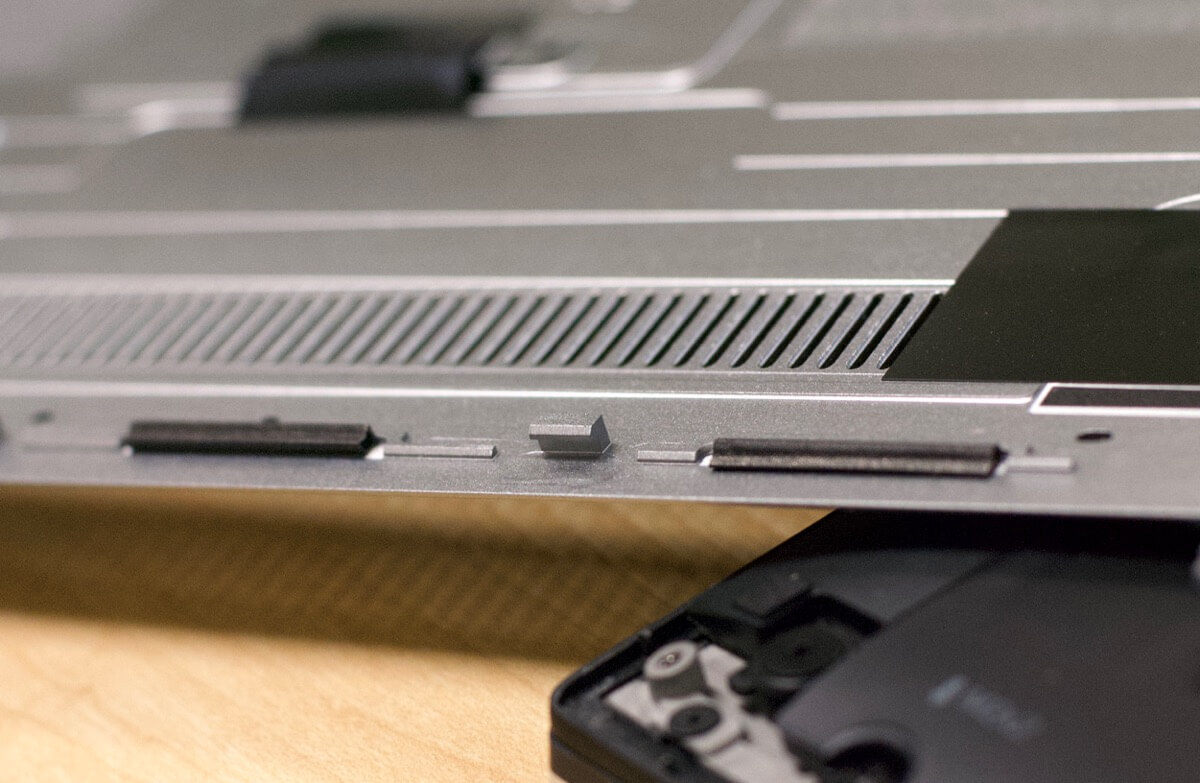
Important Note: When opening the bottom cover of the XPS 13, there are two very important things you should do to make sure you don't break anything:
- Remove the phillips screw under the magnetic 'XPS' cover (just lift that cover to reveal the screw). If you don't... SNAP, it will break!
- Use the spudger or a guitar pick to gently pry apart the case from the front edge of the XPS, then pull up on the front edge. Don't try to pry the cover from the back (where the larger gap is or near the ports), because there are thicker retaining clips back there (see illustration below), and one of them is likely to break if you pry too hard!
The key is: If you're bending the cover to get it to pop off... you're probably prying up in the wrong place. I wish Dell weren't so aggressive with the retaining clips, but since they are, make sure you pry up the cover gently using a plastic spudger or guitar pick, and do it from the front of the laptop, not the back!
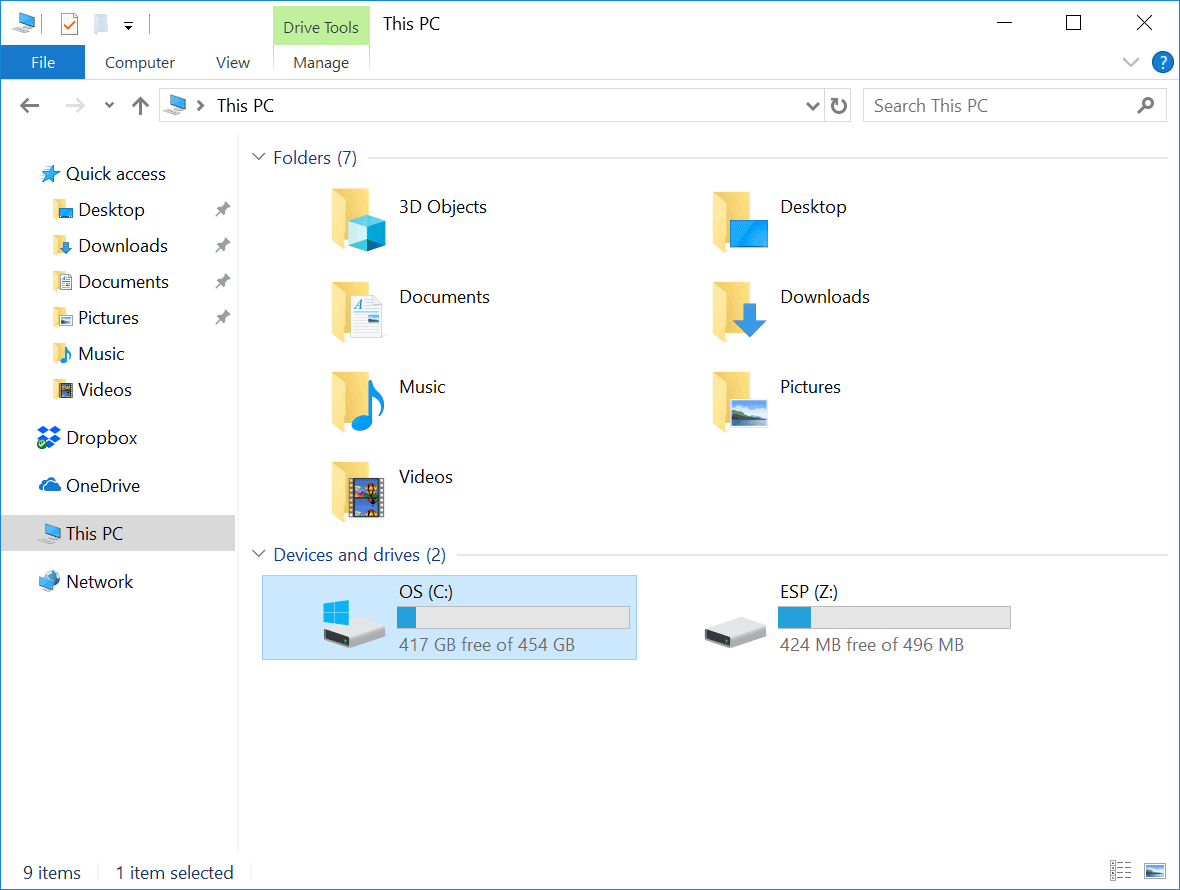
So the next step was to get all the 'Unallocated space' on the end of the new 500 GB SSD to be part of the C: OS boot partition. I pressed Windows Key + X to get to Disk Management... then I realized you can't merge partitions unless they are contiguous, and Windows 10's built-in Disk Management utility can't move partitions at all!
Oh well, off to download yet another freeware utility to do a basic system operation... this time I chose EaseUS Partition Master Free, which seemed to be the recommended way based on a bunch of random forum topics.
I opened up the partition Master, then dragged the partitions to the right of the C: partition all the way to the right of the 'Unallocated space', so the free space was to the right of the C: partition. Then I right clicked on the C: partition and chose 'Move/Merge', and merged it with the 'Unallocated space'.
Finally, I hit 'Apply', which required a reboot, and waited for EaseUS to do it's work moving around the partitions and making the larger C: partition a reality. After the reboot, the hard rive reports "417 GB free of 454 GB", so it looks like everything worked out in the end!
Comments
Thank you for writing this extensive guide!
I've also purchased a XPS 13 9360, I5-7200U with a 128GB SSD, as soon as I receive the laptop I also want to upgrade to 512GB however I'm abit confused.
You indicate that you installed a WD Blue 3D NAND 500GB PC SSD, but based on the specifications this is a SATA and not an NVME disk? Perhaps I'm mixing up the terminology, my apologies.
With this SSD do you notice an performance increase/decrease?
Speed seems about the same; and I bought an M.2 drive to replace the existing M.2 drive in the XPS 13. It seems like the XPS 13 would accept an NVMe drive, but it came with an M.2 drive (with three tabs on the connector instead of two), so I felt safer replacing like-with-like (plus the NVMe drives I looked at were more expensive).
Supposedly it's an M.2 PCIe drive, vs. an M.2 SATA drive... it all seems convoluted to me, but it worked in the end, and that's all that matters to me :)
A couple of questions:
1. How are you finding the overall experience of the 9360? I'm thinking of getting a Dell XPS 13 soon.
2. Are you running/planning to run Linux as well as Windows on it?
@Tim - I have a pretty substantial review of the XPS 13 in draft mode right now... waiting on some time to finish it up though. I'm not using it as my daily workstation, but still have been trying it out for longer periods of time to see what I like/hate about it. More to come.
Haven't decided on dual-booting Linux yet. For now, VirtualBox satisfies that need, but I do want to have a native Linux distro (probably either Fedora or Ubuntu) running on it for testing purposes. But that means more partitioning and UEFI stuff, and I hate how complicated that can be (and how easy it is to accidentally lose your Windows license for an Authentic Windows Experience™!).
Just wanted to thank you Jeff, upgraded my XPS just as you described here. Really useful.
Hi Jeff, I'm really struggling with EaseUS, I followed your steps but am now stuck with my computer still saying I have 256 GB instead of 500GB can you show me how you moved the partitions?
Thank you for guide. Changed just bigger disk to my XPS 15 9570. I was new disk in MBR type and must convert it to GPT type just before cloning in "Restore Media". That was easy job with diskpart utility that you can use from "Restore Media" / Command Line tool. Commands something like this. Notice that this removes all partitions before conversion.
diskpartlist disk
select disk x
clean
convert gpt
exit
I want to echo Ian Hurrell's comment from 4 months ago.
Thank you indeed, upgraded my XPS SSD from 128GB to 256GB. Very helpful guide, special thanks for including the part about merging partitions to make the new additional space accessible. With my version of EaseUS, I could drag the partitions as you describe to position the "Unallocated Space" next to the boot partition (C:). Before I could merge, I had to make the "Unallocated Space" a named partition ("create partition") That created new drive letter E:. Then I could select both C: and E: for merge, with C: as the destination (EaseUS forces destination to be C: - very nice). Again, thanks for a great job.
This was very helpful. It convinced me that I shouldn't do it!
Thanks a lot for taking the time to write this guide, I would never have guessed the partitionmustbenexttoit part... Worked fine !
Hi! Thank you for writing this guide, it was very helpful!
I did encounter a problem when it came to merging partitions. Once I had the new SSD installed, and had the software, when I hit merge and apply, my laptop could not restart properly. It said that I would need to use recovery tools and installation media, but I had copied windows 10 onto a USB and had it plugged it at the time. I switched back to my old SSD but still need to use my new one at some point. If you have any advice, please let me know!
Jeff, thanks for the unusually clear and detailed instructions and video. Much appreciated.
Thanks so much for the excellent video. It made it easy for me to pop out the original SSD (256 GB) and replace with a new 1TB SSD. I might offer 2 suggestions:
1. Before purchasing the SSD upgrade, actually open up the laptop and check whether you have an M2 NVME or M2 SATA SSD. In my case, I blindly ordered a SATA and the transfer speeds are ~4x faster with NVME and now not much different in price. The performance is still comparable to SATA HDD, but you never can get fast enough ;)
2. For me, the EaseUS step had a hitch in it. For some reason, I could not drag and drop for moving partitions to the right of the unallocated space, which was ~693GB in my case. However, after selecting the partition immediately to the left of Unallocated, clicking Resize/Move, then instead of dragging I clicked on "Advanced Settings" and then set "Unallocated after: 0.00 GB" which had the effect of moving Unallocated to the left of this partition. I repeated it 2 more times to move Unallocated just to the right of C:OS and then merged.
But this video and writeup made it so simple and I especially liked the tip to use my small spudger to unsnap the case from the front edge.
Like the others, MANY THANKS!
For potential XPS13 buyers. I bought an XPS13 for my wife four years ago. It is a nice machine but very well built. So far the battery has been replaced once and it claims it needs to be replaced again. The display has developed a gliding shade and with columns, the touchpad has been replaced (the click mechanism failed), the DC in jack is on its last legs. And not the SSD (256GB) is reporting failure. Not what I expected from a 1600 EUR laptop, I could have bought a MacBook Pro for that price: we have three of those in our household and none of them have failed like the XPS13.
With so many disparate aspects of the machine breaking/going wrong, that's clearly a case of user abuse. Buy your wife a used VIAO.
Thanks very much....this was very helpful tonight.
Thanks for this guide, followed it through and successfully installed and cloned my 1TB drive on XPS15. A couple of thoughts:
- It is worth checking what type slot you have for your internal HD, this can easily be done by opening the back and checking the serial numbers etc of your existing HD and even taking it out. Do this before ordering another one!
- I had to create an image of my existing HD, not a clone (following the external HD transfer method above) as the free version of the tool would not support cloning from the boot USB in the free version.
- Beware that there you need to find the "free" version of EaseUS partition manager and not the "trial" version, as the latter won't allow you to make partition changes.
Thanks again for the step-by-step guide.
Hey Jeff,
Just wanted to thank you for this great information!
Best,
Sharon
First of all thanks for your video and the really helpful note how to open it savely with all that hidden clips.
My upgrade will be from 256 GB to now 500 GB - it´s a new NVME M.2 SSD from Crucial which i received yesterday.
I am using the 9360 machine since three years with a dualboot Win10/LM 18.3 Cinnamon. The Main-OS is Linux with Grub as bootmanager and booting with UEFI.
Now with the new SSD i´m asking myself, if i really need to clone the old partitions (especially to have the installed UEFI-partition on the new one), or if it´s possible to just put it in and make a new stand-alone installation of Linux?
So, do i further need the UEFI-partition to install my new LM 20 Cinnamon, or is this obsolet?
I may also offer some suggestions for cloning: try "clonezilla"! It´s free and easy to use: https://clonezilla.org/
Use the free Windows-Tool "Rufus": https://rufus.ie/ to create a bootable clonezilla-Live-Medium - start the 9360 with the cz-Live-Stick using f12.
Clone the complete HDD, or if not needed, separate partitions to a external device.
Change the ssd and start again with the cz-Live-Medium and f12.
Write the hole cz-hdd-image back to the new ssd.
Start Windows form the new SSD.
Then download and install the free Windows-program AOMEI Partition Assistant: https://www.diskpart.com/ to move the new free space (now righthand) next to the C:/ partition (direction left).
When the old C:/ Partition and the new free space are next to another, go to Windows Disk-Management and merge those to partitions to one. Don´t do this last step with any other tool, just with windows onboard Disk-Management.
Restart Windows and it´s done.
I hope this few additional steps are a helpful add-on to your guide.
I just upgraded my xps 9380 from 256 Gb to 1 Tb Samsung 970 EVO Plus. It was very easy. I used an SSD enclosure (https://www.amazon.com/gp/product/B07MNFH1PX/ref=ppx_yo_dt_b_search_asi…) and cloned the new SSD in the enclosure with Macrium Reflect (free). I left out the 12 Gb Dell image partition and expanded the C: partition to take up the full space--all in Macrium Reflect. The clone operation only took 17 minutes. Then I opened up the computer and switched the SSD cards. I booted up and everything was just as before except I have another 750 Gb of space on my C: drive! (Note: I disabled Bitlocker before the clone just in case--and so that I can access the old drive if needed. I put the old SSD in the enclosure.)
HI Douglas Esplin
well let you tell your all service which i got from WD2002FYYS | Western Digital Enterprise RE4-GP 2TB 5400RPM SATA 3GB/s 64MB Cache 3.5-inch Hard Disk Drive
nice explanation of computer part right time you can try this as well
https://nexthdd.com/wd2002fyys-western-digital-enterprise-re4-gp-2tb-54…
All I want to do is replace the battery. However, as I got the back open per your instructions, I cannot unplug the battery. The plug does not move. I do not want to use too much force. How do I unplug? which direction does it plug out? Thanks.
I recently purchased a used Dell XPS 13 (model 9360) and opted for the base model with a 128 GB SSD. I later decided to upgrade to a larger 500 GB SSD aftermarket, which turned out to be a cost-effective choice compared to buying a higher-tier XPS model. For this upgrade, I used the WD Blue 3D NAND 500GB PC SSD.
Having experience with drive upgrades on Macs and Linux PCs, I found the process relatively straightforward, thanks to readily available disk cloning tools like Disk Utility on macOS and dd on Linux. However, on Windows, it was a bit different, as there's no built-in tool for cloning or imaging a disk.
I made use of tools like Macrium Reflect Free and EaseUS Todo Backup for the job. Ultimately, Macrium Reflect felt more user-friendly to me.
During the process, there were a few challenges. Cloning the internal drive to my new M.2 SSD via multiple adapters caused some hiccups. I later successfully cloned to an external USB 3.0 hard drive, which had ample space for all partitions.
I created a 'Restore Media' USB boot drive using Macrium Reflect to boot the XPS 13 after replacing the SSD. The process included opening the laptop, swapping the SSD, and using the boot drive for cloning.
One important note: When opening the laptop's bottom cover, remember to remove the Phillips screw under the magnetic 'XPS' cover to prevent damage. Gently pry the cover from the front edge to avoid breaking retaining clips at the back.
After the upgrade, I needed to merge the 'Unallocated space' on the new 500 GB SSD into the C: OS boot partition. Windows' built-in Disk Management couldn't do this, so I used EaseUS Partition Master Free to move partitions and merge the spaces successfully.
In the end, Windows 10 worked seamlessly with the larger SSD, providing extra space for my data. This upgrade experience was made smoother by the insights I found, including those from GracileIT. It's rewarding to share my journey with fellow enthusiasts and professionals in the IT hardware community."
Hope this helps!