raspberry pi

BliKVM - a PiKVM (KVM over IP) box based on the Compute Module 4

I received a couple BliKVM units recently, and since I don't have as much of a need (my only 'remote' PC is about 2' away from my desk...), I brought them to my Dad's radio station, and we set it up in their main on-air PC so operators could access the PC and fix problems at home, instead of driving in!

Check out our video on this board on the new Geerling Engineering YouTube channel:

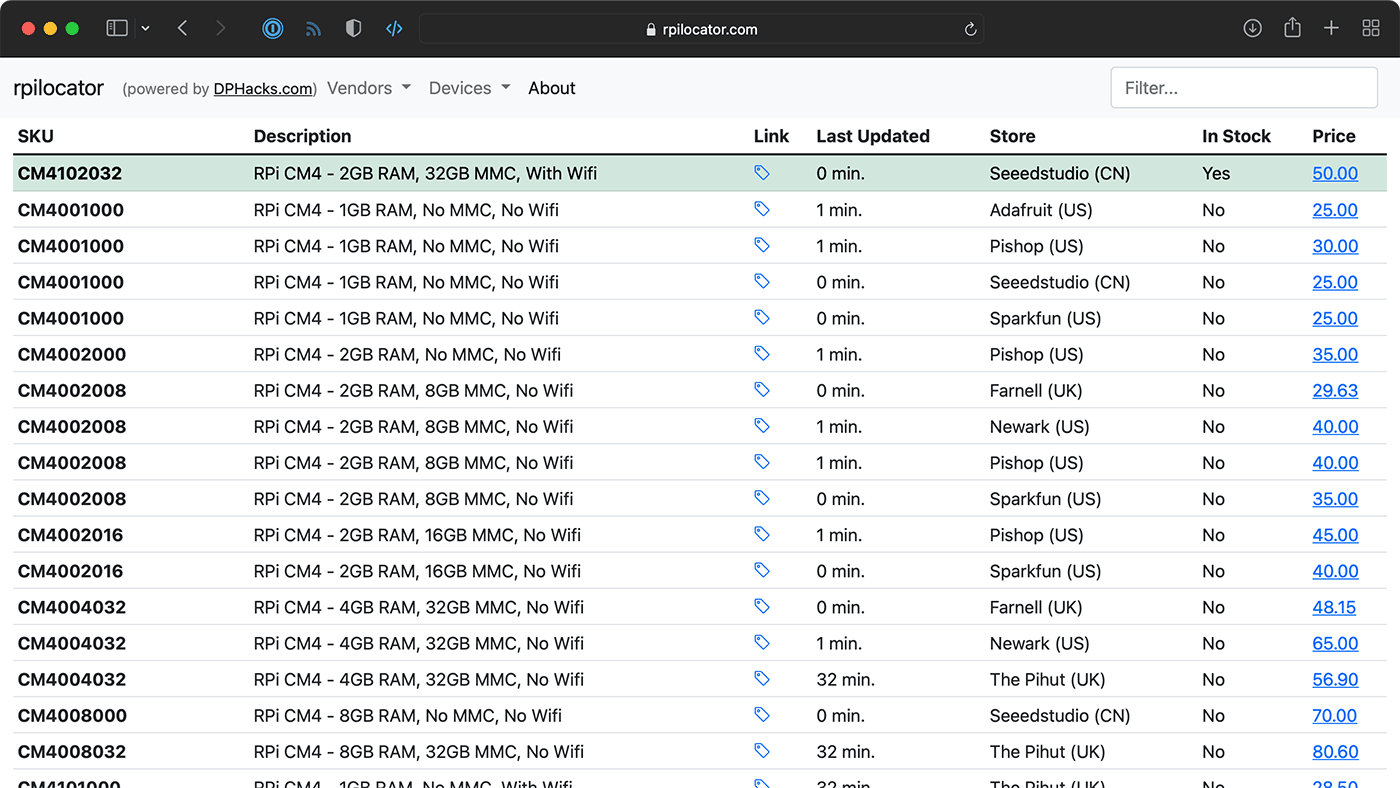
You can buy the BliKVM on AliExpress, and try your luck finding a CM4 to use in it!

Hosting this website on a farm - or anywhere

tl;dr: This website is currently being hosted off-grid, on a cluster of Raspberry Pis, via 4G LTE—or at some points through the same tunnel via WiFi if signal strength gets too low. Here's the GitHub repo for the project.

Note: The website was down for a few hours this morning, as shortly after this post I started getting a 40-50 Mbps flood of POST requests (over 6 million in a 30 minute time frame)... and yeah, no way the little Pi cluster could handle that. Thanks, Internet. It's back up through Cloudflare now, and I'll post more on this 'fun' experience later.

A couple weeks ago, after months of preparation, I took my 4-node Turing Pi 2 cluster (see my earlier review) to my cousin's farm, and ran this website (JeffGeerling.com) on it, live on the Internet—completely disconnected from grid power or hard-wired Internet.

Enable the external antenna connector on the Raspberry Pi Compute Module 4

Raspberry Pi Compute Module 4 external U.FL antenna

The internal WiFi module on the Compute Module 4 (that's the bit under the metal shield in the picture above) routes its antenna signal via software. You can route the signal to either:

  1. The built-in PCB triangle antenna (this is the default).
  2. The external U.FL connector (which has an external antenna plugged into it in the picture above)

To switch the signal to the U.FL connector (for example, if you're installing your CM4 in a metal box where the PCB antenna would be useless), you need to edit the boot config file (sudo nano /boot/firmware/config.txt, and add the following at the bottom:

# Switch to external antenna.
dtparam=ant2

Then reboot the Pi.

It's official: Raspberry Pi OS goes 64-bit

64-bits. More is always better, right?

Well, not exactly. And that's why it's taken years for Raspberry Pi OS to add an officially-supported 64-bit version, in addition to the 32-bit version they've had since the original Pi came out.

Since May 2020, there's been a beta 64-bit version of Pi OS, but it wasn't intended for beginners, and was never linked from the main downloads page.

You had to kinda be 'in the know' to get it. And the reason for that is it's actually branched directly off of Debian Linux and had a few growing pains. But almost all those problems have been ironed out now, and apparently it's time for the Raspberry Pi's 64-bit era.

Raspberry Pi OS 64-bit blog post

It's dire: Raspberry Pi availability tracker is launched

Yesterday André Costa emailed me about his new website, rpilocator.

rpilocator website screenshot as of Jan 31 2022

It's a website to track Raspberry Pi 4 model B, Compute Module 4, Pi Zero 2 W, and Pico availability across multiple retailers in different countries.

In his own words:

This database was created out of frustration trying to locate a Raspberry Pi product in the height of the chip and supply chain shortages of 2021. I got tired of visiting multiple websites every day trying to figure out if there were any Raspberry Pi's in stock. I coded this website in a few days during my spare time and had it hosted on a Raspberry Pi for a couple of weeks before deciding to make it publicly available. This is not hosted on a Raspberry Pi anymore.

Using 4G LTE wireless modems on a Raspberry Pi

For a recent project, I needed to add cellular connectivity to a Raspberry Pi (actually, an entire cluster... but that's a story for a future time!).

Raspberry Pi 4 model B with 4G LTE wireless Quectel modem and antenna and USB adapter

I figured I'd document the process in this blog post so people who follow in my footsteps don't need to spend quite as much time researching. This post is the culmination of 40+ hours of reading, testing, and head-scratching.

There doesn't seem to be any good central resource for "4G LTE and Linux" out there, just a thousand posts about the ABC's of getting an Internet connection working through a 4G modem—but with precious little explanation about why or how it works. (Or why someone should care about random terms like PPP, ECM, QMI, or MBIM, or why someone would choose qmi_wwan over cdc_ether, or ... I could go on).

Hopefully you can learn something from my notes. Or point out places where I'm glaringly wrong :)

SSH and HTTP to a Raspberry Pi behind CG-NAT

For a project I'm working on, I'll have a Raspberry Pi sitting behind a 4G LTE modem:

Raspberry Pi 4 with 4G LTE modem and antenna on desk

This modem is on AT&T's network, but regardless of the provider, unless you're willing to pay hundreds or thousands of dollars a month for a SIM with a public IP address, the Internet connection will be running behind CG-NAT.

What this means is there's no publicly routable address for the Pi—you can't access it from the public Internet, since it's only visible inside the cell network's private network.

There are a few different ways people have traditionally dealt with accessing devices running through CG-NAT connections:

  1. Using a VPN
  2. Using a one-off tool like ngrok
  3. Using reverse tunnels, often via SSH

And after weighing the pros and cons, I decided to go with option 3, since—for my needs—I want to have two ports open back to the Raspberry Pi:

Autofocus on a Pi - ArduCam's new 16MP camera

ArduCam with other Raspberry Pi Cameras - v2 HQ and Autofocus 16MP

ArduCam recently completed a successful crowdfunding campaign for a 16 megapixel Raspberry Pi camera with built-in autofocus.

The camera is on a board with the same footprint as the Pi Camera V2, but it has a Sony IMX519 image sensor with twice the resolution (16 Mpix vs 8 Mpix) and a larger image sensor (1/2.53" vs 1/4"), a slightly nicer lens, and the headline feature: a built-in autofocus motor.

Autofocus performance

Getting right into the meat of it: autofocus works, with some caveats.

First, the good. Autofocus is quick to acquire focus in many situations, especially in well-lit environments with one main subject. Using ArduCam's fork of libcamera-still or libcamera-vid, you only need to pass in --autofocus and the camera will snap into focus immediately.

Raspberry Pi holds its own against low-cost ARM NAS

Earlier this year, I pitted the $549 ASUSTOR Lockerstor 4 NAS against a homebrew $350 Raspberry Pi CM4 NAS, and came to the (rather obvious) conclusion that the Lockerstor was better in almost every regard.

Jeff Geerling holding Raspberry Pi Radxa Taco NAS board and ASUSTOR Drivestor 4 Pro

Well, ASUSTOR introduced a new lower-cost NAS, the $329 Drivestor 4 Pro (model AS3304T—pictured above), and sent me one to review against the Raspberry Pi, since it make for a better matchup—both have 4-core ARM CPUs and a more limited PCI Express Gen 2 bus at their heart.

Around the same time, Radxa also sent me their new Taco—a less-than-$100 Raspberry Pi Compute Module 4 carrier board with 5x SATA ports, 1 Gbps and 2.5 Gbps Ethernet, an M.2 NVMe slot, and an M.2 A+E key slot. (The Taco will soon be available as part of a kit with a CM4 and case for around $200.)

The specs evenly matched, at least on paper:

Check your driver! Faster Linux 2.5G Networking with Realtek RTL8125B

Since the Raspberry Pi Compute Module 4 was introduced last year, I've been testing a variety of PCI Express NICs with it. One of the main types of NIC I'm interested in is cheap 2.5 Gigabit Ethernet adapters.

2.5 Gigabits is about the highest reasonable bandwidth you can get through the PCI Express Gen 2.0 x1 lane on the Raspberry Pi, and it's also a lot more accessible than 10 Gigabit networking, especially for home users who might already have Cat5e runs that they are loathe to swap out for Cat6 or better cabling.

In my testing, besides discovering that not all 10 Gbps SFP+ transceivers are created equal, I found out that when it comes to performance, the Linux driver you're using matters—a lot.