Last year I spent a bit of time building a Kubernetes cluster with the original Turing Pi. It was fun, and interesting, but ultimately the performance of the Compute Module 3+ it was designed around led me to running my homelab off some newer Pi 4 model B computers, which are at least twice as fast for almost everything I run on them.
So this year, I was excited when the folks at Turing Pi sent me a Turing Pi 2 to test drive. And the board arrived just in time for Patrick Kennedy from ServeTheHome to challenge me to a cluster build-off at Supercomputing '21! Check out his ARM cluster build here.
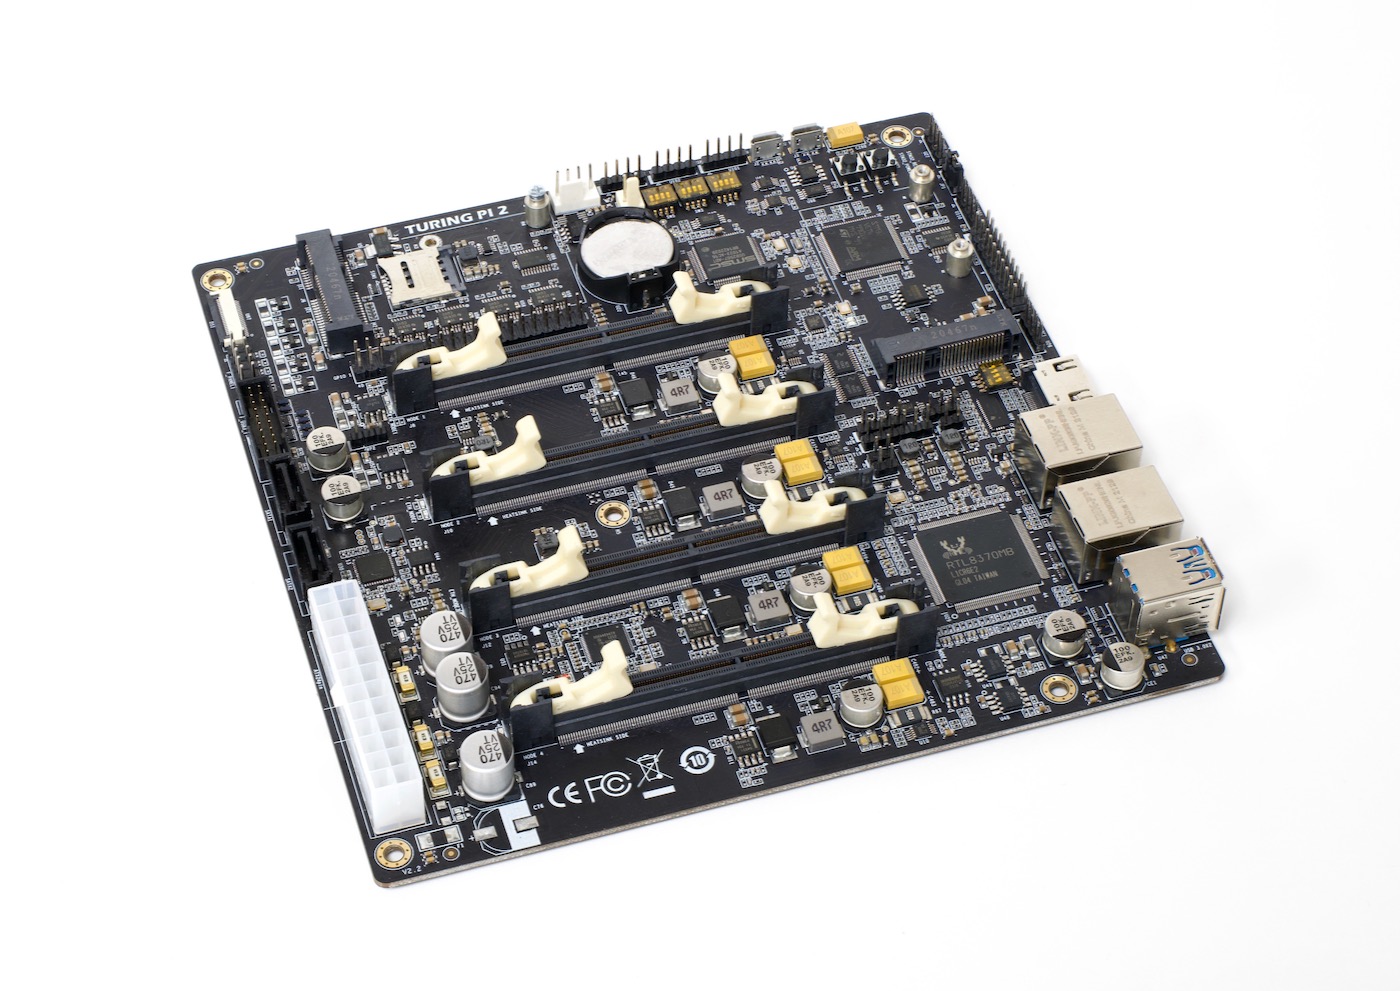
The Turing Pi 2 is a mini ITX motherboard capable of holding up to four Raspberry Pi Compute Module 4s or NVIDIA Jetson Nanos, and it integrates a board management backplane, power management, and gigabit Ethernet switch, alongside various PCI Express breakouts, so you can build a 4-node SBC cluster.
And it performs—as I hoped—much better than the older version. Not only do the CM4, Jetson Nano, and even pin-compatible replacements like Radxa's CM3 and Pine64's SOQuartz all have full gigabit Ethernet, their CPUs are noticeably faster than the CM3+ they replace.
The board I have is a prototype, and as such is still running a very early version of the firmware—RTC PWM fan control aren't even implemented yet! But the folks at Turing Pi seem set on having all the features ironed out for a January 2022 launch. The board will cost about $200, with CM4 adapter cards (which connect a CM4 to the vertical SO-DIMM slot) adding on $10 each.
PCIe Expansion support
Since each CM4 has one PCI Express Gen 2 lane available, the board exposes each one in a different way.
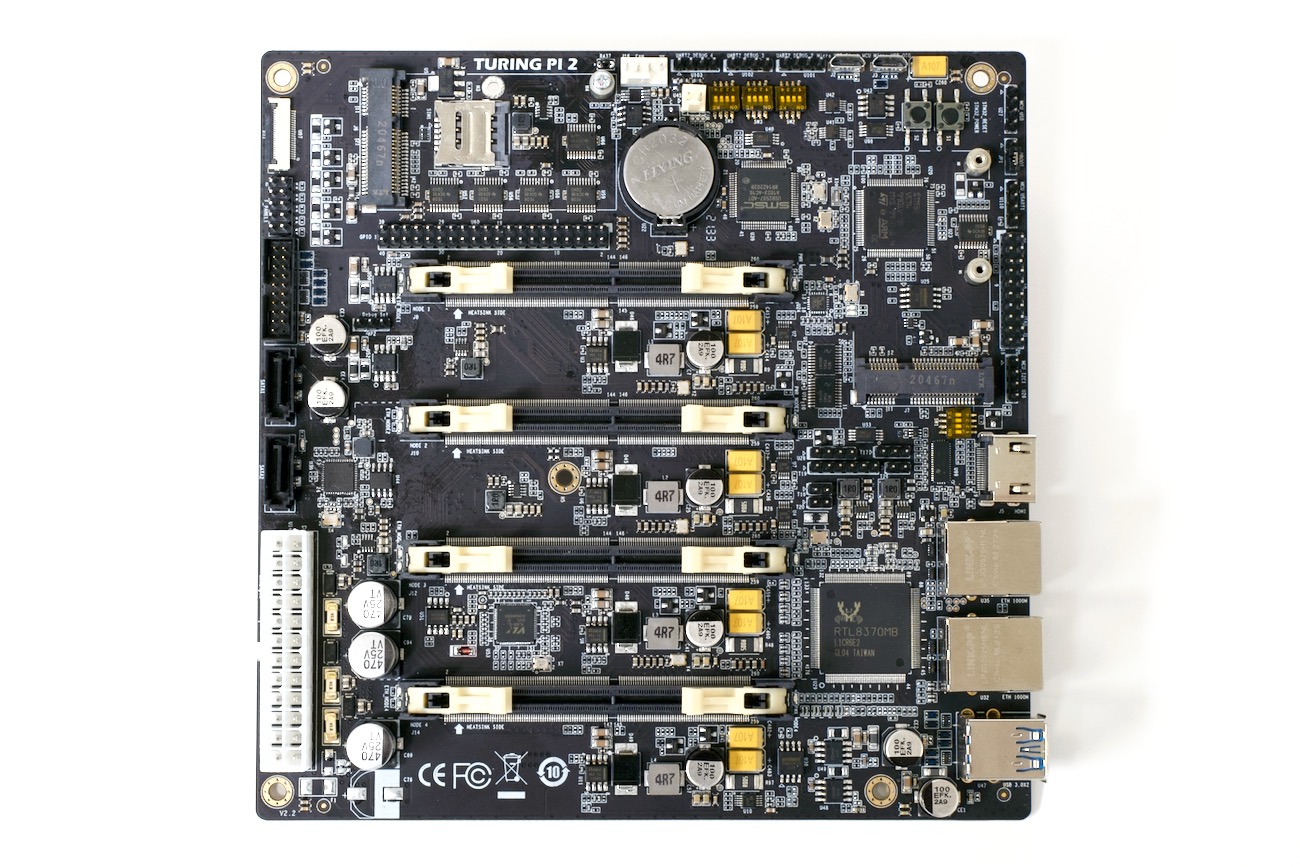
For node 1 (at the top of the board), there's a mini PCIe slot with a SIM tray underneath—useful for things like 4G or 5G modems. For node 2, there's another mini PCIe slot (with no SIM tray).
Node 3 is connected to an ASMedia 2-port SATA controller, so you can plug in up to two SATA III drives directly into the Turing Pi 2, and they'll be controlled by the computer in slot 3.
Node 4 is connected to a VL805 USB 3.0 controller, and that exposes a USB 3 front panel header and two USB 3.0 ports on the rear to the computer in slot 4.
The idea is you can use node 3 as a storage controller (e.g. run two drives in RAID 1 and have an NFS share for your cluster running on that node), use node 4 for USB devices (and share them, if needed, through that node), and use nodes 1 and 2 for whatever specific connectivity you want (e.g. a wireless 4G gateway for redundant Internet access).
The back of the board has two bridged 1 Gbps Ethernet adapters—though the Realtek RTL8370MB Ethernet switch is managed, so assuming updated firmware, the board's network configuration should be malleable as well.
Power
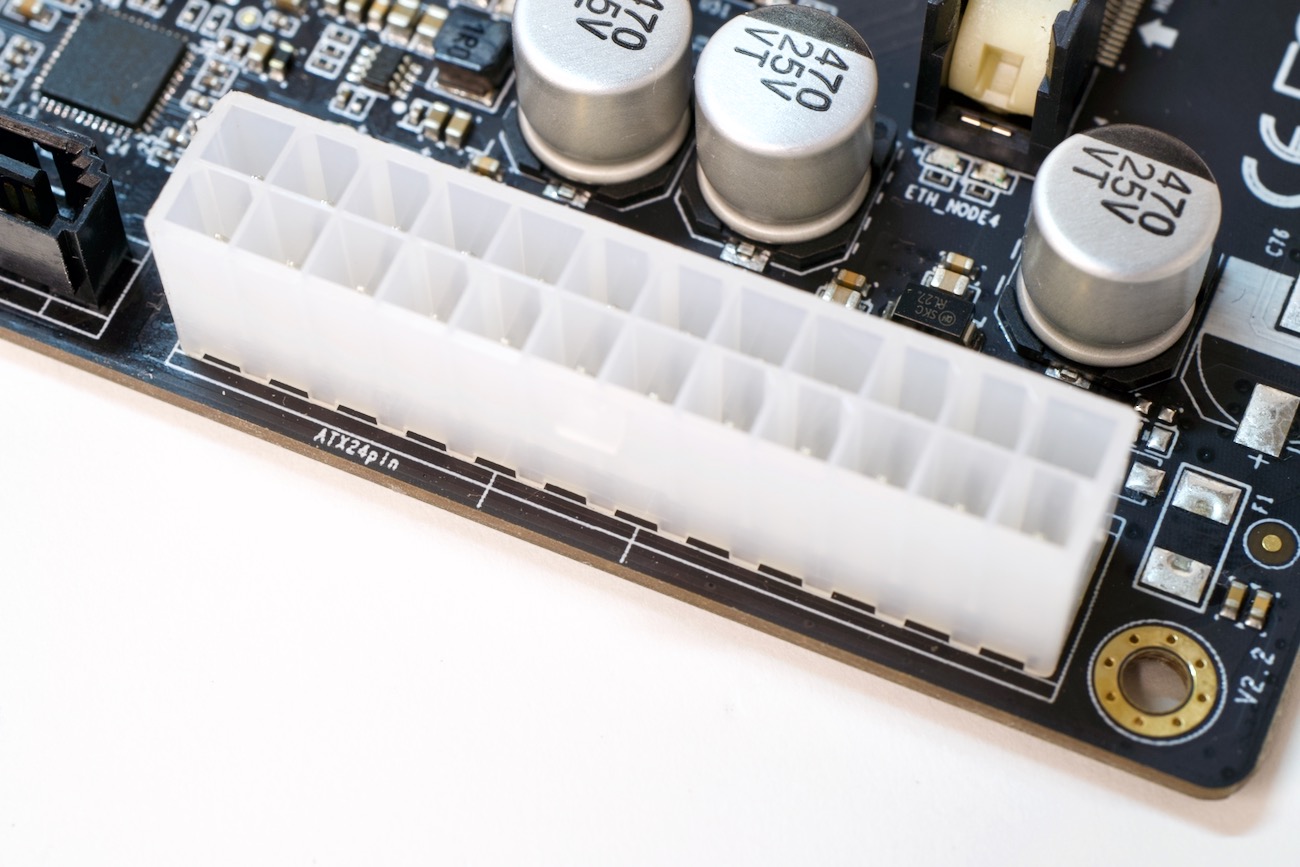
In a first for a Raspberry Pi board, the Turing Pi 2 gets its power via a standard ATX 24-pin power header. You can use any standard PC PSU, or even a Pico PSU and 12V adapter to power the Turing Pi 2.
With four CM4 8GB Lite nodes with WiFi and Bluetooth, plus a connected 2TB Crucial SSD, power consumption was around 15W at idle, and 25W when running under full load on all four nodes (as measured at the wall by a Kill-a-Watt). I'll talk a little more about efficiency in the performance section.
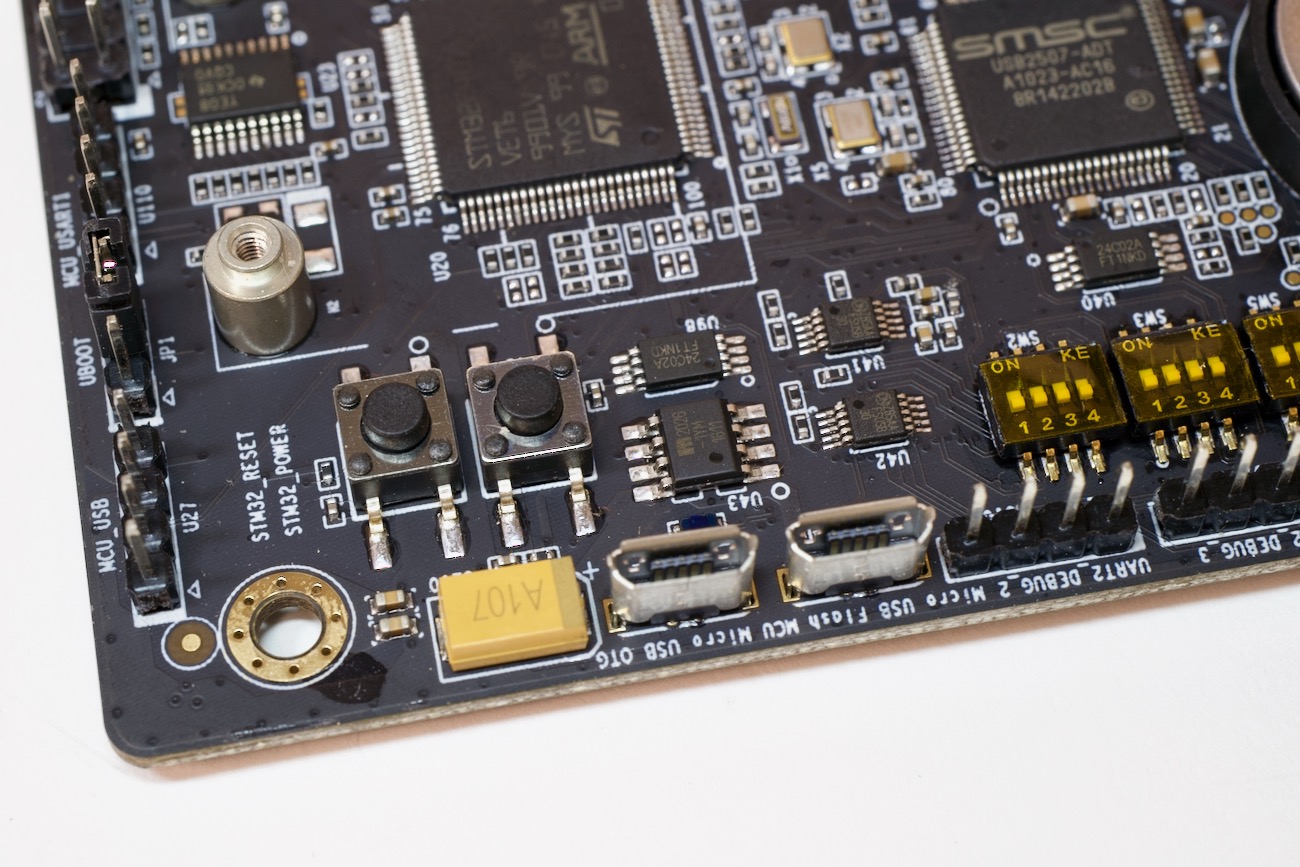
The board also has a reset and power button built in, as well as headers for front panel power and reset functionality. And these buttons work well, providing a sometimes-necessary full halt/reboot to the cluster.
If you press 'reset', the entire cluster will be powered down immediately, then booted back up, one slot at a time. If you press 'power' the cluster will power down gracefully one slot at a time, and remain off. Pressing 'power' again boots the cluster back up, one slot at a time.
Other IO
Around the edge of the board, there are various other IO options as well. There are UART headers for each Pi, along with a full 40-pin GPIO header for slot 1. There's also a full-size HDMI 2.0 port attached to slot 1.
There are micro USB ports for flashing both the MCU and eMMC modules on the CM4s themselves (you can see them in the picture in the power section above), and unlike the Turing Pi v1, all nodes can be hot-plugged and eMMC can be flashed using software control, courtesy of a new board management backplane, managed by an STM32 chip.
The user interface and CLI for that chip is still a bit rough, so I haven't had a chance to really dig in—hopefully I'll have more time for that soon, since I'm planning on racking up this unit!
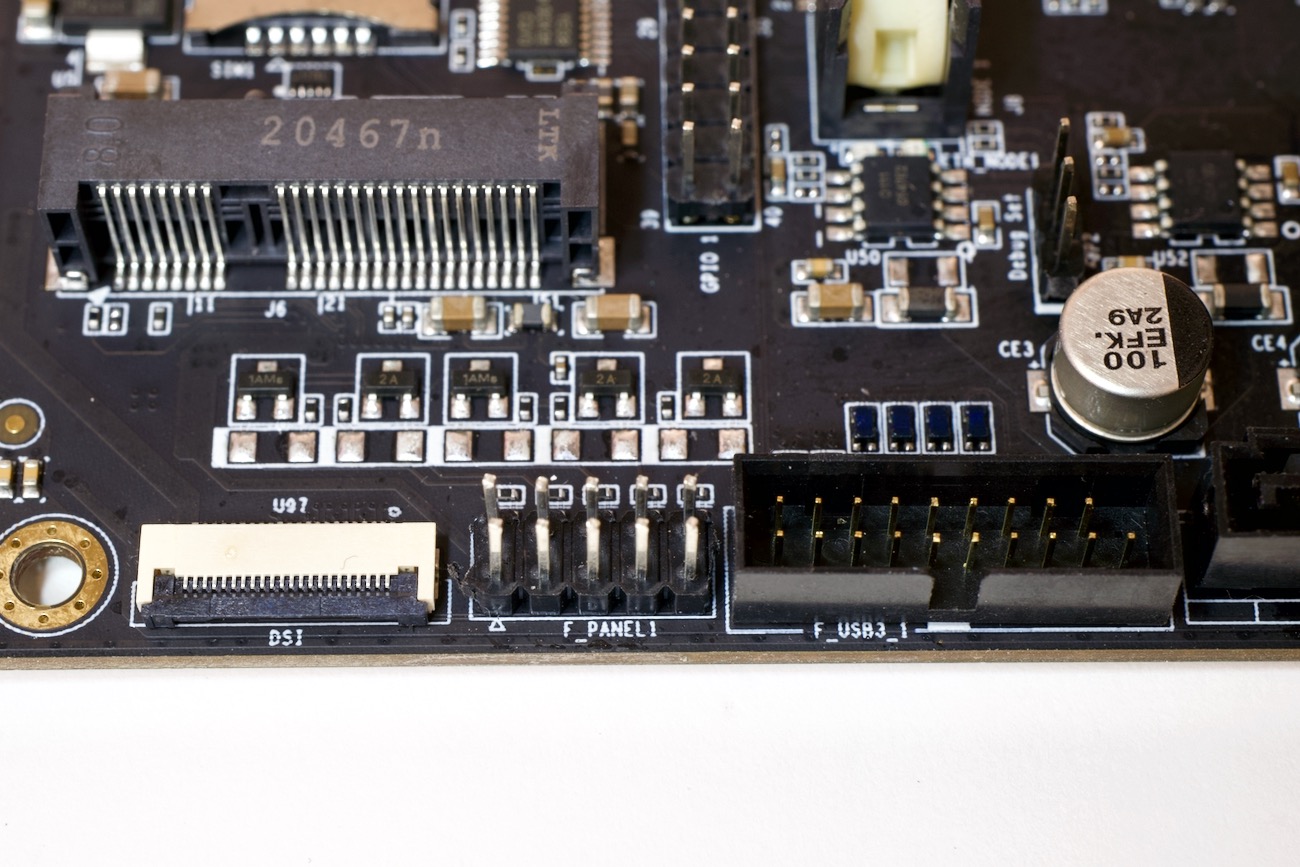
There's also a front panel header for LEDs and a power switch, as well as a DSI display connector attached to slot 1.
There are a few other connections, jumpers, and dip switches too, but I'll defer to the official site and documentation for more detail.
Blinkenlights
Besides performance, one thing I didn't like about the original board was how few status LEDs it had. This new board is much better in that regard, with status LEDs for almost every important feature.
Both of the Ethernet ports on the back have functional link and activity lights. Each slot also has appropriately-colored link and activity lights. Each slot also has a power indicator LED, plus there's an overall board power LED, and an LED to indicate the MCU is 'on' (helpful when deciding to safely shut down the cluster).
And finally, each of the CM4 adapter cards has a green power and activity LED on the back, so you can visually confirm they're powered on and doing something.
All in all, a good show of blinkenlights if I've ever seen one.
Performance
No Raspberry Pi-based cluster will seriously compete in the Top500 list, but since the list was just updated at Supercomputing '21—which was held a few weeks ago in St. Louis, my hometown—I thought it'd be a fun experiment to see how it fares running HPL (High Performance Linpack), the standard benchmark for the Top500 clusters.
Initially, I had some trouble getting HPL to run. I built an automated playbook to build MPI, ATLAS, and HPL on the cluster (it's in my turing-pi-2-cluster repo), and everything would work, but when I ran the test on more than two nodes, it would just hang.
As it turns out, the problem was DNS (of course it was DNS), and once I added all the IP addresses to the cluster hosts files, I was able to get it to run. I benchmarked the cluster at the default clock (1.5 GHz) and overclocked (to 2.0 GHz), and here are the results:
| Benchmark | Result | Wattage | Gflops/W |
|---|---|---|---|
| HPL (1.5 GHz base clock) | 44.942 Gflops | 24.5W | 1.83 Gflops/W |
| HPL (2.0 GHz overclock) | 51.327 Gflops | 33W | 1.54 Gflops/W |
The cluster would rank somewhere in the middle of the Top500—at least in November 1999! And by my calculation, to make the cutoff for this year's list, I'd only need around 146,772 more Compute Module 4's :)
But what's more pertinent to a little cluster-on-a-board like the Turing Pi 2 is energy efficiency. And looking at the Gflops/Watt measurement, it actually ranks favorably in this year's Green500—with 1.83 Gflops/W, it would rank in the 150s. Of course, the other servers in that range are throwing out thousands of teraflops... so not exactly an equal comparison.
But the cluster does run at 15W idle, and about 24W full tilt, with all four Pis running Linpack. Not too shabby if you compare this little ~$500 cluster to a four node setup of old X86 laptops or mini desktops.
If you want to dig deeper into the test methodology and results, check out my HPL benchmarking issue on GitHub.
Video
In addition to this blog post, I have a video that goes more in-depth on the cluster build and board features—check it out on YouTube:
Conclusion
The Turing Pi 2 should cost about $200, and the Compute Module 4 adapter cards $10 each. It should be available in January 2022, and hopefully in greater quantities than the Turing Pi 1, which was almost always out of stock!
I think this board is a great platform for learning and low-end ARM cluster builds, and could also be useful for edge environments or other places where power and budget are primary constraints, but you still need multiple nodes (for whatever reason).
It has improved on the first Turing Pi board in every way except quantity of Pis, but that's to be expected since there's only so much space in the mini ITX footprint, and it also means the board can support many new features, like Nvidia Jetson Nano boards and multiple PCI express expansion cards!
Check it out at TuringPi.com.
Comments
I think you should change the domain of your website to something like "zooofpi.com" or the likes :)
I agree.
The Radxa CM3 has 3x 100 pin connectors, so they can't be compatible IMHO. Apart from Nvidias Jetson Nano modules, the Jetson TX2 NX and Xavier NX modules are also compatible though.
The CM3 has three connectors, but will work with only the two that are on most CM4 boards. It's designed so the 3rd connector breaks out additional IO.
> boots the cluster back up, one slot at a time
You know that awful feeling when you've just hit restart instead of shut down, especially on a slow computer? I feel like this feature has the potential to cause some even worse incidents :)
(But, yes, it does make some sense from a software perspective).
Can you plug NVMe SSDs into the PCIe slot, and is it better than just using a sata SSD?
I'm going to guess probably not, and here's why. The Pi's PCI interface is known to be fairly anemic, so saturating that sucker is pretty easy to do. The throughput you're going to get from the SATA SSD may come close to what it can accept through that bus - but this is all just speculation. It may be very different in reality, and I'd have to do some research to be sure.
But in terms of cost, per Mb/s, per W, and per GB, the SATA drive will likely win out. And let's be honest, if you're clustering Pis you are probably pretty cost-minded.
None of the compatible SoCs has native SATA and as such they're all already bottlenecked by the single Gen2 PCIe lane. The ASM1061 SATA controller on the carrier board performs ok-ish but while native SATA 6Gb/s ports provide up to ~540 MB/sec sequential performance you'll have a hard time to exceed 400 MB/s with ASM1061 (max. bandwidth _shared_ by the two ports).
But why does each and everyone always focus on these sequential transfer rates only? What happens mostly is not sequential IO but random IO.
And here is where NVMe shines. It's a modern protocol from this century unlike SATA/AHCI. It's made for performance and with flash storage in mind and not with slow spinning rust. Accessing a NVMe SSD via PCIe avoids unnecessary overhead compared to a PCIe attached SATA controller in between (also less IRQs to process). Latency also way lower compared to such a SATA setup with an el cheapo ASMedia controller from a decade ago.
All of this of no relevance of course as long as you always buy the cheapest SSDs possible :)
I would also be interested in this question. Can you, please, check it @Jeff Geerling?
On the Turing Pi 2, the slots are mini PCIe, and there aren't any NVMe SSDs that fit that form factor (though maybe some mini PCIe SATA SSDs could? Not sure, but I think that would require different hardware). You could use adapters to go from mini PCIe to M.2 M-key, but it would be a bit of a mess.
SATA drives are a better match for the Pi's bus speeds. NVMe drives are often much slower on the Pi since it's limited to 420 MB/s max.
Curious about your DNS problems. Have you tried to use link local addressing as intended? Not defining turing-node-1.local as within the 10.0.0.0/8 but where it belongs to naturally (169.254.0.0/16).
If you define turing-node-1 as hostname in Raspberry Pi OS the whole device should be available also as turing-node-1.local with a random but unique address from 169.254.0.0/16 (even if there's no DHCP server present, ZeroConf is designed for this).
We used this type of self-assigning unique addresses with dynamic name resolution already almost 40 years ago (AppleTalk) while TCP/IP learned that much later. But at least the RPi guys made it working few years ago so that I really wonder whether it's necessary to maintain static host files per host instead of just relying on something that 'should just work'.
Hi.
I wonder if you got anything like a Nvidia Jetson Nano based setup running here? I think the site said that Jetson Nano is supported? Can you use the Ethernet plugs from the Nano's with the four board build?
Warm regards,
Bob
Yes; in the video during the build process I also demonstrated plugging a Nano into the Turing Pi 2 — it should work without issue, though the software stack is a bit different than the one on the Pi.
Hi, thanks for your reply. Is it possible to get the Nano ethernet-ports to show up on the system, or are we talking discrete independent nodes that can talk to each other with a bus of some type? I was thinking about a setup with four Nano's with 6 interfaces, but then again don't know if that's doable without getting my hands dirty?
I'm also interested in the Turing Pi 2, but am trying to build the hpl benchmark on a single RPi4/8gb with Bullseye to become familiar. I have ansible installed on my Ubuntu desktop and am trying to use the playbook from your repository, but it fails on the mpich install and seems to trip over something having to do with double precision floats. Did you see this in your install?
Would I have to populate all the slots to a have a working cluster? It seems like I would have to, unless I would like to do without storage or USB ports
No, you could just do one, two, or three of them, depending on your needs!
in the video i noticed you put a sata card. but the turing pi already has built-in sata ports. why didn't you put a network card instead?
Mostly because the only network card I have that fits in mini PCIe is a 2 port 1 Gbps LAN card that requires Intel drivers to be installed—I could do it, but for this video I mostly wanted to verify the slot works, and also show that you could add more drives to the cluster via additional PCIe cards.
oh, then why didn't turing pi make it as a 2 port slot? it would be more useful...
i want to know about the rtl8370mb-cg chip, where can i find it's datasheet?
Hi @Jeff Geerling - is it possible to cluster multiple Turing Pi 2's?
should be possible, the pis just need to talk to each other, nested ethernet switches are no problem.
in all your videos and blog posts on itx, i don't understand one thing, why the side which has most of the io called the back side?
Typically people have the IO on the back, to hide the mess of wires hanging out all over the place.
ok, so the main thing of itx is to look neat on the front?
You could always turn around the case and look at the back instead of the front ;)
But it's the same as with PCs—typically ports are on the back of ATX/ITX cases so all the wiring can stay on the back side of the desk and be neatly (or messily) tucked away.
Hi Jeff,
Interesting article. Thank you.
Ppl have been hooking up Pis to ARX supplies for years so this is not a first for the Turing Pi II. I've been doing it for the last five years and others longer. This is my latest creation below. I'm currently using four of them in a 1U server case.
https://www.tindie.com/products/tomtibbetts/mini-atx-psu-ii-cool-deskto…
And, here is the server:
https://hackaday.io/project/181249/gallery#72b403523717049113a2cee5733d…
i want to run the turing pi as a desktop computer. how to share the usb ports to the master node?
Yes, same here!
Well he did say "use node 4 for USB devices (and share them, if needed, through that node)", I'm just wondering how...
Turing pi is advertising the introduction of the compute module "Turing Pi RK1 Rockchip RK3588" for the Turing pi 2, do you expect that compute module to introduce a leap in performance for example in the LINPACK test?
Ok, so you've had this thing for about a year now. What are your longer term impressions? I've been interested in it since before they were released, but the CM4 modules (or the Jetson ones) are still unobtanium for us normal folks, so haven't been able to build one. Makes it hard to justify the price to buy the TP2 board if I can't get the processing modules to plug into it...
I've had time to test it and the DeskPi Super6c quite a bit more. Honestly for my own needs (mostly testing out different stuff, not necessarily running in production), the Super6C is a little more convenient only because it's smaller (flatter) and allows two more CM4s, plus I can boot them all off NVMe.
But for production deployment, the flexibility of the different PCIe uses for each node on the Turing Pi 2 is great. And assuming they can get the software worked out for the BMC to remotely manage all the nodes, and flash eMMC modules straight through it (instead of plugging into another computer)... that would make for a much nicer deployable solution.
Have you used Jetson Nano's with the Turing Pi 2? If so, do you have any guidance on flashing them? I have yet to complete the flashing process for them on the Turing Pi 2.
Something I'd be interested in trying with this board: shoehorn it into a Jonsbo N2 SFF mini-ITX case then either run a PCI RAID controller through a mini-PCIe to PCI slot adapter or one of those 5 port SATA m.2 cards to run the drives then I've got my NAS & homelab cluster in a tiny 9x9x9" cube. Either that or packing it all into a 2U rackmount case. I have my eye on an ITX-G2250 from PLinkUSA if I decide to go that route but that requires buying 5.25" bay hot-swap trays which I'm not all that hyped about.