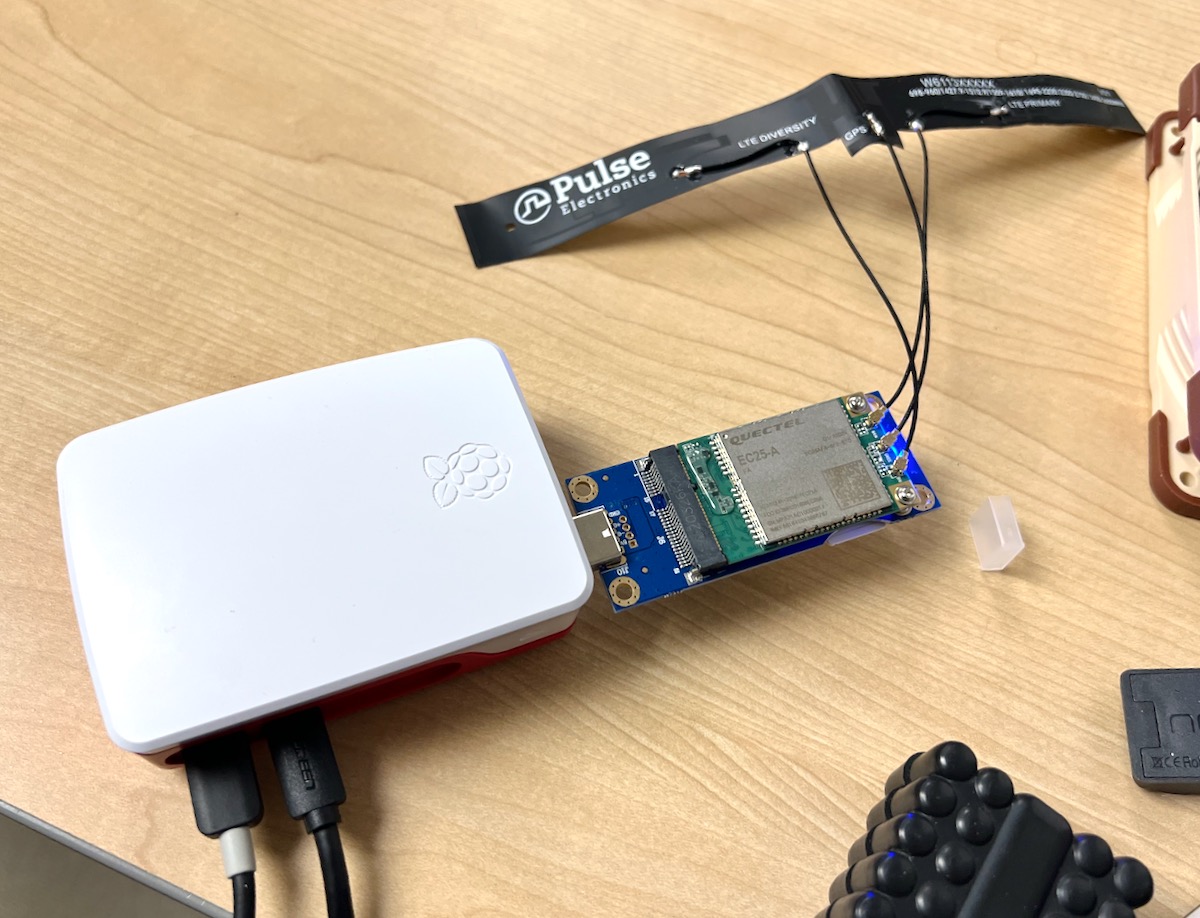
For a project I'm working on, I'll have a Raspberry Pi sitting behind a 4G LTE modem:
This modem is on AT&T's network, but regardless of the provider, unless you're willing to pay hundreds or thousands of dollars a month for a SIM with a public IP address, the Internet connection will be running behind CG-NAT.
What this means is there's no publicly routable address for the Pi—you can't access it from the public Internet, since it's only visible inside the cell network's private network.
There are a few different ways people have traditionally dealt with accessing devices running through CG-NAT connections:
- Using a VPN
- Using a one-off tool like ngrok
- Using reverse tunnels, often via SSH
And after weighing the pros and cons, I decided to go with option 3, since—for my needs—I want to have two ports open back to the Raspberry Pi:
- Port 22, for SSH access
- Port 80, so I can serve HTTP traffic
Security Warning: Punching a hole through to any network—especially to expose something like a Raspberry Pi to the public Internet, increases your network's attack surface. You're responsible for your own security, and if you don't have a good grasp on fundamental Linux and SSH security, you might not want to do this.
Prepare a VPS as a Tunnel Server
Paid services like VPNs and ngrok run their own servers, but can cost upwards of $10-20/month if you want to run a lot of traffic through them. Sometimes they are easier for specific needs, but as I mentioned, I just wanted two open ports.
So I chose to use one of my existing DigitalOcean VPSes for the task. I pay $5/month for it, use it to host some websites, and it also gets assigned a static public IP address, so I can point a domain at it, like www.jeffgeerling.com.
On that VPS, I needed to configure SSH so it could work as a tunnel server:
SSH's AllowTCPForwarding option must be set to yes for this to work—and that's the default. But you can confirm this with sshd -T.
You will need to configure the GatewayPorts option, so edit the SSH config file:
$ sudo nano /etc/ssh/sshd_config
And add the following line at the bottom:
GatewayPorts yes
Save your changes, and restart SSH:
$ sudo systemctl restart ssh
Confirm both settings are yes with:
$ sshd -T | grep -E 'gatewayports|allowtcpforwarding'
gatewayports yes
allowtcpforwarding yes
Security Warning: For better security, you can set
GatewayPorts clientspecified, and then specify certain IP addresses allowed to connect. Or, you could restrict access tolocalhostby settingGatewayPorts no—that way only users who are logged into the tunnel server could access the Raspberry Pi via SSH.
Prepare the Raspberry Pi
The Raspberry Pi will need to be able to connect to the VPS via SSH, so you should create an SSH key pair for this purpose. On the Raspberry Pi, run:
$ ssh-keygen -t ed25519 -C "my-raspberry-pi-name"
Then press enter for all the prompts. This should create a public SSH key located at /home/pi/.ssh/id_ed25519.pub. Get the contents of that file by copying the output of:
$ cat /home/pi/.ssh/id_ed25519.pub
Now, log into your tunnel VPS, edit the ~/.ssh/authorized_keys file, paste the public key you just copied into a new line, and save that file.
At this point, you should be able to SSH into the VPS from your Raspberry Pi. Test it with:
$ ssh my-username@my-vps-hostname-or-ip
You'll be prompted to accept the host key, so type yes when prompted, and you should be logged in. Go ahead and log back out (type exit).
Set up the tunnel
Now, it's time to test if tunneling works. First, on the Raspberry Pi, run this command to configure a tunnel over the IPv4 interface between port 22 on the Pi to port 2222 on the VPS:
$ ssh -nNTv -R 0.0.0.0:2222:localhost:22 my-username@my-vps-hostname-or-ip
This will output a bunch of debug information, and eventually show:
...
debug1: Entering interactive session.
debug1: pledge: network
debug1: client_input_global_request: rtype [email protected] want_reply 0
debug1: remote forward success for: listen 0.0.0.0:2222, connect localhost:22
Leave that terminal session running, and in another, log into the VPS and test logging into the Pi from it:
$ ssh -p 2222 pi@localhost
If you have password login disabled like I do, you might get a prompt like:
pi@localhost: Permission denied (publickey).
But that's okay—the important thing is you should see more debug messages in the Pi's terminal—if you do, that means the port forwarding is working.
Now, for the big test: check if you can SSH directly into the Raspberry Pi from your own workstation (not logged into the VPS) through the VPS tunnel:
$ ssh -p 2222 pi@my-vps-hostname-or-ip
And bingo! You should be in. But if not...
Troubleshooting
There are a few things that could be going wrong:
- Check SSH's current configuration with
sshd -T | grep -E 'gatewayports|allowtcpforwarding'— make sure the two settings configured correctly. If the sshd config file is correct, make sure you restart SSH to make the changes take effect (sudo systemctl restart ssh). - If you have a firewall configured on the server (
iptables,nftables,ufw, orfirewalld), make sure the ports are open through which you're connecting! - Triple check open connections with
netstat -tulpn— in one case, I hadn't setGatewayPortscorrectly, so when I ran that command, I saw a listing for127.0.0.1:2222, meaning the forwarded port was only accessible if logged directly into the VPS. It should be showing as0.0.0.0:2222if you set up everything according to this guide.
Better persistence
This is great if you just want to connect through to the Pi once, but if you want a persistent connection resilient to network dropouts, you will need to run something like autossh.
It's easiest to install it via apt:
$ sudo apt install autossh
autossh doesn't come with any automatic service integration, so you need to create a systemd unit file and defaults manually.
autossh defaults
Create a file to store autossh defaults, with sudo nano /etc/default/autossh, and put the following inside:
AUTOSSH_POLL=60
AUTOSSH_FIRST_POLL=30
AUTOSSH_GATETIME=0
AUTOSSH_PORT=22000
SSH_OPTIONS="-N -R 2222:localhost:22 my-username@my-vps-hostname-or-ip"
Note: You can add multiple ports in the
SSH_OPTIONSline—just add in an additional-R, like-R 8080:localhost:80after the first port 22 statement, and you'll be sharing the local HTTP port over the remote server's port8080.
autossh systemd unit file
Create a file to tell systemd about autossh, with sudo nano /lib/systemd/system/autossh.service, and put the following inside:
[Unit]
Description=autossh
Wants=network-online.target
After=network-online.target

[Service]
Type=simple
User=pi
EnvironmentFile=/etc/default/autossh
ExecStart=/usr/bin/autossh $SSH_OPTIONS
Restart=always
RestartSec=60

[Install]
WantedBy=multi-user.target
Save that file, then symlink it into place so systemd can discover it:
$ sudo ln -s /lib/systemd/system/autossh.service /etc/systemd/system/autossh.service
Starting autossh
All that's left is discovering the new systemd unit, and starting the service:
$ sudo systemctl daemon-reload
$ sudo systemctl start autossh
If everything's working (you can log in from your own workstation through the VPS tunnel server), you can set autossh to run at system boot:
$ sudo systemctl enable autossh
If you have any problems, run journalctl -u autossh to view the logs.
Conclusion
There are myriad ways of making a Pi accessible through CG-NAT, including VPN solutions like Wireguard (e.g. with Pi-VPN), Tailscale, Zerotier, etc.—however, if you already have a VPS running somewhere, and know SSH pretty well, SSH tunnels are a nice, simple, secure solution, at least for small scale deployments.
You may also not need autossh at all—later versions of OpenSSH include some of the features of autossh built-in, and you could just use ssh + systemd to keep a connection alive. For more on that, see these two posts:
Comments
I just realized I wrote a similar post, Setting up a Pi for remote Internet connection monitoring about a year ago... though in that post I just focused on SSH and didn't mention the use of
autossh. Honestly... I'm not sure which solution I like most yet :POne way might be to set up two remote Pis on the same network, and see which one is up and reachable more often. Supposedly modern versions of OpenSSH have the settings available to make the connection just as reliable in tandem with systemd.
This is a little less direct, but one might also be able to communicate using a script that watches something hosted in the cloud, making every communication through the cellular network a regular client request. You could then define your own run-able commands this way... But this course leaves you with a lot less functionality. For someone who wants to save some money, though, using a DB hosted on something a free Oracle Cloud instance might just do the trick. (I'm not sure if this makes any sense, I probably need to get some sleep...)
Yes, yesterday-self, you definitely needed sleep. :]
I've been pretty happy using CloudFlare Tunnel to SSH to my Raspberry Pi(s). CloudFlare Teams provides a lot of functionality for a pretty low cost.
Same here, though I mainly expose some of my self-hosted apps to the Web. If you're willing to do some manual setup, you can do most things for free.
Thanks for this article, very informative and detailed.
Juts a little typo that may raise issues for people not familiar with SSH tunneling, in the note after the autossh template config file:
"Note: You can add multiple ports in the SSH_OPTIONS line—just add in an additional -R, like -R 8080:localhost:80 after the first port 22 statement, and you'll be sharing the local HTTP port over the remote server's port 8888."
I think "8888" should be "8080", or "-R 8080" should be "-R 8888" to make things consistent ;-)
Oops! Fixed.
Wireguard with oracle cloud free tier for the VPS is my current setup to remotely access my lan network and machines, oracle also provides always free ARM VMs as well!
Thousands of dollars for a Sim with static IP?
Sprint/T-Mobile Kickstart line unlimited talk/text/5G data $15 + static IP add on $3 = $18
Thsts what I pay.
The only references to that plan I can find online are on Reddit; and even when that plan was available, it seems like it had some severe limitations in some cases (e.g. 5 GB of data then throttled speeds).
Looking at T-Mobile's public site right now, I see the cheapest plan they have (Essentials) starting at $60 for one line, and there's no mention anywhere on T-Mobile's site about static IPs. Their user forums seem packed with requests for static IPs (with users saying they're not available).
It would be great if I could find a plan like yours but it seems like it's just not available.
Some details on the hardware for 4G and how to set that up would be nice to see.
I'm probably going to do a bigger writeup/video sometime, but for now, check out this issue on GitHub: https://github.com/geerlingguy/raspberry-pi-pcie-devices/issues/344.
Interesting read. I used to do aomething similar a few years ago, but now I setup a raspberry pi at home with a wireguard server and then the remote one is on my parents house. The wireguard there is setup it as a client. It starts as a service automatically on start and connects to my home in order to bridge two MQTT servers for IoT devices, share the printer, etc
Great explanation, I was looking for this as my entire data usage is provisioned via two unlimited 5g SIM plans, one permanently attached to my home network and the second in my mobile phone. I usually tether my laptop, tablet and an oculus quest 2 to my phone
I have been planning to build a personal intranet between the two connections, and this could help.
Is there something preventing you from using IPv6?
In my case, I'm trying to build out this solution to work no matter what carrier / ISP is in use—many still don't even assign persistent IPv6 addresses :(
Nice. If it's useful, I maintain a list of tunneling projects/services here:
https://github.com/anderspitman/awesome-tunneling
Excellent article Jeff and very helpful in my situation. I just switched to fibre with my French ISP, SFR RED, to find that it was actually worse than before vis-à-vis functionality. I had never heard of CGNAT till now. Suddenly NAT and DYNDNS were no longer available! So I am implementing your approach with a local PI in my holiday home in Provence. There's one thing I don't quite yet understand and maybe you can point me in the right direction? I have several IOT gadgets that service HTML pages to control them. Will it be possible to forward these pages to my VPS so I can log into them according to this scheme? VPS>>>RASPBERRYPI>>>IOT THING. Any suggestions where to start or is it actually easy and staring me in the face?
I solved my own problem! It WAS staring me in the face as suspected. All you do is add another entry to the SSH_OPTIONS line of the /etc/default/autossh file but replace locahost with the local lan ip address of the IOT thing you're trying to access.
E.G. -R 7675:192.168.1.76:75 then restart autossh and it all works beautifully!
I have a question for Jeff or anyone else who may know the answer: one of my IOT things I can now contact using the above techniques has a webserver so you can log in and control it. This works brilliantly. But is there some way to check that the webserver is online or not by PINGING it with some sort of utility like CRYPING? Even if the IOT is offline it says that it's online because it only seems to check as far as the VPS and port, not actually test the IOT's webpage/server. Any ideas please?
But created a new one! Though the above works and enables me to log into my various IOT things on my remote LAN behind CGNAT those 'iot THINGS' have a login webpage asking for a password. I supposed the password is sent between the VPS and the Raspberry pi or IOT THING securely via SSH but not in the first part of the journey from my local computer to my VPS which is http not https. My VPS provider doesn't seem to understand the need for the VPS to be an https address with SSL. But anyone could intercept the password in the first half of its journey couldn't they? What to do apart from keep trying to convert the VPS to https?
Looks like I am talking to myself here but if what I am saying makes sense and is useful to others, so be it! I've realised that you can avoid the insecurity of logging into the webpage of a remote IOT thing by using SSH port forwarding. This way the first part of the "journey" from a local computer to the VPS can be secure even though you are connecting by the non-secure public internet to the VPS. This is achieved by SSH tunnelling. Anyone see any problems with this approach? It means that you don't need to make your VPS connection via SSL but can still send sensitive data such as passwords.
Took me a while to find sshd_config, not ssh_config. Then I also noticed that the default username has changed and this is specified in the service file.
The instruction worked for me, I was able to make the tunnel work for port 22 and connect to my raspberry pi using a AWS VPS. Even when I was behind an ISP NAT.
Excelent blog post.
Nevertheless, It would be awesome if you could point how to tunnel my python APP via HTML and have it available for the whole world at a subdomain in the VPS ip address.
This reverse tunneling is only possible for one host (raspberry-pi) on the VPS, am I right?
I have configured the VPS sucessfully for host#1 (This host can login to VPS with the ssh-key)
Then I have added a ssh-key for a host#2 to the VPS autorized_keys file.
login Result: Load key "/home/pi/.ssh/id_rsa": Permission denied
host#2 cannot login with ssh-key (see "sectionPrepare the Raspberry Pi" :ssh my-username@my-vps-hostname-or-ip)
If my assumption is correct, that the tunneling is only possible for one single host: how can I possibly delete the configuration for host#1 and add host#2 instead?
To delete the ssh-key for host#1 in the authorized-keys file is not enough.