articles

Happy #PiDay 2016 - Celebrating with the Raspberry Pi

I think today was my most Pi-full π day, ever! Let's see:

Early in the morning, I finished upgrading all the Ansible playbooks used by the Raspberry Pi Dramble so my cluster of five Raspberry Pis would run faster and better on the latest version of official Raspberry Pi OS, Raspbian Jessie.

Later, opensource.com published an article I wrote about using Raspberry Pis placed throughout my house to help my kids sleep better:

How to shoot a large event (photography gear / workflow)

Jeff Geerling shooting photos with Nikon at Steubenville Youth Conference
Shooting with a Nikon D7100 and 70-200mm f/2.8 VR (photo by Sid Hastings).

I love taking pictures. Specifically, I love taking pictures at meaningful events where people show a range of emotions, and enjoy interesting environments and situations. I've been honored to help at a few large events year after year, such as the Ordination Masses for the Archdiocese of St. Louis, or the Steubenville St. Louis Mid-America youth conference, and I thought I'd try to write an article detailing my workflow with tips and techniques for other photographers getting into solo event photography.

Everything over Cat5 Cable

Whether you call it Cat5, Cat-5, Cat5e, or even the newfangled Cat6, it remains the best cable in modern history. Never has the humble element Cu (copper) been so adaptable, flexible, and amazingly helpful in so many areas.

This article explains how you can utilize Category 5 cabling to route just about any kind of multimedia or network signal over short, medium or long distances, and many tidbits of extremely helpful information and links to products to help make your life much easier.

A few examples:

Build a Wood Standing Desk for your Cubicle

I've written previously about my simple $50 standing desk that can be installed on a wall. That standing desk worked great at my house, where I worked full-time as a remote employee for a few years. I started a new job for a local company in April 2013, working on-site, and was relegated to a cubicle with a decidedly un-adjustable sitting-height desk top. Even when using a Pomodoro-esque technique of standing and moving around every 20 minutes or so hasn't been much of a help.

Not to be kept sitting down by 'the man', I eschewed the provided office chair and adjustable-height keyboard tray, and built a small surface on which to work in a standing position, while still working in the cubicle to which I was assigned. Behold:

Standing Desk in cubicle at work

Old Mac of the Month - Macintosh IIci (on 512 Pixels)

This month, my old Mac story about a IIci was featured on on the excellent Apple-related blog 512 Pixels, by Stephen Hackett: Old Mac of the Month: Macintosh IIci.

My old Mac IIci

I briefly mention the IIci in my (not-yet-complete) Computing History article here on Life is a Prayer.com. I really liked the IIci, and it's probably one of my favorite Macs of all time, especially considering I probably owned and used it the longest!

Special thanks to my brother and dad, who not only helped me get into electronics and computing, but also helped me edit the article.

Tips for Using a MacBook (Air, Pro) in Clamshell Mode

On this page, I will compile all the knowledge, tips and tricks I have for using a MacBook, MacBook Pro, or MacBook Air as a desktop replacement, in clamshell mode.

I've used a variety of Mac laptops in the past few years (starting with a PowerBook 100, moving on to a 190, then a 1400, a 5300c, a G3 Wallstreet, an iBook G3, iBook G4, PowerBook G4, MacBook, MacBook Pro, MacBook Air, and back again to a MacBook Pro. With all of these laptops, I tended to use them most often at my desk. And what better way to sit at a desk on a computer than with a huge 20"+ display and a full keyboard and mouse?

Along the way, though, I've learned a lot about effectively using these Macs while their open next to the main monitor, and while they're closed—in 'clamshell' mode.

Convenience and Stands

One of the great advantages of having a laptop is being able to take it with you on a moment's notice for some mobile computing. However, many of the stands and I've used to help me get the most out of my laptop while at my desk made it very hard to grab the laptop and go.

How to Make Chai Tea Mix (for delicious Chai Tea Latte)

A recent project on which I spent many hours required the production of many gallons of Chai Tea Latté Mix; After enjoying a few cups of this extremely tasteful drink, I thought I'd post the recipe I used here, as well as a few notes for the mixing directions which will help point you in the right direction.

Chai Tea Mix Recipe - Ingredients
(You probably won't need quite this quantity of ingredients. Not pictured: the dry milk powder.)

The key to the mix is to make it really, really smooth. After you've finished mixing the chai in the food processor, you'll be rewarded with a very beautiful fragrance—you can almost breathe in the caffeine and sugar! One of the nicest things about homemade chai mix is that you can store it for quite some time, and it will still taste amazing.

DIY $10 iPhone 4 & 3G/3Gs Tripod Adapter/Case

Please read this article for background/more info: iPhone/iPad external microphones

[Update] Here are a few other commercially-available tripod mounts:

In earlier posts, I've written about my new highly-portable audio/video recording setup, using an iPhone 4 and an external microphone. Getting great sound is half the game, when it comes to video recording. The other half is a stable platform by which to record. (Yet another half—making more than a whole—is good content to be filmed... and great editing...).

iPhone 4 in DIY Tripod Case/Adapter

After watching this video on YouTube, I was inspired to make my own DIY tripod case/adapter for my iPhone 4. And, in lieu of making a video about it, I figured I'd just give a quick step-by-step of the build, along with a parts/price list, like I did for my DIY Blue/Greenscreen Backdrop.

External Microphones for iPhone 5s, 5, 4S, iPad and iPod Touch Audio input

iPhone 5 with Microphones and Input Adapters
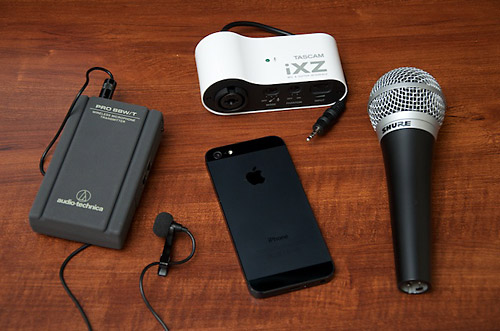
A few of the many microphone options to make your mobile recordings better.

Note on iPhone 5: Right now the only confirmed way to record stereo on the iPhone 5 is with the GuitarJack Model 2 and an Apple 30-pin to lightning adapter. All other headset-jack based solutions work as well as the iPhone 4/4S!

To dramatically increase the quality of the sound you record on your iOS device, you should use an external microphone or mixer, or a direct line input.

You can use external microphones/inputs with any of the following iOS devices:

  • iPad (audio recording), iPad 2/new iPad/iPad mini (audio or video recording)
  • iPhone 3G, iPhone 3Gs, iPhone 4, iPhone 4S, iPhone 5 (audio or video recording)
  • iPod Touch (3rd/4th/5th generation) (audio or video recording)

Skip to: Recommendations | Details

Video: iPhone External Mic Comparison

(See also: iPhone 4/4S External Microphone Comparison, listing of mics and adapters used in this video)


My Recommendations

Software - App Recommendations

  • iPad: Use GarageBand. It's not expensive, and is awesome for recording and editing.
  • iPhone/iPod Touch: Use FiRe, FourTrack, or even built-in Voice Memos.
  • Camera/iMovie (Built-in) - Quick and simple to use, can lock focus, but has very few settings/features. Handles different audio inputs, but without much configuration or level control, and no monitoring.
  • For Video: Although the built-in Camera app is pretty good, I prefer FiLMiC Pro, which allows focus, metering, and white balance lock/unlock, and has a built-in audio meter. No audio play-through yet (as far as I can tell).

Simple, one-mic setup (podcasts, one-person interviews)

Buy a RØDE smartLav, and plug it into your iPhone. If you need more than about 5' of cable (so you can record an interview with the iPhone's camera, for instance), buy a 2m TRRS extension cable as well.

Another option, which allows you to have a more flexible mic setup so your mic can be used with other equipment, is to buy a microphone and adapter to use together:

For better quality recordings

This setup will allow you to record a little nicer quality sound, especially since the VeriCorder cable or Tascam adapter boosts the signal a bit so it comes into the iPhone at the right level for more clarity and amplification:

For wireless mobility and great quality

Another option, for more freedom of movement, a perfect recording level, and much more flexibility with one mic (this is the kit I use most often now - plug the line/headphone output on the wireless receiver into the KVConnection line-level adapter):

For multiple-mic interviews/recordings

Buy a Dual 1/8" Microphone to iPhone adapter from KVConnection, and plug one Audio-Technica ATR-3350 into each jack. (If you use XLR mics, get this adapter instead).

Another couple of options include:

  • The GuitarJack Model 2, into which you can plug a stereo input source (or two microphones that go one in left, one in right channel).
  • You can get a Monster iSplitter and plug a lavaliere microphone into each side, then plug this into a KVConnection mic adapter. (See example video).
  • The Fostex AR-4i works great for the iPhone 4/4S (put one lavaliere microphone in on the left channel and one on the right), but doesn't work with the iPhone 5.
  • The Line 6 Mobile In, which also has a stereo input like the Guitar Jack.

For recording loud music, concerts, environmental sound

Right now, there aren't a lot of out-of-the-box options for recording sound in high SPL situations (loud rock concerts) or other environmental sounds. However, there are three solutions I recommend:

  1. The Tascam iM2 - a great stereo mic for the iPhone 4/4S/5 that provides a simple AB-pattern stereo microphone (that can handle up to 125 dB).
  2. The GuitarJack Model 2 (read my review of the GuitarJack Model 2) allows for padding and relatively high sound level input.
  3. A preamp or mixer in-line before the iPhone. This is more clumsy/less portable, but if you simply plug the output of a mixer or preamp into the iPhone (or a product like the AR-4i or GuitarJack), you can handle as loud of sound levels as your mixer/preamp can handle.

For line-level inputs (Guitars, Mixers, Sound Systems)

One option right now is the Apogee Jam, a nice interface for guitars and other 1/4" plug line-level inputs, that works through the Dock connector, and is specifically advertised for use with GarageBand on the iPad. Another simple option (if you want a little nicer build quality than the KVConnection adapters) is the iRig from Amplitube. Another inexpensive option is the iJAM cable from Ampridge.

KVConnection provides two nice adapters, though, which I use because they're cheap and reliable: Line-level 1/4" adapter w/ attenuation ($28), and Line-level 1/8" adapter w/ attenuation ($28)


The Details

I'll run through most of my kit for mobile recording, following along with the picture below:

Mobile iPhone 4 3G/3Gs video and audio external microphone podcasting kit

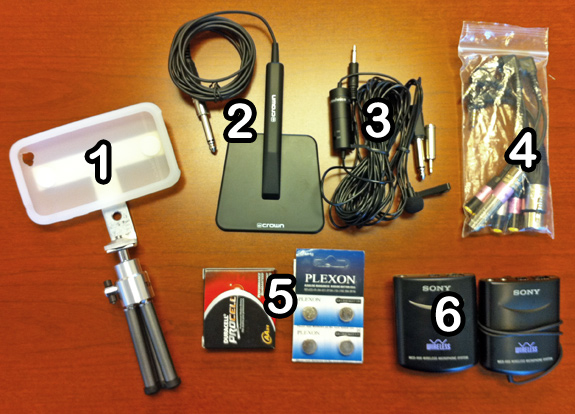
  1. iPhone 3G/3Gs/4 Tripod (instructions for building the tripod mount)
  2. Crown Sound Grabber II PZM Boundary microphone ($80)
  3. Audio-Technica ATR-3350 Powered Lavaliere Microphone ($20)
  4. KV Connection microphone-to-iPhone audio adapters (read more about them, and about available alternatives below)
  5. Spare batteries - you can never have too many
  6. Sony WCS-999 Wireless Microphone Adapter ($100 - Note: Throw out the included mic, and use the ATR-3350 with this. Only good for 10-50 ft., but nice and cheap, that's why I'm recommending it.)
  7. (NOT PICTURED: The following items have been added to my kit since I wrote this article)
    1. Rode VideoMic shotgun/condenser mic ($150)
    2. VeriCorder XLR Adapter Cable ($70)

One option for easy external audio in a pinch is to plug in your headset, hit record, and voila! You have a much better sound-isolating mic than the iPhone's built-in mic (especially over distance). The disadvantage here is that the iPhone's headset cable is pretty short.