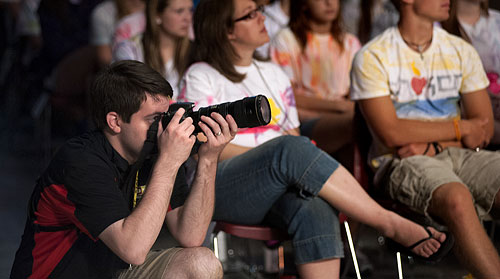
Shooting with a Nikon D7100 and 70-200mm f/2.8 VR (photo by Sid Hastings).
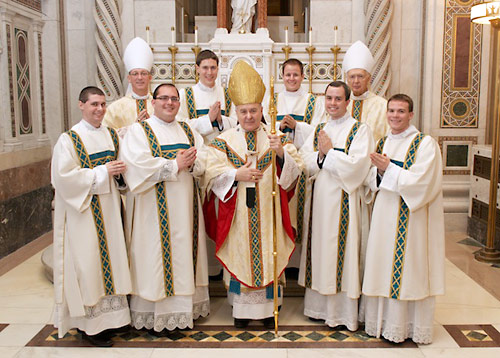
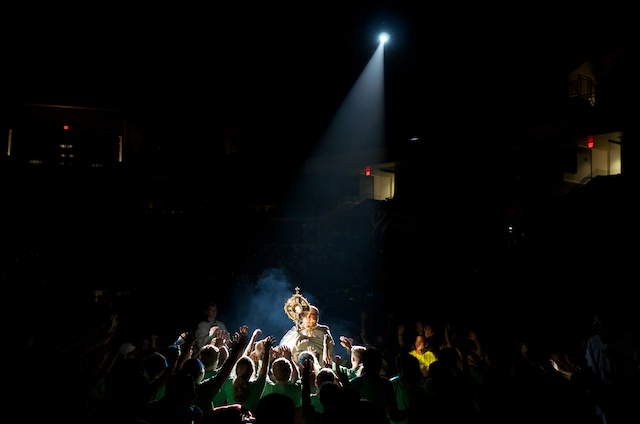
I love taking pictures. Specifically, I love taking pictures at meaningful events where people show a range of emotions, and enjoy interesting environments and situations. I've been honored to help at a few large events year after year, such as the Ordination Masses for the Archdiocese of St. Louis, or the Steubenville St. Louis Mid-America youth conference, and I thought I'd try to write an article detailing my workflow with tips and techniques for other photographers getting into solo event photography.
Reducing Stress — Being Prepared
One of the most important things you need to do before shooting a large event is to elminate the unknown. One of the most important things is to know your equipment. Nothing paints a photographer as an amateur more than the photographer becoming a distraction—standing in a glaringly obvious location for too long, wasting time chimping too many photos. If you know your camera, lenses, and other accessories, you can move to a location, get the shots you need, then move on, often with few people noticing you were ever there at all!
I often rent an extra camera body or two (usually from Borrow Lenses), and possibly a special lens or two, so I have two camera bodies with lenses that cover a large zoom range. Depending on the event, I'll rent something like a full-on professional D3, D4, or D5 (if I'm in a low-light environment) or a D7200 or D500 (if I need a faster camera for a lower cost) to supplement my current primary body, a D7000.
I also bring an assortment of lenses, but generally stick to a short zoom and a long zoom—usually my DX 17-55mm f/2.8 on a DX body and my 70-200mm f/2.8 VR on FX. Using these two lenses (or something similar) allows me to throw the background out of focus when needed, crop tight when I need it, and never really worry about light levels (with a D3/D4/D5, the camera works in anything but pitch-black lighting!).
If you're using a completely new body (e.g. you shoot a D610 but are renting a D5), make sure you get it a couple days before hand. Then take it around your house, get familiar with the controls, especially ISO, aperture, playback controls, etc. And if you're using a new lens, take a bunch of pictures at different zoom levels with different apertures; get a feel for 'sweet spots' and distances so you don't have to run back and forth like a fool at the event!
Check everything — Twice
I keep everything I need in one giant bag; it has both camera bodies (with body caps), 3-4 lenses, 2-4 batteries, 1-2 battery chargers, 1-2 flashes (+ batteries and charger), a remote, extra filters, a power strip, and a few other accessories.
Make sure your batteries are all charged to 100% the night before the event, then verify by putting the batteries in your cameras and making sure everything's good to go. After this, and before you stick things in your car, double-check everything once more. You don't want to be missing the one cap, filter, battery, or card reader you need at the event!
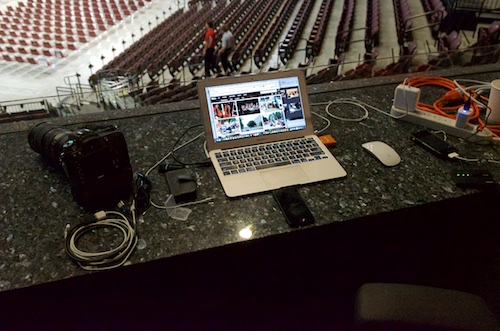
A Proper Staging / Editing Area

A decent staging area has room for gear, laptop, chargers, and a beverage or two.
Once you arrive at the event, especially if it's more than a few hours long, you should set up a staging area in a secure area (e.g. only you and event staff can get to it). Make sure it has a power socket, and ideally is near restrooms and a dining area (so you don't have to go far when you're dumping off some pictures or changing out lenses/gear).
I usually take a surface about 6' wide and claim it as the 'photographer' zone, and I plug in all my chargers, set up my laptop, then set all my gear out so I can grab it as-needed (e.g. lenses, flashes, extra SD cards, and remotes). If you can't find a good secure area, you might have to strap everything you need to your body, or worse, lug your entire bag around with you. Try to find a secure area—ask the event organizers before hand to make sure you have access to one!
Being Mobile — Minimalism Saves Your Back
For the Steubenville Conference, I would generally take 2-4,000 photos across 4 different locations within a 1 mile radius over 3 days. That's a lot of photos, and that's a lot of movement. If you only need one body and one lens to grab certain photos (e.g. you only need tight cropped shots of a speaker), then drop the 2nd body and just bring one body and a telephoto lens.
The key is to only have on you what you need. If you need something more, you should have time to run back to the staging area before you need it. Also, ditch the tripod and/or monopod unless it's absolutely necessary. I don't usually bring mine to events at all these days, since I would only use it for a few shots and it's not worth the hassle of an extra item to lug around.
Two speedlights and some creative placement with an umbrella create very pleasing, portable light.
If you're doing more formal shots (e.g. portraiture), and you need to set up special lighting, consider using speedlights and umbrellas with portable light stands (or HLSs) rather than more complicated lighting setups. You can get 'strobist' kits that weigh only a few pounds but still allow for lots of flexibility and portability, meaning you don't have to break your back to get stunning pictures.
When freestyling, having two bodies—one with a wide lens and one with a telephoto—allows me to quickly get an environmental shot if the moment calls for it.
When I'm freestyling (taking pictures on the move during more dynamic portions of the event), I generally have my primary body (the D7000, since I've memorized every button on the thing) attached to an across-the-shoulder sling strap (I currently use the OP/TECH Utility Strap - Sling), with the long zoom lens, and then my secondary body hanging around my neck with a standard Nikon strap. This lets me shoot long primarily, but when I need to do a wide or environmental shot, I slight the long lens against my hip and pull up the secondary body.
For any non-D3/D4/D5 body, I also have a battery grip attached, because shooting without one feels so awkward, and the extra grip for my pinkie leads to less hand fatigue after 8-12 hours holding the body.
Eye-Fi + Photo Editing Workflow
I used to take photos in RAW only. Every hour or so, I'd run over to my computer and dump off a bunch, pick a few to upload to a live photo blog of the event, swap in a new SD card, and repeat the cycle throughout the day. I've since switched to using an Eye-Fi and shooting in RAW + jpeg mode; this has helped keep my stress level way down.
Instead of hurriedly running to my computer/base station every hour or so, I could spend 2-4 minutes jogging through photos on the camera bodies throughout the day, pressing the 'Lock' button on any of my on-the-floor favorites. These selects were automatically uploaded straight to the event's Flickr photostream (for example), meaning I didn't have to do any extra work to post live photos. I still needed to dump off a few SD cards' worth of photos at the end of each day, but using this setup allowed me to batch the longer photo processing workflow whenever it was most convenient (e.g. around lunch, afternoon breaks, or in the late evening.
Importing and Processing in Aperture
Note: I still use Aperture... for now—since it's been discontinued, I'm torn on whether to try to suffer through Apple's 'Photos' app and growing pains since it doesn't support all the aspects of my workflow, or to relearn everything within Lightroom. We'll see. For now, I'm sticking with Aperture until it won't run anymore.
When I imported all the photos, I would take only the RAW files (the jpeg versions I chose were uploaded to Flickr already), and I would tag any photos that I had locked with 'Flickr' so I knew which ones were up and public already.
Use a fast 1, 2, 3 star rating system with three passes for a very efficient 1,000+ photo processing workflow.
Since I would be processing close to 1,000 photos per day, and I wanted to do things like eat and sleep, I had a very efficient workflow for the day-of:
- Import all the RAW originals into Aperture.
- Wait for all photos to be processed (so Aperture would be more responsive).
- Open up the first photo full screen, and press "1" on the keyboard if it was a keeper, then advance to the next photo with the right arrow key. I could get up to about 1/second in this first pass—I just looked at whether the photo was in focus, had anything interesting at all, and was exposed relatively well.
- After running through all the photos and giving 1 or 0 stars, I filtered the view to just the 1 star photos.
- Open up the first photo full screen, and press "2" on the keyboard if I thought the photo was decent, then advance to the next photo.
- After this pass, I did the same again, but with "3"—only for photos I personally liked (e.g. showed emotion, were technically brilliant, etc.).
After separating the wheat from the chaff, I deleted all the 'unranked' photos (those with no star rating)—this was usually half or more of the take—then I spent a little time tweaking exposures and colors on the 3 star photos.
If I had extra time, I would then do another pass for 5 star photos—photos that I would use in a personal sampler or have printed for myself, and then also export a few more photos for the Flickr photo stream. It helped that sometimes I'd have a volunteer assistant who would do the grunt work of tagging things in Flickr and posting to Facebook, Twitter, Instagram, etc. under the organization's name. It stinks when I have to do that on my own, especially since I'm not a direct brand representative!
Conclusion
I wanted to write down my formal process for event photography, but also mention that this process has evolved over the past decade, and will continue to do so in the future. As gear gets smarter, people expect even more imagery in real time. I don't know where we'll be in a few years, but I'm guessing things like 4K+ video streams, 3D/VR imagery and more will be extra things we can work to capture.