Perhaps you're tired of taking pictures with the DIY Greenscreen you just made, or you have had enough fun (for now) keying out backgrounds in Photoshop... but now you want something more. But you don't want to spend more than 2 minutes setting up for your next project. Well, how about a do-it-yourself mini macro studio that is made of materials you already have within arm's reach, and can set up in less than two minutes?
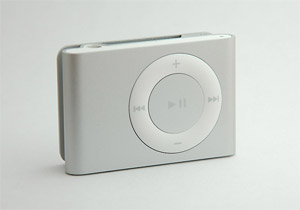
My iPod shuffle... |

...and a pack of bubble gum. |
Both of the above pictures were taken with the macro setup I made out of two pieces of printer paper and two pieces of scotch tape. That's it. That's all I needed. I've taken to liking the photographic philosophy I first learned at Strobist: whatever's simplest, cheapest, and quickest works, if it gets the job done.
In this article, I will outline how I made my mini macro setup, and how you could modify it (and light it) to make quick but beautiful pictures of small objects. If you're looking to make a or more durable macro setup, be sure to check out this tutorial on Strobist [hint: basically, use a cardboard box and bigger paper].
1 - The Materials
Keeping with the maxim, "cheap or free > expensive," I sought to take a quick picture of my iPod shuffle, just for fun, but I wanted to make it a pleasing picture, more matching the style and substance of the shuffle than my normal 'set it on the bed and see what you can do' pictures. So after reading about Strobist's macro studio, I thought, why not forget about the cardboard and stick with just the paper? Here's all you need:
- Two sheets of white printer paper. Thick or thin, textured or not; it doesn't really matter. As long as they're flat and white, you're good to go.
- Two pieces of tape. Scotch (clear) tape is best, but you can use any kind.
- A light (or two) or an off-camera flash. Anything that produces light is okay. Even a high-powered flashlight may work.
2 - The Setup
For visual learners, here's a picture (a step-by-step setup guide is below):
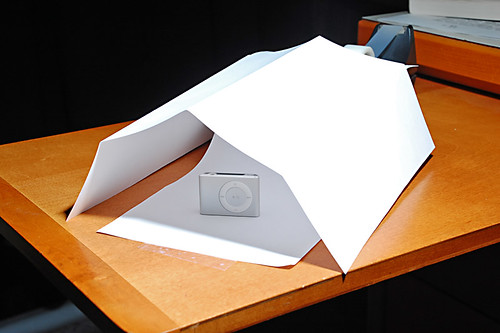
The setup: one sheet of paper (cut), placed on flat surface, raised at the back by being taped to a tape dispenser; another sheet of paper simply folded three times and placed over the top of the first paper. |
Here's a step-by-step procedure:
- Take one sheet of paper, and cut it (longways) narrower by a few inches (you need not be exact).
- Put a piece of tape at either end of the paper. Tape the front edge (closest to you/where your camera will be) to a flat surface (like a table), and tape the back edge to something laying around (like the tape roll in the top right of the above picture), and make sure the paper gradually bends upward (like in the below illustration).
- Now take your other piece of paper and bend it either longways or sideways in such a way as to create a 'tent' to place over the first sheet of paper (see the above picture). This paper will make your light 'soft,' thus making this setup give a nice light gradient that will make your pictures look nice.
- Now, place your object inside the tent, and light it. You'll want your light or lights (if you have two) mostly above the paper 'tent.' See the section below for tips on lighting.
Lighting the Mini Macro Studio
If you're like 99% of the picture-takers I know, you have a limited budget. And that budget applies to your lighting setup, as well. Luckily, if you have a tripod, you can use darn near any light source you can imagine, including flashlights, lamps, off-camera strobes, or even monolight strobes (if you're privileged to have one... but it isn't at all necessary). Here are some tips for lighting for the shot:
- Put your light (or lights) about a foot above, and to either side, of the light tent. Basically, you want the light to cover as much of the tent as possible, to provide for the softest light (because the paper you use will diffuse the light and make it softly 'wrap around' the object you're taking a picture of.
- Set your camera to 'M' mode (manual - if it has it) or 'S' mode (shutter-priority - if it doesn't have a manual mode) and, if you don't have an off-camera strobe (if you don't know what that is, you don't have one), you'll have to see how long of an exposure it takes to make a well-exposed (i.e. the lighting looks right) picture with whatever light source and paper thickness you have. If you're using a lamp, you'll probably have to set your camera to 1/10 of a second or longer, and you should manually set the aperture to a higher number (like f/10 or higher), and your ISO to the lowest setting (like ISO 50, 80, 100, or 200...). This will give you a sharp, noise-free, and beautiful picture (if your camera focuses correctly—otherwise set it to manual focus).
- If you're using an off-camera strobe or monolight (triggered by slaves, PC sync cords, or whatever else you have), check out Strobist for some great tips and tutorials for off-camera lighting. In fact, if you're a photographer who has any aspiration at getting better pictures, read through some of the stuff on Strobist. It's that good.
- Here's a picture of the lighting setup I used (a Vivitar 285 flash, attached to an old tripod (see how I did this) I had laying around via an umbrella light stand adapter, triggered by an ebay trigger; the flash was set to 1/16 power (that's all I needed) and aimed at the top right of the light tent).

More Tips for the Mini Macro Studio
- Experimentation is key to becoming a better photographer. Change anything you want: try larger paper, try different light setups, try different colored paper for the 'seamless' background, etc.
- Almost any camera (digital or film, cheap or expensive) can get the same quality picture as you see above with this setup. You just need to get the lighting down. Once you learn to control light, you can take beautiful pictures almost anywhere, with any kind of lighting equipment. To become a better photographer, play with the camera you have. Read it's manual. Don't go out and buy more expensive equipment unless you are truly limited by what you have now. Don't blame your camera for bad pictures (unless it's a really junky cheapo camera); that will lead to expensive equipment purchases that don't really help you.
- [UPDATE 4/23/07] The kind folks at DIYPhotography.net have taken my $0.02 macro studio idea and run with it. For a few cents more, you can make a larger studio for objects larger than a pack of gum by simply using different paper and folding it to make it more stable. Check it out!
- Here's another nice tutorial for a similar technique using only paper, but allowing for larger items.