If you need a better way to hold the light you use while taking pictures with the DIY Greenscreen you just made, or you need a better way to control where light goes for keying out backgrounds in Photoshop, read through this tutorial on how to make a quick and durable (and highly configurable) lightstand out of one of those old, sort-of broken cheap tripods you have sitting in your closet. Even if it's your main tripod, you should be able to modify it so you can swap it for a lightstand or standard tripod pretty easily.
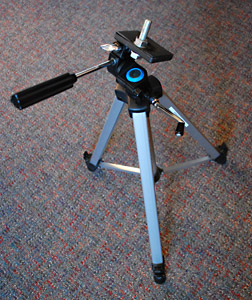
 Here's my old tripod, modified to mount monolights or other photographic lights (like an off-camera speedlight) via the bolt you can see at the top of the picture. |
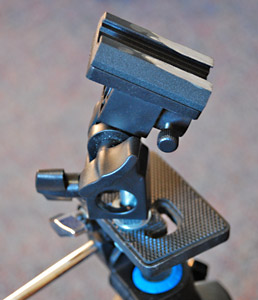
 Here's a closeup of my umbrella/hot shoe light stand adapter that I mounted on my modified tripod. You can get an umbrella/hot shoe adapter on eBay or any photographic supply store for less than $20. |
1 - The Materials
As in the case of my $0.02 macro studio (with which I use my tripod/light stand), I like being resourceful with my money. If I have something I can use for more than one purpose, I will do so. I have an old tripod (about 20 years old) that is a bit squeaky and doesn't pan or tilt well anymore. So I went to the hardware store to find some parts to modify the tripod into a makeshift (but sturdy) light stand. You'll need:
- An old (or new) tripod. Preferably one without a 'quick connect' camera mount - the top surface needs to be able to be drilled through.
- A 3/8" (or so) diameter bolt, with a washer an nut to fit on it (Get them at your local hardware store). You don't need to be exact here, but this will basically be the part your monoligh or umbrella stand adapter will fit onto. Total Cost: about $1.
- A powered drill and a bit with a diameter larger than the bolt you bought. If you're old school, you could use a hand-powered drill... but don't whine to me about how sore your hands will be!
2 - The Setup
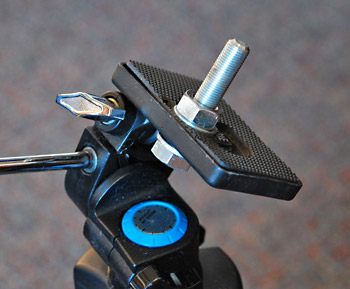
For visual learners, here's a picture of the tripod head with the bolt on it (a step-by-step setup guide is below):

Basically, take a drill bit that's a tad bit larger in diameter than the bolt you bought, drill a hole in the tripod's flat surface, then put the bolt through, with a washer on either side, and a nut to secure the bolt to the tripod head. |
Here's a step-by-step procedure:
- Go to the hardware store and get a bolt that's about 3/8" diameter, with two washers and a nut to put on the bolt.
- Take your tripod and pop the head off, or swivel the head in such a way that you can drill a hole through it without damaging anything or anyone else.
- If you can't get at the tripod head with your drill unless you remove the part that screws into your camera, you can usually remove that using a small socket wrench or needle-nosed pliers... Take that part off if you need to.
- Using a drill bit that's a tiny bit larger (in diameter) than your bolt, drill a hole through the flat top part of the tripod. A wood drill bit should work fin for plastic; if the tripod has metal, you'll have to get a metal-drilling drill bit.
- With a washer on it, stick your bolt through your newly-drilled hole, so the head of the bolt is on the underside of the tripod's mounting surface (see the illustration above).
- Put another washer on over the end of the bolt that's sticking up from your tripod, then secure everything with a nut.
- That's it! Now you can stick a monolight or an adapter for your hot shoe flash on the bolt, and use the tripod to direct where the thing is pointing and how high it is.
Notes About the Tripod Light Stand
-
If you need a light stand that's taller than, say, 5', don't use your old tripod; get a real light stand instead so you don't have safety issues (a cheap tripod can easily fall over if you put a large light on it, with an umbrella, then raise it to the maximum height, chances are you will break something.
- If you don't have an old tripod to do this to, it might be cheaper (and less stressful) to get a real light stand. You can get them in any height up to about 13', with air-cushioned supports, etc. for less than $50. This modification was practical for me because I have a new Bogen tripod (one that will actually last) and no use (other than as a light stand) for my old cheapo tripod.
- There are tons of creative ways you can mount your lights on various objects. This is only one of a million ways you can find cheap mounts for your strobes. I learned on Strobist how to use some $3 hardware clamps as 'clip light stands.'
- Don't put really heavy lights on a cheap, fragile tripod. Usually these tripods have a maximum weight of something like 3 pounds. Putting a 5 pound light with a two pound umbrella on it would be what I call a "bad idea."