This article will explain how I recently shot a youth concert at a small-to-mid-size theater, using principles learned from the Strobist website (if you are a photographer, and you haven't seen Strobist, check it out. Seriously.). Whenever you're shooting a concert, there are a plethora of problems that you'll have to overcome. I will show you what approaches I used to overcome diverse, and often poor, lighting, while maintaining the atmosphere at the concert.
(click to enlarge)
One of the most important aspects of setting the right atmosphere at any kind of concert is lighting. Lighting also happens to be the most important aspect of photography (in my humble opinion). Unfortunately, the lighting for an emotive atmosphere at a live performance and the lighting for an awesome picture rarely match up. Because the human eye is still very sensitive to dim lighting, and can still see color even in relatively poor lighting, stage lighting directors will often use very low light levels at certain points in a performance.
There are three ways for a photographer to work with this situation:
- Give up. It's an option, isn't it?
-
Buy insanely expensive low-light photography equipment so you can work with the light you've got.
(Example: Buy a D3x, 70-200mm f/2.8 VR lens, and start working out—that combo is heavy!). - Create your own lighting setup, to either complement or negate the stage lighting. (This is the method I chose).
Lighting a Theater
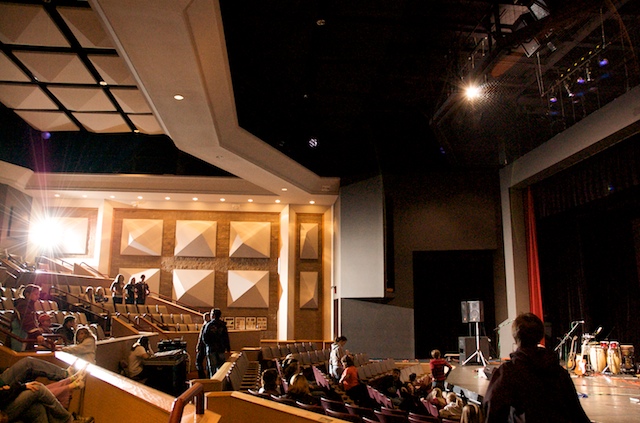
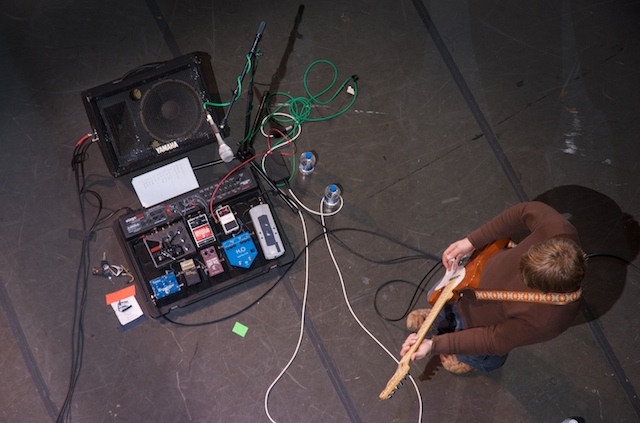
In the picture below, the two highlights show the primary locations of my strobes; one is in the back of the theater, on the highest balcony, perched atop a light stand. The other is simply sitting on the 'spider walk' netting above the stage, shooting straight down onto the stage. With these two lights, and control over the camera's aperture and shutter speed, you can already do a lot more than you could if you simply went with the ambient light. I triggered the lights using 'eBay remotes,' which simply use a radio frequency to tell the strobes to go off when I press the shutter button of my camera.
(click to enlarge)
I set both lights (Nikon SB-25 in the back, Nikon SB-24 above the stage) to full (1/1) power, because of the distance they had to cover to reach the band on the stage (and so I could use the lights even when the stage lights were full-on, to provide fill light). Since the light above the stage was simply meant to add a little character to the band as a 'rim' light, I put an orange warming gel on it, which made it a little less harsh.
Setting up the lights freed me to do many things that I otherwise could not have done with my equipment:
- If the stage was dark, I could use the lights to brighten up the band, while still controlling how much ambient light was in the picture (to do this, I just turned the shutter speed down. To add more ambient light, I would set the shutter to something like 1/30 instead of 1/60 or 1/80).
- If the stage was quite bright (especially during the band introductions—a very good time to get individual band members' pictures), I could still use the lights for fill. A lot of stage/concert lighting is harsh, and makes for washed out highlights and dark shadows. The speedlights fix that problem.
- If there were some crazy colors or lots of movement on stage, I could set the camera to a slow shutter speed but freeze the action by using the flashes. Putting the camera in 'rear curtain sync' mode is especially nice for this, because you'll have a picture with a blurred motion trail behind the band member who's moving around.
This lighting style can be used not only for concerts, but also for theatrical plays, orchestra performances, and pretty much any indoor event in a large venue. I had two other speedlights I could've used, but I left them at home for the day, because this gig was simply for fun/learning. Maybe next time I'll have another fill light on the opposite side, and a backlight behind the band... we'll see!
Some Examples
(click to enlarge)
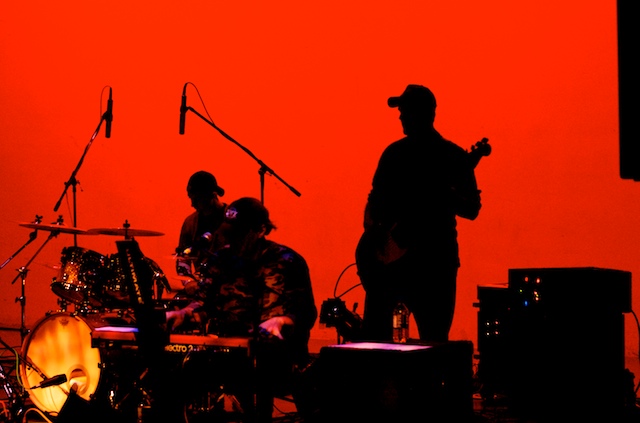
Ambient Light Only (above)
In this picture, I decided to use only the ambient light (I just took the wireless trigger off my camera). Sometimes the ambient light alone can make a pretty awesome picture—the key is to know when to use it, and when to lose it. I would recommend using ambient for more dramatic colors, like deep reds, blues and oranges. I could've used the flash to bring out the band, but I liked the silhouette effect here, so I left off the flash.
(click to enlarge)
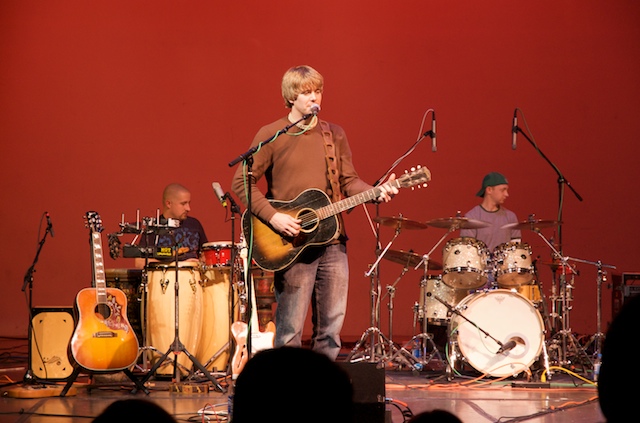
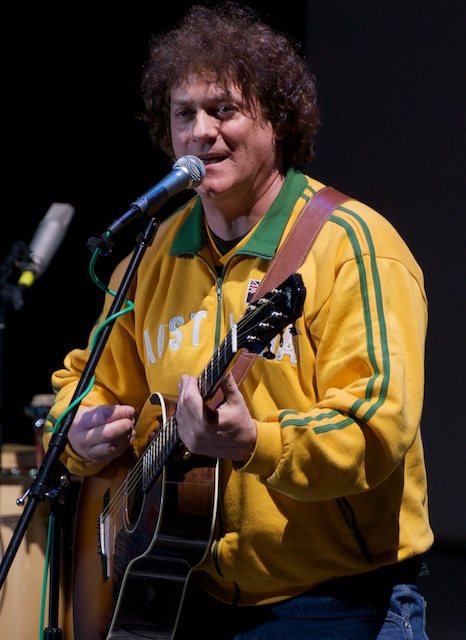
Ambient Light + Flash (above)
As in the previous picture, there was an abundance of bright red light in the background, but I wanted to get a more general shot of the band members, faces included, so I put the trigger back on my camera, and shot it with both overhead and left-rear strobes on full power. I also had the help of some bright tungsten stage lights in this picture. As long as you take control of the lighting situation, it's very easy to control the mood and impact of a picture.
(click to enlarge)
Using Flash for Fill (above)
Sometimes the stage lights (in this case, the direct, overhead lights) are quite bright. Since the stage lighting is not up to you, you'll have to work with what you have. In this case, since the overheads were overpowering my flashes, I set my camera to a higher aperture, exposing to use the overheads as the key light, with my flashes providing fill in the darker areas (you can see the fill from my flash on the singer's right side).
(click to enlarge)
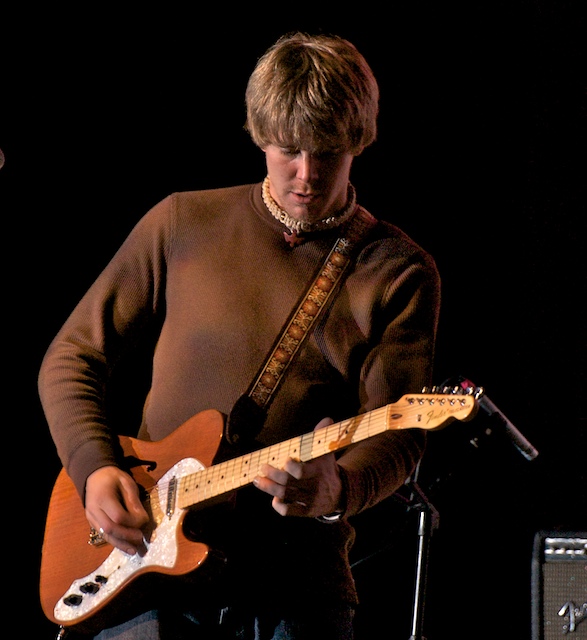
Getting Creative with the Light & Composition (above)
After I made sure to get nice pictures of all the band members, some members of the audience, and especially of the band as a whole, I decided to experiment a little, and try some new compositions and lighting setups. For this picture, I put my flash to my left, while laying flat on the spider walk (it's basically a large area over the stage where steel cables are meshed together so you can literally walk around in 'thin air' above the stage). You can see the harsh shadow cast to the right of the guitarist from my flash. There is also a lighter shadow coming from the back of the theater (the shadow that runs almost parallel to his guitar handle).
Always Be Prepared for the Unexpected (A Lesson Learned)
After about two hours of continuous shooting, two things happened that could've put a kink in my plans. One, I was expecting and planned for; the other, I was not expecting, and almost ruined my evening. I know from experience that taking over a hundred pictures in less than an hour with your flash on full power can cause some overheating issues with the flash, so in-between performances, I made sure to shut off the flashes, take the batteries out, and let them sit for a few minutes. That was all fine and dandy (the flashes were pretty darn hot, though!). However, another problem cropped up that caught me quite off-guard: the on-camera trigger stopped firing.
After playing around with it, I noticed that even when I pressed the trigger's button, the little red LED that normally lights up whenever it goes off was not lighting at all. It was then that I realized I hadn't brought any tools (I usually at least have a little pocketknife!). Kicking myself, I thought to ask the 'roadies' (the tech guys) if they had anything, and luckily one of them owned a nice leatherman (thanks, Adam!). I took apart the trigger, and noticed the battery had slipped out of its holder inside the trigger (that's what you get when you pay ~$20 for a device that competes with $200+ devices!). After putting the battery back in place (and getting my heartbeat back down to a mere 100 bpm), I started shooting again.
Also, I was glad to have arrived early, because when I was testing the triggers (I wanted to be able to have both flashes trigger from anywhere in the theater), I realized I'd have to get the antennae in better positions. For the strobe above the stage, I used some gaffers' tape to tape the plug onto the camera, and simply let the whole remote receiver dangle by its cable above the stage (it's black, thankfully, so nobody noticed it).
End Notes
Towards the end of the show, I was getting quite tired and sweaty (especially when I was above the stage, standing around those 500W stage lights!), and I think my strobes were in the same situation (minus the sweaty part). I was using the same set of AA batteries throughout the 3 hour event, and the batteries and flashes were getting quite hot. Two songs before the end of the concert, I decided to call it quits, pack up my gear, and start looking through the photos. Had my flashes not started overheating, I might've done more, such as using other gel colors to get some different color effects. But I'm okay with how things turned out. In the future, I hope to get some more stable triggers, and bring all four of my flashes, along with my whole gel kit.
Link to all the pictures taken at the concert [Facebook Album].