raspbian

Install Raspberry Pi OS's desktop environment over a Lite install

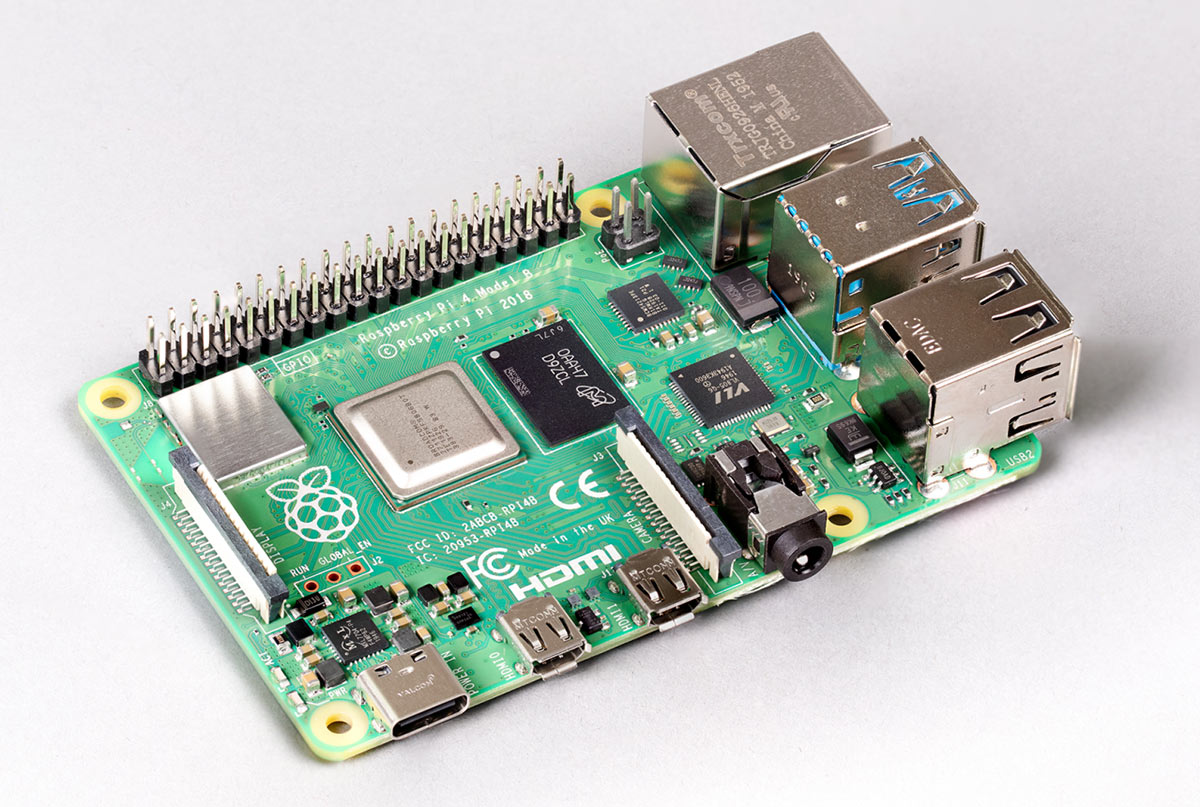
Almost every time I set up a Raspberry Pi these days, I use the 'Lite' version of Raspberry Pi OS. That version doesn't come with a GUI, it just boots to the console. It's much smaller in size and contains most things you'd need for a 'headless' Pi setup.

And if you know your way around the command line, it's not daunting to plug in a monitor, keyboard, and mouse, and explore via the shell if you need to.

But every so often, I've had a Lite install that I wanted to switch to GUI, but I'm too lazy to pull the Pi out of wherever it's installed, pull the microSD card, and re-flash it with the full OS, and then re-run my automation on it to set up whatever I had running before.

And that's why it's nice to be able to just install the GUI on top of an existing Lite install!

To do that (assuming you're running the latest Pi OS version, Bullseye as of this writing), just install Xorg and the Raspberry Pi 'PIXEL' environment:

Enabling TRIM on an external SSD on a Raspberry Pi

I've been doing a lot of benchmarking and testing with the Raspberry Pi 4 and SSDs connected via USB. I explored UASP Support, which USB SSDs are the fastest, and I'm now booting my Pis from USB SSDs.

Anyways, one thing that I have wondered about—and some people have asked me about—is TRIM support.

I'm working on a new video for my YouTube channel that will go into some more detail on which of the drives I tested support TRIM, but while I was researching for that video, I also found that TRIM support in Linux is not as simple as it seems at first glance—it's definitely not plug-and-play, in my experience.

While internal microSD cards seem to support TRIM out of the box, none of the external USB drives I tested supported it out of the box. They all needed a little help!

Raspberry Pi 4 goes 8GB, and Raspberry Pi OS goes 64-bit!

.embed-container { position: relative; padding-bottom: 56.25%; height: 0; overflow: hidden; max-width: 100%; } .embed-container iframe, .embed-container object, .embed-container embed { position: absolute; top: 0; left: 0; width: 100%; height: 100%; }

This morning the Raspberry Pi Foundation announced a new 8 GB version of the Raspberry Pi 4. They've been selling a 1, 2, and 4 GB version for the past year, and I've been using all three models in my projects.

8GB Raspberry Pi 4 - photo from Raspberry Pi Foundation website

More RAM is always better, because you can fit more applications on the same Pi, especially if you're using them in a Kubernetes cluster, like I am in my Turing Pi Cluster series!

Flashing a Raspberry Pi Compute Module on macOS with usbboot

I recently got to play around with a Turing Pi, which uses Raspberry Pi Compute Modules to build a cluster of up to 7 Raspberry Pi nodes.

Turing Pi Raspberry Pi 7 nodes of Compute Modules

Interested in learning more about building a Turing Pi cluster? Subscribe to my YouTube channel—I'm going to be posting a series on the Turing Pi and Rasbperry Pi clustering in the next few weeks!

You can buy Compute Modules with or without onboard eMMC memory. If you don't have memory, you can attach a microSD card and boot from it, just like you would on any Raspberry Pi model B or model A. But if you have the eMMC memory, it's nice to be able to 'flash' that memory with an OS, so the compute module uses the onboard storage and doesn't require a separate boot device (either microSD card or USB disk).

The best way to keep your cool running a Raspberry Pi 4

From home temperature monitoring to a Kubernetes cluster hosting a live Drupal website, I have a lot of experience running Raspberry Pis. I've used every model through the years, and am currently using a mix of A+, 2 model B, and 4 model B Pis.

Stack of Raspberry Pi model B and B+ 2 3 4

The 3 model B+ was the first generation that had me concerned more about cooling (the CPU gets hot!), and the Pi 4's slightly increased performance made that problem even more apparent, as most of my heavier projects resulted in CPU throttling. I've written about how the Raspberry Pi 4 needs a fan, and more recently how it might not.

Upgrade the Raspberry Pi 4's firmware / bootloader for better thermals

In October, the Raspberry Pi Foundation released an updated bootloader/firmware for the Raspberry Pi 4 which dramatically reduces power consumption and overall temperatures on the Pi 4 by setting the USB controller and CPU into a more power-friendly mode.

I wanted to post here the instructions for checking the current version, and upgrading, because I have a large number of Pis to upgrade over time, and I needed a quick reference. For more details, check out the Raspberry Pi Documentation page Raspberry Pi 4 boot EEPROM.

Checking if the current bootloader is up to date

Upgrade system packages and install the rpi-eeprom utility:

$ sudo apt update
$ sudo apt -y full-upgrade
$ sudo apt install -y rpi-eeprom

Check if an update is required:

$ sudo rpi-eeprom-update

If you see a difference in the output, you can restart to update to the newer version. If everything's the same, you're already on the latest version.

Raspberry Pi Zero W as a headless time-lapse camera

tl;dr: There are many ways to capture time-lapse videos. But this one is cheap, completely wireless, and mine. If you want to skip the post and go straight for the glory, grab a copy of my Time-lapse app for the Raspberry Pi.

Time-lapses transform subtle, slow processes into something beautiful, and often make us think about things in new ways. For example, have you ever thought about just how heavy a wet snow is? The trees in your yard might know a thing or two about that! Check out a time-lapse I recorded this morning some mighty oak tree branches, as they relaxed upward as if in relief from the wet snow falling off:

Setting a Static IP address with Raspbian Jessie Lite on the Raspberry Pi

In the midst of my work upgrading the Raspberry Pi Dramble to Raspbian Jessie Lite, I noticed one of the basic components of the architecture—static IP addresses for all the Raspberry Pis—was not working correctly anymore. My Ansible playbooks configured the /etc/network/interfaces file correctly, so it would define a static IP address for the eth0 interface (the built-in Ethernet port on the Pi):

auto lo

iface lo inet loopback

iface eth0 inet static
  address 10.0.1.60
  netmask 255.255.255.0
  gateway 10.0.1.1
  dns-nameservers 8.8.8.8 8.8.4.4

allow-hotplug wlan0
iface wlan0 inet manual
wpa-roam /etc/wpa_supplicant/wpa_supplicant.conf
iface default inet dhcp

In the past, with Raspbian Wheezy, everything worked fine, and the Pi would (after a reboot) use the static IP address 10.0.1.60.

How to Build Your Own Raspberry Pi Cluster ('Bramble')

Rasbperry Pi Dramble

One of the first questions I'm asked by those who see the Dramble is, "How do I build my own?" Since I've been asked the question many times, I put together a detailed parts list, and maintain it on the Dramble's project wiki on GitHub: Raspberry Pis and Accessories.

For a little over $400, you can have the exact same setup, with six Raspberry Pi 2s, a network switch, a rack inside which you can mount the Pis, microSD cards for storage, a 6-port USB power supply, and all the required cables and storage!

Raspberry Pi RGB LED boards

Mounting a Raspberry Pi's ext4 SD card on Ubuntu 14.04 inside VirtualBox on Mac OS X

Since I'm running a Mac, and don't have a spare linux-running machine that can mount ext4-formatted partitions (like those used by default for official Raspberry Pi distributions like Raspbian on SD cards), I don't have a simple way to mount the boot partition on my Mac to tweak files on the Pi; this is a necessity if, for example, you break some critical configuration and the Pi no longer boots cleanly.

To mount an ext4-formatted SD or microSD card on a Mac, the easiest option is to use VirtualBox (and, in my case, Vagrant with one of Midwestern Mac's Ubuntu boxes). Boot a new linux VM (any kind will do, as long as it's modern enough to support ext4), shut it down, go into Settings for the VM inside VirtualBox and enable USB, then reboot.

Follow these steps once the VM is booted, to mount the flash drive: