The Raspberry Pi 4 needs a fan, here's why and how you can add one

December 2020 Update: Lo and behold, the Pi Foundation tacitly acknowledges the Pi needs a fan in the official case, because now they sell the Case Fan!

The Raspberry Pi Foundation's Pi 4 announcement blog post touted the Pi 4 as providing "PC-like level of performance for most users". The Foundation even offers a Raspberry Pi 4 Desktop Kit.

The desktop kit includes the official Raspberry Pi 4 case, which is an enclosed plastic box with nothing in the way of ventilation.

I have been using Pis for various projects since their introduction in 2012, and for many models, including the tiny Pi Zero and various A+ revisions, you didn't even need a fan or heatsink to avoid CPU throttling. And thermal images or point measurements using an IR thermometer usually showed the SoC putting out the most heat. As long as there was at least a little space for natural convection (that is, with no fan), you could do almost anything with a Pi and not have to worry about heat.

The Pi 4 is a different beast, though. Not only does the CPU get appreciably hot even under normal load, there are a number of other parts of the board that heat up to the point they are uncomfortable to touch.

Here's a thermal image taken with my Seek thermal imager highlighting the parts of the board generating the most heat after 5 minutes at idle:

Raspberry Pi 4 Thermal IR image Seek

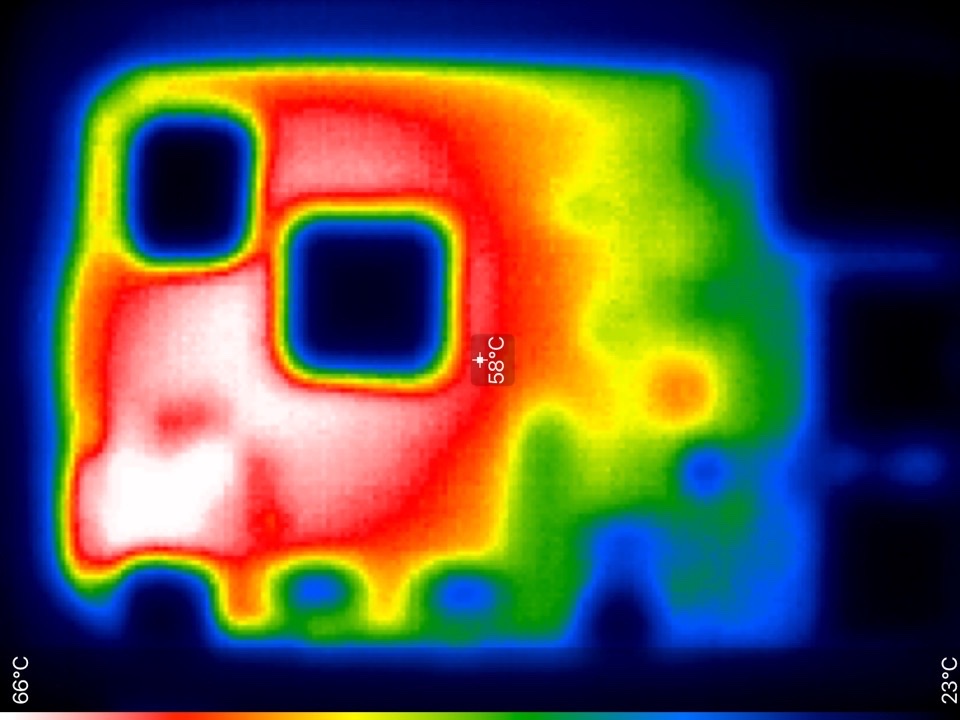
The CPU/System-on-a-Chip (SoC) was around 60°C as well, but the metal casing helps spread that heat around the perimeter pretty well, and in the IR image, the heat radiating off the top of the CPU is somewhat masked by the reflective metal surface. You might notice, however, the bright white areas on the lower left. That's all the power circuitry coming off the USB-C power input. That area of the board is almost always putting out a pretty large chunk of heat, and the components in this area don't put off heat as well as the metal-bodied CPU.

Finally, this image was taken at idle, but if you have any activity on the USB ports, the USB controller chip on the right (that small red spot before you get to the far right of the image) lights up bright white and gets to be 60-70°C as well. A firmware update for the Pi 4 may help keep that chip a little cooler, but it will still get hot under load.

So imagine if you're truly using the Pi 4 as a desktop replacement, with at least one external USB 3.0 hard drive attached, WiFi connected and transferring large amounts of data, a USB keyboard and mouse, a few browser windows open (the average website these days might as well be an AAA video game with how resource-intense it is), a text editor, and a music player. This amount of load is enough to cause the CPU to throttle in less than 10 minutes, in my testing.

Why is throttling bad? Two reasons: First, throttling prevents you from getting the full CPU speed the Pi can offer, meaning things that you're doing will take longer. Second, it indicates that parts inside the Pi (usually just CPU, but likely other parts) are getting hot enough to reach their own internal safety limits. If you run computing hardware at its thermal capacity for long periods of time, this will cause more wear on the parts than if they are run well inside their limits.

If you're just doing extremely light browsing, reading Wikipedia and the like, it might not hit the point where it throttles. But watching videos, scrolling through more complex sites, and switching applications frequently gets the CPU up to 80°C pretty fast, especially if it's closed up inside a plastic box with no ventilation.

For my more formal testing, I started running stress --cpu 4 to make the CPU do lots of work, continuously. After a couple minutes, using vcgencmd measure_temp and vcgencmd get_throttled, I was able to see the CPU start throttling as it hit 80°C (176°F):
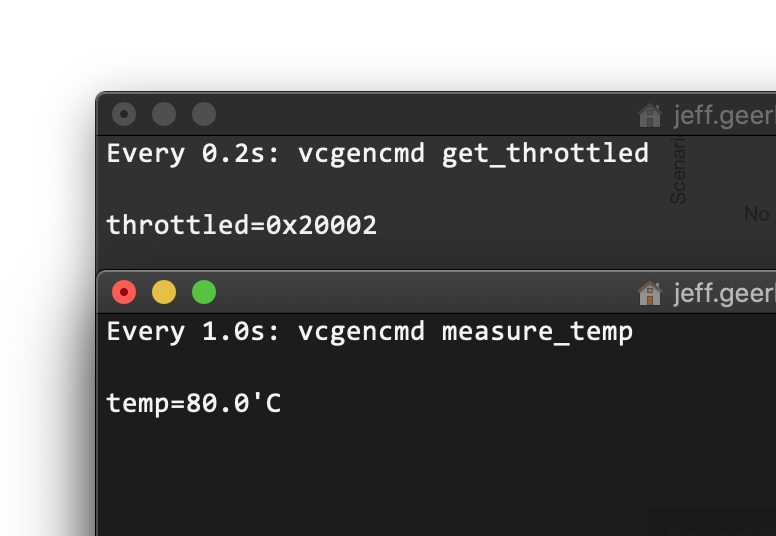
Raspberry Pi 4 throttling CPU at 80 degrees celsius measured using vcgencmd

To install stress, run sudo apt-get install -y stress. You can monitor the current temperature in a terminal window by running the command watch -n 1 vcgencmd measure_temp. When the CPU throttles, the command vcgencmd get_throttled outputs 0x20002 (the first 2 indicates the Pi has throttled at some point between the prior boot and now; the last 2 indicates the Pi is currently throttling the CPU frequency.

Modding the official Pi case to have a fan

tl;dr: Watch the video (skip to 9:15 for the most exciting part, or read through the instructions below):

Without any ventilation, it's kind of a little plastic oven inside the Pi 4 case. A heat sink might help in some tiny way, but that heat has nowhere to go! So I decided to follow the lead of Redditor u/CarbyCarberson and put a fan in the top cover.

Pi Fan outside Raspberry Pi 4 case unplugged

  1. I purchased a Pi-Fan (came in a 2-pack) from Amazon, since it fits nicely above the board and comes with the proper screws for mounting. It plugs directly into the Pi's GPIO pins and needs no modifications.
  2. The easiest way to make a hole for the fan is to use a 1 1/8" hole saw, drilling slowly.
  3. Put the hole saw on your drill, and either use the lower speed setting, or hold the trigger gently, and apply light pressure drilling while holding the Pi case steady.
    • If you spin the hole saw too fast, you'll either lose control and scratch up your Pi case, or burn the plastic and make it look pretty ugly.
  4. Drill directly over the center of the top of the case (make sure the Pi is not inside!), in the middle of the area opposite the Pi logo (this way the fan won't be hitting the network or USB jacks).
  5. Use a file and/or sandpaper (up to 600 grit for a really nice finish) to smooth out the cut after you drill through.
  6. Place the fan on top of the hole, lining it up as closely as you can, then use a mechanical pencil or some other method to mark where the screw holes are around the fan's perimeter.
  7. Use a 7/64" drill bit to drill out the fan screw holes you just marked.
  8. Use sandpaper to knock down the burrs from those screw holes on the inside.
  9. Place the fan under the top of the case, label sticking up (so you can see it through the top of the Pi case), and use the screws and nuts to secure the fan to the case.

When you're putting the Pi back into the case, put it in as normal, then connect the red wire from the pan to the Pi's pin 4 (5V), and the black wire to the Pi's pin 6 (ground). (Reference: GPIO pinout diagram.) Next time you plug in the Pi, the fan should start spinning right away. If it doesn't, either something is physically blocking the fan blades from turning, you have the fan plugged into the wrong GPIO pins, or your fan's a dud!

Raspberry Pi 4 official case with fan

If you don't have a drill and/or don't want to purchase a 1 1/8" hole saw, you can also use a Dremel tool, though it takes a lot more care to drill through plastic without burning it or wrecking the rest of the top cover! Use a slow speed, and drill out a hole slightly less than the final size using a Dremel drill bit. Then use a round sanding bit to slowly cut back the last 1/8" or so of plastic to reach the fan's outline. Then use the Dremel drill bit again to drill out the screw holes. Not as simple as using a real drill, but it can work.

Temperatures after installing a fan

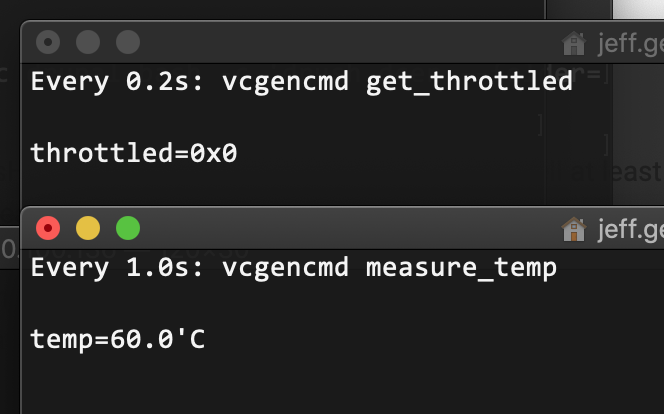
After installing the fan, I booted the Pi and ran stress --cpu 4 and let it go for an hour. The entire time, the CPU's temperature stayed at or under 60°C (140°F), a full 20°C lower than the throttling point:

Raspberry Pi 4 with stable CPU temperature at 60 degrees celsius

I have also been running a Kubernetes cluster with four Raspberry Pi 4's (see more: Rasbperry Pi Dramble), and with the built-in fans on the official PoE HAT, those Pi's processors do not throttle either, even when I'm running a suite of tests which stresses the entire system for an hour or more. The area around the Pis gets fairly warm (since the fans are moving that heat out), but that's a good thing—the heat can dissipate into the surrounding air instead of forming a bubble around the board itself!

The Pi-Fan that I am using produces 50 dB of sound at a distance of one foot (30 cm), so it's not silent, but it's actually a bit quieter than the little fans on the PoE HAT, which also have a higher pitched 'whine' to them that I found more distracting. When it's running, the fan also draws 80 mA of power, continuously, so if you're counting milliamps when supplying power to the Pi (e.g. when running off solar or battery), keep that in mind!

The Pi 4 needs a fan

A heatsink installed inside the Pi 4's official case will do precious little to avoid throttling the CPU (and likely other components, as they all get very hot). A case like the 'Flirc' heatsink-as-a-case might help a little, though it still only offers passive heat dissipation. The Pi 3 B+ was the first model I used a fan with for intensive computing (e.g. running a Kubernetes cluster), but it could be used for light computing fanless. The Pi 4 pretty much demands a fan, and I'm amazed that the Pi 4 case doesn't even include holes for better natural heat convection.

Here's to hoping the official Pi 4 B+ case includes some active ventilation, if we're going to keep increasing the speed and energy consumption of not only the SoC but all other Pi subsystems. Until then, I'll be modding my cases to include fans, or using something like the PoE board, with built-in ventilation, to keep my Pis cool.

There are some other options which may be even easier than modifying the official case, like the Fan Shim from Pimoroni or purchasing a 3rd party case with a fan built in. But this option was easy enough and all I needed to complete the project was a $4 fan and a $7 hole saw drill bit (which I can use for other projects in the future).

Comments

I can confirm this too. I tried a passive heatsink and it did very little to stabilise the temperature under load.

Bought a fan shim from pimoroni to helo - it has open source control software so you can set the temperature threshold yourself. When the CPU is cool it switches off to save power.

https://github.com/pimoroni/fanshim-python

Just avoid the Raspberry Pi 4 is the worst raspberry ever, with very bad engineering design at any point of view that make almost unstable for any serious usage.

Not sure I'd agree with that. The USB-C power circuit was definitely a miss, and I'm on the fence about going to micro HDMI ports... but almost every other detail is a much-requested feature that was implemented well and works well in my testing.

I'll be posting a more detailed review of the Pi 4 soon, but early preview: it's a huge improvement over all the previous generation Pis in almost every way, especially for memory, I/O performance, and networking.

I disagree. I have deployed 3 RPi4’s without issues or incident. For heavy desktop apps a fan will be advisable, but for headless utilities, it runs well below 80 degrees science. For pihole, print server, airplay, backup nas and other network services, it is pretty much perfect. Real gigabit ethernet and usb3 are a godsend... in light of that, i would not even mind a heatsink and or a fan.

I cannot agree with that -- there is indeed a problem with the USB-C charging circuitry - not an issue with the official Charger.

But does need cooling and that is no real problem. RP4 performs well and so far no problems have occurred.

I fail to see your reasoning...but there again you did not give any.

Fortunately, new firmware fixes this heat issue so this post may turn into a suggestion more than a requirement. Good post tho.

Why not air on the cpu? Because of the closed case? I'm interested to know the temps with a fan blowing on a heatsink and an open case.

Well it looks like they have made Hats and smallness totally useless. Yeah, great...Pi4's are faster and have more memory....but with that comes more heat. No problem you say.. just add a fan. But what about my LCD or Hat that conveniently sat on top and plugged directly into the GPIO pins? No problem you say... just run the necessary wires or ribbon cable to the accessory. But now it is bigger...See what I am saying ? Besides the USBC problem the heat problem and the necessity of adding a fan can only give hurt the appeal of getting one. Sure not everyone uses Hats but that was the original appeal of the Pi. Now if the GPIO pins came out the back side of the board.....

They're not stopping production of the other Raspberry Pi's. If you like hats, continue to use the old Pi's. This Pi4 is for new applications where higher performance is needed.

Also not true that the idea of hat modules was the original appeal of the Pi. The Pi had many features, one of which is the hat. It would be dumb to not evolve the platform simply to retain that single feature.

There's nothing preventing you from desoldering the GPIO pins and putting them on the underside. I've done this many a times when dealing with arduino's and robotics projects and seeing the RPI4 sitting next to me, I can't see anything that will stop you from doing that. You'll have to definitely mod your case anyhow to get cooling either way.

It is indeed producing so much heat. I have RP4 just running pi-hole and even with the heat sink on the CPU, covering the thing (with the official case) would shoot up its internal temp well up to the 80s. I ended up running the thing uncovered.

If you're careful you can use hot glue or epoxy to attach the fan. It will look nicer than the screws.

True; I'm someone who uses physical fasteners whenever possible though, just because no matter how strong the glue is, I never trust it as much as a nice metal screw into something solid!

It's a matter of choosing the proper adhesive for the job. Plastic-to-Plastic seems to be best with JB Plastic Welder. For most everything else, slow-set 2-part epoxy seems best (for strength). For quick 'hold it in place' applications, I'm sticking with DAP Rapid Fuse.

@ Dan - Since the case is closed and there is no other fan pulling the warm air out of there, this single fan has that job. It's how you ventilate a space; by pulling air out of it.

That said, I suspect there are plenty of not-so-clever individuals who would mount this fan the wrong way around, so that it instead pushes air into the case...

(ps. Jeff, something seems defunct about your attempt at making a comment antispam system - for some reason my first reply "had a problem" and was rejected, and I was instructed to wait 420 seconds before I could try again, and the second time the problem persisted and the retry timer went up to 442420 seconds. Good job!)

Haha, oops! Sometimes the spam prevention is a little snippy. Be careful or next time it will be something like 10,000 years!

Negative pressure in a case... that's usually not a goal, dust and moisture are two main reasons why a positive pressure is usually maintained in an enclosure.

Clearly this works, but where does the air go? Just thrashed around by the fan or are there exit holes somewhere?

In this case, I have the fan pulling air out and blowing it directly up out of the case. Air is sucked in through the little gaps around all the ports. It's not optimal (I could put in more vents underneath to create even better airflow around the board) but it does the job of removing the waste heat.

The CPU looks "cool" because it is not emissive to IR radiation. Instead it reflects, and conducts heat, but does not radiate it. In order to accurately measure the temperature of a surface using the radiant flux you need to know it's emissivity, or efficiency at heat radiation. Put a piece of 3M electrical tape that you have cut, not torn, from the roll and you'll see how much heat the CPU is producing. Shiny metal has an emissivity of 0.1, 3M electrical tape (regardless of the color) has an emissivity closer to 0.95. http://thermal-imaging-blog.com/index.php/2010/09/01/emissivity-underst…

We used to suggest heat sinks in the pi 3 when overclocking as well.
And using thermal imaging to see if any other parts of the motherboard heat up as well.
It's easy to use some thermal tape to those areas, and mount a larger heat sink on the entire lower left part of the board that gets so hot.

I use the 13x13x13mm heatsink from adafruit and I didn't exceed 75C while running a53burn for 10 minutes. I need to use a header extender when I plug in a hat, but I would rather do that than have a fan.
I also added a wake/reset button on the board that connects to GLOBAL_EN and GND. I leave it plugged in all the time and didn't need a dtoverlay.

I bought a 4 pack of 50 x 25 x 5mm heatsink on amazon and got a similar result, ~75C after 10 minutes, from a53 burn. Added benefit of unobstructed access to all the pins because its short

Look up how to properly use the thermal cam. From the pictures it's clear that it wasn't used properly (hint: emissivity).

I wonder if the thermographic imaging was done correctly. You should spray paint it black and then take the thermal image again.

You can use chalk spray, too. No matter which color. Goal is to achieve equal emissivity. Note that the angle can affect measurement, too (regarding edges of components).

I’m going to wait until there’s a full heatsink integrated with a fan for the pi 4. With the pi 3 b+ the heat never goes more 35 C with integrated heat sink fan.

Thanks. Great write up. I can't believe the pi team didn't test this....Just unbelievable. I added a fan to one of the pi3's that was overclocked but it's more challenging to add a fan when you have add-ons like the hifiberry....etc that use up the gpio pins.

It would probably function OK with just a nice large heat spreader and some ventilation holes. That is not to say that a fan doesn't likely so the job better.

Typo: "Flirc" not "Flir"?
Have one of those awesome cases on preorder.
Really hope the heatsink makes contact with the ram, usb, ethernet chips as well as the Soc.

I just got something very similar. Right now the Pi 4 is running at 52C, I've got about eight tabs open in Chromium and I'm typing this. I'm debating getting one with fans, but I don't want the noise and I'm not sure I'm going to push the Pi 4 hard enough to make it an issue.

I'm actually finding the Pi 4 to be too much and too little. My multi-room audio system doesn't need the extra power and I bought a QNAP almost a year ago, so my major use case is not an issue for me any more. I am not terribly happy that cooling issues make HATs less convenient.

I don't hate the Pi 4, I'm just trying to figure out what to use it for.

FYI, the big passive heatsink seems to work well. I haven't run a torture test on the Pi 4, but running videos and doing general computer work has not gotten me to observe a temperature at or above 55C. It's pretty much stayed in the low 50's, dipping into the 40's at idle. I'd say that it's a good bet if you aren't really seriously taxing it.

I run Minecraft server on an RPi 4 / 4 GB. The temp for 3-4 players is around 70-75°C, on idle server <65°C. Yesterday I accompanied a friend of mine to get some components and ended up buying a small fan (30x30x10 mm, 5VDC, 190mA). I hooked it up to the 5V/ground pins in the GPIO. Noisy (9000 rpm, 23 dBA) but I figured I can live with it, at least now I'd remember to shut it down for the night. Well, a few minutes into the game the RPi just froze, didn't respond to anything. PSU off/on, it booted up nicely, tried it again and after a few minutes it crashed again. I removed the fan, tried again and this time it worked nicely for the rest of the evening. I think I'm adding some circut around the fan next time (https://www.raspberrypi.org/forums/viewtopic.php?t=216884).

Ok, so I got the components and a breadboard, hooked them up to my RPi4 and the fan, and wrote an awk script to control the fan to keep the temp around 50°C. I haven't had a crash yet. The lesson I learned was that don't hook up the fan directly to the board.

Are you still using Raspbian Stretch on your Kubernetes Raspberry pi 4 nodes?

I can't seem to find the Kubernetes software for buster as of yet.

Please advise

I did my own informal thermal testing using VCN into the Raspberry Pi , and running You Tube videos, and installing OpenCV.
In open air, without heatsinks, RPi4 ran around 60C, and is 5 C cooler than my RPI3B with heatsinks. Adding heatsinks to the RPi4 dropped it another 5C (10C total) compared to the RPi3B. Part of the experiment included a 12V 250mA fan blowing on RPi4, it sat at 33C, and after heavy use, only heated up to 34C. Clearly this fan is overkill.
The RPi3B sitting in a purchased "wallet sized" transparent plastic box got hot, showing the red thermometer on the desktop. I have to remove the cover to let air in for it to run. I would think a metal box would be much better than plastic as it would exchange convection heat with free air.
It is a given that putting an RPi in a small "wallet size" enclosure with limited vent slots is going to cause the CPU to get to 80C. Adding heatsinks to the RPi4 (or any heat producing device) will provide more thermal mass, but without cooler air to exchange with, the heatsink will just help heat the enclosure and find thermal equilibrium to the CPU temperature to the enclosure inside temperature.
Sticking ANY electronics in a small, sealed box, is going to get hot eventually. The ratio of radiated thermal watt loss to net enclosure volume that makes the temperature go up, and a small box will get you there the quickest.
So...….none of my Raspberry Pis are in a traditional purchased enclosure. My enclosure box is a 2 inch by 3 inch sheet of plastic for the top and one for the bottom. There are 1/2 inch standoffs between the RPI4 bottom and the plastic bottom. There are ~ 1 inch or so standoffs from the RPI4 to the top cover. There are no sides. Vent holes, slots, and even a fan can be added to the plastic sheet top.
This solution is not as pretty as a purchased case, but it protects the Pi while energized, and has plenty of access to free air, and RPi4 is a happy happy machine.

When taking thermal pics, it's important to paint the PCB with a flat black spray paint. This will create the most accurate temperature information due to emissivity differences of different colors. It does, however, use up a PCB for the test.

Not sure I agree that the Raspberry PI 4 requires a fan. I just picked one up this past week and the Flirc case made for the 4. I first updated the firmware and Raspbian.
10 minutes of stress testing cpuburn-a53 the max temp I saw was 69C. Yeah maybe if I let it run endlessly it might eventually hit the throttling point.. I think there is a good chance that the Pi4 with the right case will work for the majority of users with no fan without throttling ever. My guess is if you have an app using the Pi4 that makes it hit the throttling point consistently even with decent passive cooling (like the Flirc case) you probably want a system with a CPU with more processing power than a pi4 that can still be passively cooled.
https://core-electronics.com.au/tutorials/stress-testing-your-raspberry…

Hi. Cool work!

Do you know if you can control the on/off of the fan with this two pins (pin 2 and 4). With this construction, the fan will be always on. Is there a way to turn it on only when the temperature gets too high?

Thanks! The mod worked great. No more thermometer popping up on the screen when I'm trying to watch a video... or update packages... or pretty much anything else.

Thanks for the instructions. Was wanting to do something for my new RPI4, and this did the trick.

However, the fan at 5v is pretty loud. I plugged the fan into the 3.3v, and the system still gets cooling and I can stand to be in the same room with it.

Really nice work/article! Adding a fan to my RP4 has worked very well. When it comes to controlling the fan speed based on temperature, allow me to point to https://github.com/ziggymax/pi-fan. This a small "fan speed server" with a very small system footprint. It does nothing that all the Python based solutions doesn't do, apart from using fewer system resources and plugging directly into systemd.

Hello! The article is very interesting. Thanks you. In your screenshot I saw a dark theme with red, yellow and green buttons. What is this design theme?

Great write up!!! I did the fan install, while not a pretty as yours, it works. I have a PI4 w/ 4G and the kit I ordered came with heat sinks. I put those on using thermal grease I already had laying around.

I noticed the air was very restricted and could barely feel the air coming off the fan. I already had my 7/64" bit loaded up so I added four (4) 7/64" holes to the sides of the case. I added one opposite the indicator light in front of the wireless chip and three (3) along the GPIO pins. The air was still very restricted but I ran stress for about an hour and the temperature floated between 47 and 49 degrees. I opened up the holes up to 5/32" and the air flow off the fan is more noticeable. I have been running stress and it is steadily bouncing between 46/47 degrees.

I am not trying to be critical here but to carry the ventilation considerations a step further..... Even with adding the fan as you did, you called out that the intake of air has to be increased to match that of the fan. I looked and was having a hard time trying to find the duct diameter for 8 CFM. However, what little air you are getting around the cracks, is no where near enough to match what the fan is trying to push out. This makes the fan work harder and ultimately burns up the fan. I have seen other cases and they are just adding a fan to the top. They are not taking air flow into consideration. The key is to get fresh/cooler air to flow across the chips/heat sinks and pushed out by the fan.

Again, great write up and video and thanks for posting!!!

Good point; and I'm reminded of the same issue being prevalent in many different areas. For example, most people have clothes dryers which blow air through the dryer (after it's heated) out of the house. If you don't have enough intake air in your laundry room to keep a balance, the dryer is extremely inefficient, and will take a lot longer to dry your clothes.

It's similar but the reverse heating situation for computers. You have to have an equal area open for intake as for exhaust. The best illustration of this is a computer like the Mac Pro (any model in recent memory)—they are all basically giant ventilation tubes, with fans at one or both ends (intake and exhaust). If you had openings only on one side, the thing would melt down!

Well i found your post really interesting. I go straight to the point. I just have a pi2 and pi3. I use it only as a small web server with php and sql and wordpress. I don't connect any monitor as well as i don't use keyboard,mouse or whathever. It is just connected to the lan with ethernet and i manage it with terminal from my mac. No video,no music,no gui (it does not start because i don't need it). So my question is: considering it's not a "big" website, considering even the basic kit give you the heatsink do i really need a fan?
It's not a matter of money, obviously, but just because it is running 24/7 and if not strictly necessary i don't to ear a spinning fan all day long. Let me know what do yu think about, thanks. Pietro.

i'd REALLY like to see a closeup pic of the fan wire connected to the pins. If i have it backwards will it fry?

hi, I need to mount raspberry with lcd 7 inches plus fan together, is there a box or a solution for that?
With fan shim, can I use a standard box/case and mount also lcd with fan, together? thank you :)

This calculator ought to not be made use of in circumstances where the warm resource is much smaller sized than the base of the heat sink. The concentration of the warm resource over an area a lot smaller than the warm sink base is not taken into consideration in this calculator.
Custom Skive Fin Heat Sinks

Don't bother getting cooling for this. Stick it to a pierce of cardboard and mount it vertically. Mine runs at 2.2GHz and doesn't throttle, YMMV.

Hi Jeff. I love your youtube channel. I recently purchased a Pi-4. I also got a third party acrylic case for it. The case came with a small 5 volt fan. It has two pins (two cables). I connected them properly and they work. However, i also wanted to use the Pi settings fan adjustment thingy. You know, you can set a temperature for the fan to start working. I put in the pin number that pi gets energy from (pin 2). The other wire is ground. But the fan is "constantly" on. It never stops. Even when the pi is cool. Actually, i shut the pi down, and the fan still works unless i plug the whole thing off. What am i doing wrong here? Thx.

ok i'll answer my own question. It turns out, two pins are not enough to modulate the the fan speed/on-off status etc. Pi organization came up with their own fan recently and it has three pins. The third pin goes to one of the gpio pins and this is what the Raspberry pi OS fan setting is for. And i think this setting only works with the original raspberry pi fan. Third party fans with three or more pins would probably operate with third party scripts. A two pin fan will always run, nonstop.

First time I've seen this article, looks good apart from missing a vital diode to prevent the possibility of a Back EMF pulse causing component damage.

I would suggest using either a 1n4148 or 1n5187 across the fan Diode cathode ( the end with the stripe ) to the + of the fan, and the Anode to the - of the fan.

There is a case for using a MOV for this purpose, but maybe not worth going into for this

Ref : https://en.wikipedia.org/wiki/Faraday%27s_law_of_induction

This fly-back diode should be used when switching any inductive load ( iron bar through coil of wire induces current )

Hi, I'm planning on running a Pi 4 B bare board + heatsink as a Christmas lights controller in a 15 litre sealed weatherproof box. Is this likely to cause a problem or should I attempt to vent the box? I am in Sydney Australia so the ambient temperature can sometimes be 30 deg C outside at night, unlike the northern hemisphere where it's freezing at night around Christmas.