I've been a Mac user for years, and I've repaired hundreds of different Macs, from the early II series to the latest 2015 and 2016 model MacBook Pros, iMacs (and other Apple hardware to boot!), and there is almost never a hardware situation where I've thrown in the towel and told someone to ditch their Mac.
The 2011 MacBook Pro has, for almost a decade, been the exception to that rule. There was a major flaw in the AMD Radeon GPUs included with that model year's logic board which seemed to cause GPU failure either due to overheating, internal chip problems, BGA solder joints getting broken, or a combination of the above. The problem was so rampant, Apple was forced to set up a free repair program for affected MacBook Pros—though the 2011 model has since been dropped from that program. I've handled three 2011 MacBook Pros (none of them my own—I had an Air back then), and all three of them were scrapped because of the GPU issue.
My sister just turned over her 2011 15" MacBook Pro, which she said was running slow, and I dug in. First off, it was using a slow 5200 RPM hard disk; after replacing that with a nice, fast SSD, and ensuring she had 8 GB of RAM in the laptop, I was pretty pleased with my work, and was about to shut down the laptop and send it on its way. But then, I noticed the display would 'glitch'. Horizontal banding, some weird color issues... things I had seen before.

Replacing the slow hard drive with an SSD makes this thing feel brand new!
Beginning of the Debugging Journey
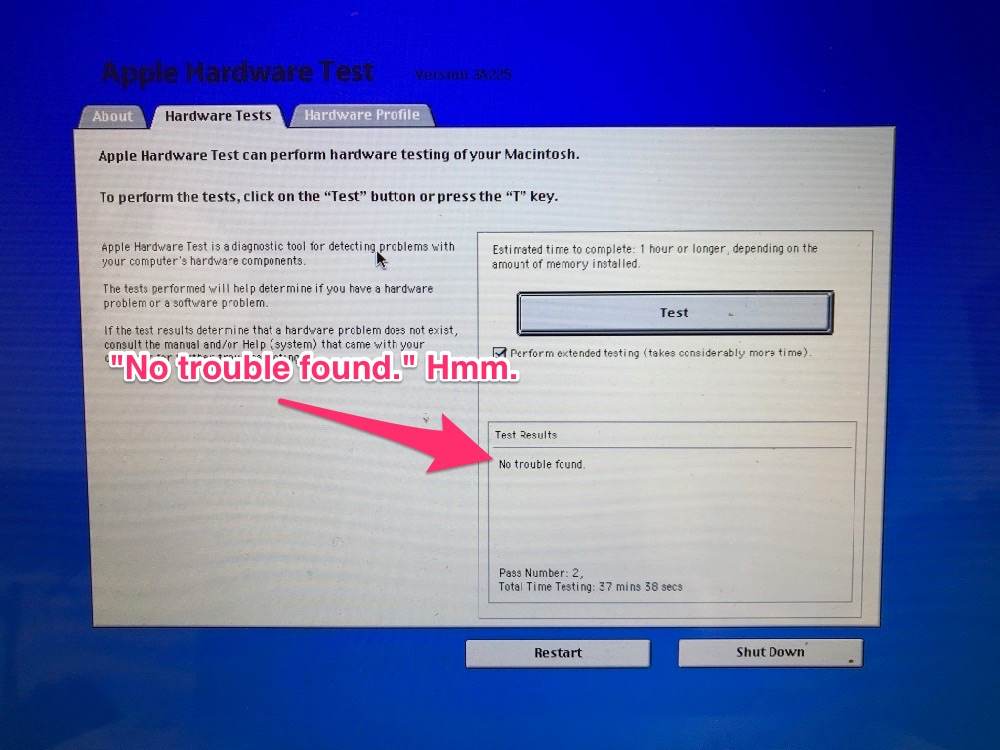
Fearing the worst, I rebooted into the Apple Hardware Test mode (right after startup sound, hold 'D' key). I ran the quick test, which found no errors. So I ran the full (super long) test... no errors again. Huh—usually the GPU issue would present itself during the AHT, but not this time.
So I rebooted. Apple logo, then progress bar, then grey screen. Ten minutes later, still a grey screen—and the fans are spinning madly. Not good.
So then I tried:
- Safe mode (hold down Shift from startup sound through to login or desktop)—same thing, stuck on grey screen after Apple logo + progress bar.
- Recovery mode (hold down Command + R from startup sound to Apple logo)—same thing, again.
- Internet Recovery mode (hold down Option + Command + R from startup sound to Apple logo)—same thing, again.
Getting nervous, I then tried single-user mode (hold down Command + S from startup sound until you see the matrix text going past as the Mac boots into its FreeBSD underpinnings)—and was happy to find at least this worked fine. I did an fsck -y to check the hard disk. A few records were off, but they were repaired successfully. I didn't see anything obviously wrong, but knowing from past experience that problems usually surface only when the GPU/Radeon .kext files (Kernel Extensions) are loaded... I was assuming the worst.
I was going to pop out the SSD and RAM, and suggest my sister sell the laptop for scrap... but then I thought twice—I would look if there was any possible way to resurrect this thing.
Obviously everything else was working fine—Internet Recovery proved wifi/networking was okay. Single user mode proved disk, RAM, CPU, and even integrated graphics were okay. The only thing that seemed wrong was the Radeon GPU. Surely there's a way to bypass it!
Lucky for me, I found this answer on Stack Exchange: GPU problem - Boot Hangs on Grey Screen.
Attempting to drop the Radeon .kexts
That answer had a fairly comprehensive guide to—using software changes only—disable the Radeon GPU and get the Mac happy again.
After running through the guide twice, I eventually got the Mac to boot... to a grey screen again. But this time it would reboot itself within a minute or so, so that was different! Alas, after hacking around a bit more with System Integrity Protection disabled, the reboot cycle eventually became quite short indeed:
(This got old, fast.)
Hitting dead ends when attempting the software fix, I was about ready to throw in the towel... but then I scrolled further in that Stack Exchange answer, and noticed a link to this interesting article: MacBook 2011 Radeon GPU Disable - Real Radeongate Solution.
Being somewhat handy with a soldering iron (but having never done SMD work—basically, soldering little bits and bobs that are the size of a speck of dust!), I thought I'd give it a go. Better than telling my sister to junk the laptop!
Hardware hack to cut off the GPU entirely
I'm not going to rehash the entire article from RealMacMods (after all, they found the process, and they also offer it as a service for $85 for anyone not willing or able to do it himself!), but I did want to highlight a few parts where I think it's important to further illustrate what needs to happen.
The first part of the process involves prepping the software side of the Mac by doing the following:
- Build a USB boot drive with Arch Linux.
- Boot the MacBook Pro from said USB drive (hold option key at startup to choose it).
- Follow the directions to get in the right Arch Linux boot mode so you get to the console.
- Hack your EFI by adding a file telling your Mac to disable the Radeon GPU.
- Reboot into Safe Boot mode (Shift key all the way through startup).
- Shut down using the Apple Menu > Shut Down option.
Again, see the source article from RealMacMods for the gory details (they even offer a $10 download to package up the fix for you—well worth it if you're not used to a command line!).
Once that's done, it's time to get your hands dirty, by permanently modifying the MacBook Pro's logic board!
First, to prepare the patient for surgery:
- Unplug the Mac, put it on a nice, non-scratching, non-static surface, and flip it over. (I use a cutting mat on my workbench... which is an old desk).
- Unscrew the 10 tiny phillips screws on the bottom.
- Pull off the back cover (should come off quite easily unless it's dented somewhere), and place it aside.
At this point, you're going to want to make sure you have the tools to make this operation not-impossible—you need to desolder / remove a tiny resistor ('R8911') from the logic board, and you need a few tools to do that:
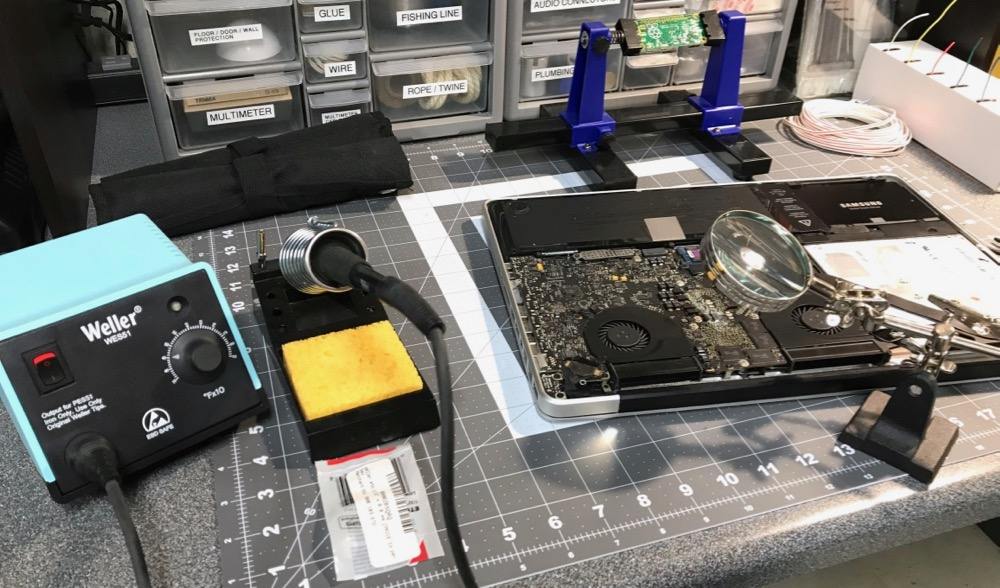
Pictured: Weller soldering station, helping hand with magnifying glass, and a precision tip for the soldering iron.
You can use a handheld magnifying glass... but if you're like me, you're going to need both hands to steady the soldering iron when desoldering the tiny, tiny resistor from the logic board. How tiny? Take a look through the magnifying glass:
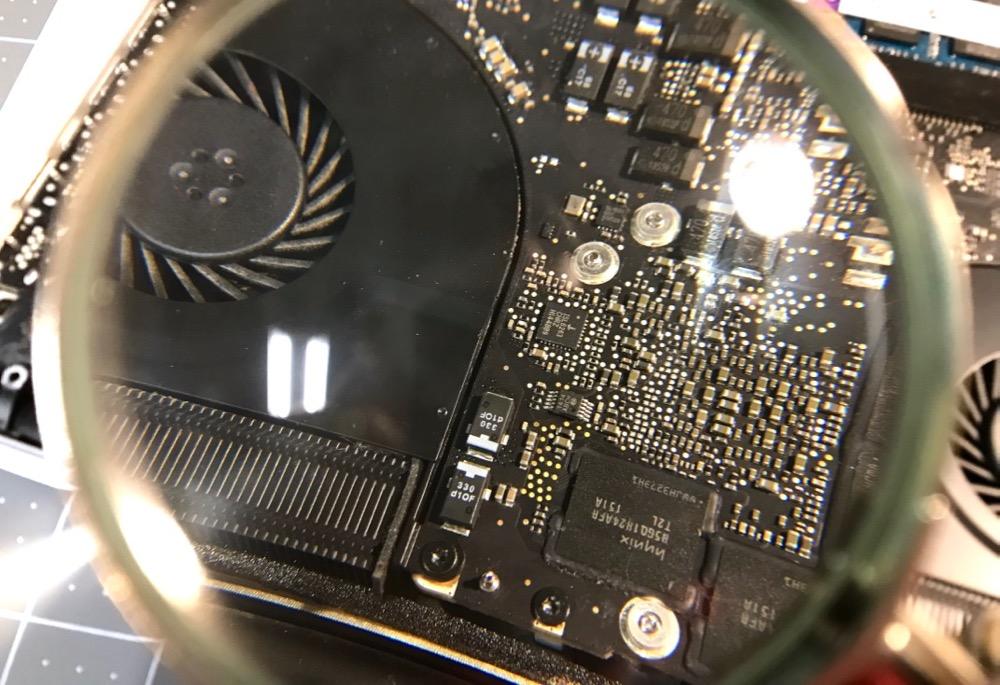
Still don't see it? Let's zoom and enhance:
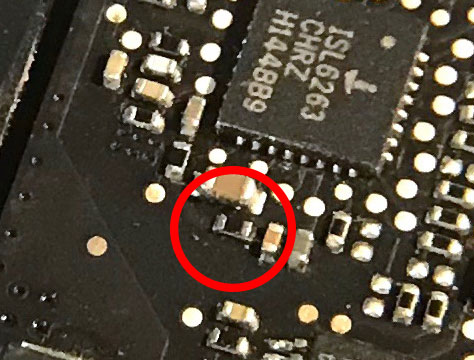
And a wider shot, for perspective:
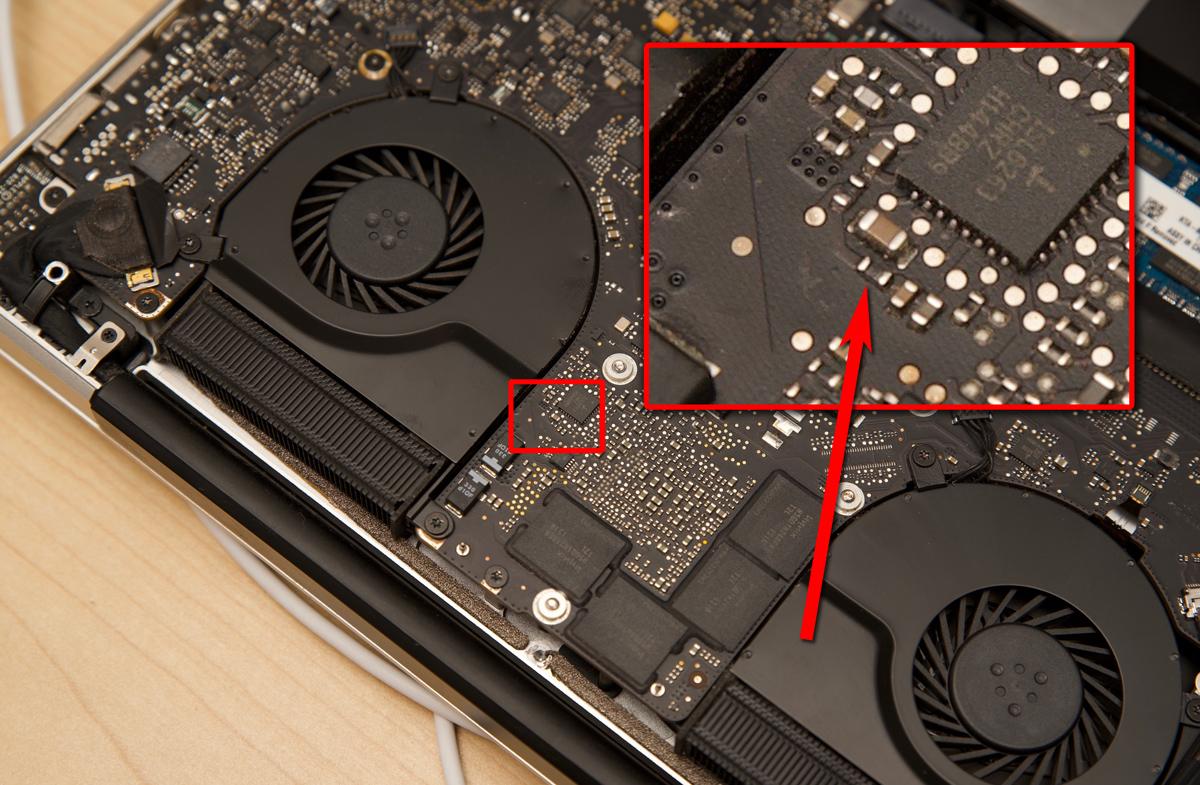
So, with the resistor identified, it's time to turn on the iron (I set mine to 500°F and tinned the tip with a tiny bit of lead-free solder) and get to work! I hold the iron in my left hand, and provide a little resistive force to steady it with my right hand. Touch the tip of the iron to each metal side of the resistor (where the joints are), alternating one side to the other for about 1-2 seconds each, until you notice the resistor starts to become free from the logic board. Once that happens (after about 15 seconds in my case), put the tip against the side of the resistor facing the open space on the logic board, and push, with a very slight upward (away from the logic board) force.
You might need to keep heating the resistor a bit before it pops free. And if you're like me, you might shoot the little resistor a few inches across the logic board! Just be sure to do the following after it comes off:
- Make sure there's not a solder joint between the two pads where the resistor used to be. If there are, heat the pads with the iron tip until you can 'wick away' the solder a little. Just enough to not join the two pads together.
- Set down the iron / put it in it's holder, and get the resistor off the logic board. Hopefully you can just lift the bottom-cover-less laptop, turn it over, and you see a tiny black speck fall to you work surface.
After you get the resistor off. Take a second and marvel at it's minute size. And realize there are thousands of these things soldered to the logic board!
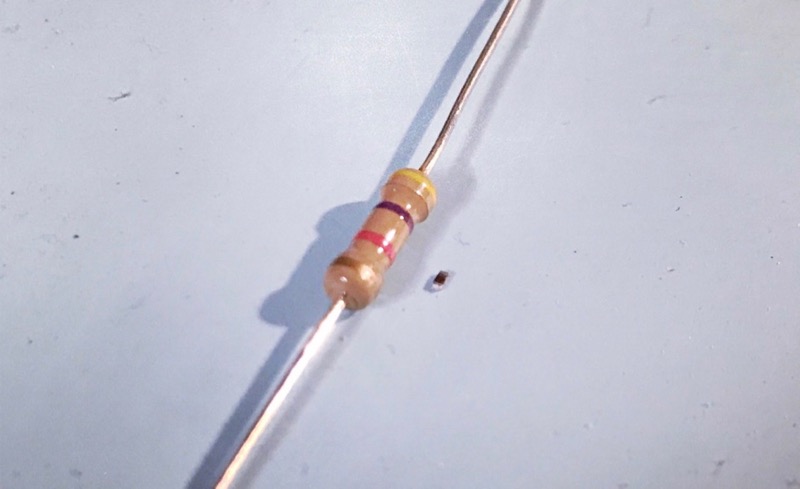
Those are specks of dust in the image—except for the very-slightly-larger black spec next to the standard through-hole resistor. The resistor is small enough I can't pick it up with my fingers—or even a standard needle-nose pliers!
With the resistor gone, one step remains: replace the bottom cover, plug it in, and turn it on!
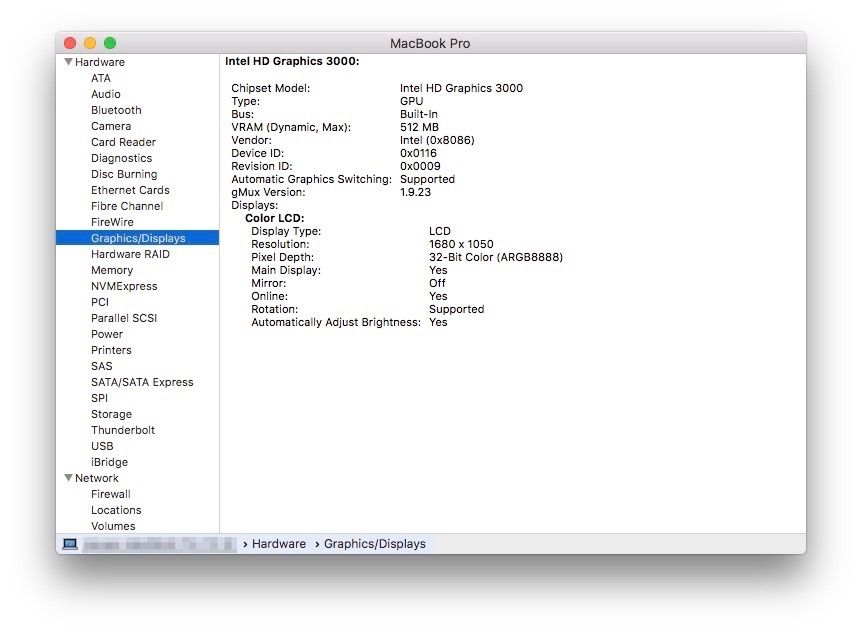
I did so, and less than 40 seconds later (the SSD makes the boot process fast!), the Mac was as good as it's ever been, sans AMD Radeon GPU:
One last thread that was worth a read-through for more background and debugging information was from the RealMacMods forum, After GPU repair issues (R8911 removal). After removing the resistor, be very careful when upgrading the OS or making other major changes (be sure to keep current backups!). And, as suggested by RMM, try to avoid resetting the NVRAM, just in case that makes things go a bit south.
Comments
Great Read! - fixed two 2011 MBP's that I got oon E-bay this way. THANKS. I also checked out as you said Real Mac Mods.
Does this mod have an impact on Thunderbolt I/O or use of MiniDisplayPort adapters for additional monitor?
I didn't test either, but I would assume the external monitor will work okay, but you won't have the same performance as before the operation, since only the onboard chip (which can't support two high res displays at the same time as well as the Radeon) is crunching graphics.
The hack disables the external display as the external display through the thunderbolt is actually powered by the dedicated AMD chip which is now failed. So it will not work.
i spoke with adam at real mac mods who said you dont need a hard drive inside the mac to do this procedure.
he also said if if there is no hard drive the safe boot procedure is not required.
Just wondering, what if I remove the resistor and do a clean installation of the OS, would it still needs the EFI mode? Because technically the OS should see the laptop as having only the Intel GPU only.
Anytime that you would update or do a clean install it will overwrite the efi chip and the efi hack would need to be performed again.
Thank you very much for this! Very helpful.
Thank you very much for this... I'm not talented enough to do this procedure myself, but someone savvy generously accepted to try it for me... And it's amazing! I've decided to change my HDD for a SSD... and It's like having a bran new CPU. It's been almost a week since the hack and everything works perfectly. Only thing : my external monitor (minidisplay) stopped working. Do you know if anyone had the same issue? Is their a fix (or is it the price to pay to kill the Radeon beast?) Best!
I think external monitors should still work after this hack, but it could be that the resolution is too high for the integrated graphics to drive the external display, or maybe for some reason the Mac is not recognizing the external display at all due to some signaling issue.
Do you have the ability to try connecting through a different interface? E.g. if the monitor has DVI and VGA, and DVI is not working, try the VGA connection instead.
From what I know, the external displays physically relies on the AMD, so I would not expect it to work after this hack. Anyway, it's way better to have a working Macbook (with pretty decent performances given its age) without external display than a very expensive flat grey desk lamp turning on and off.
Hi,
I'm in Australia. I don't have the ability to do this type of work but found someone in Melbourne (about 5.5 hours drive from me) who does this.
They warned me that the external display port would no longer work and asked me if I still wanted to go ahead with the repair. Naturally, with the choice of a dead MacBook Pro or a working one but minus a working external display port, I chose to go ahead.
After they completed the work, they told me that the brightness control also doesn't work as it also relies on the same chip. There are a few utilities to get around that, so I can live with that. Finally, they told me that I can use an Apple TV to project my display to a TV. They said that Apple TV 1 won't work. I can't remember what they said about Apple TV 2, but from 3 onwards will work.
But I don't remember what steps I have to take to get it working. I bought an Apple TV 3 specifically for this purpose, but I'm yet to get it projecting. Not much help, am I? Sorry.
Hey, Andrew! I’m in Melbourne and have encountered this issue. Would you mind sharing the name of the person who was able to complete the repair for you? Many thanks!
Hi Andrew K, could you please tell me who in Melbourne does it? My MacBook needs some help! Cheers
Hi Jeff and thanks for that article !
I did the same thing to my machine (early 2011 15") but noticed that the thermal sensor from de dGPU was still reporting temperatures from 35 to 45 degree (using iStatmenu), have you got the same thing ?
As I understanded the mod was to cut power to the chip powering the dGPU so… that seems od to me
Thank you for finding and posting this fantastic article from realmacmods.com !!! I just saved my early 2011 MacBook Pro!
I did this mod and now my screen wont turn on help!
I got the same.... black screen when switch on... can see Keyboard have light on but Screen nothing, even cannot hear any startup sound!
Anyone experience the same and how do you solve it?
I have similar issues. MBP 15" works fine using internal GPU after software mods. Resistor removal - black screen and no hdmi but MBP still works fine I can share desktop and work on it from another mac.
I wander if the firmware update is needed? I got MBP8,2 BootRom MBP81.0047.B32 SMC 1.69F4
What is yours?
No solution so far.
I see there are updates MBP81.0047.2AB and SMC1.69f3
weird though SMC seems lower version that I have, hard to tell if boot rom vertion is lower or higher.
Before the hardware mod, did you do the EFI mod? Did you tested the EFI mod before removing the resistor? And don't do a Pram-Reset!
Hi Jeff, Thank you for this post. I have the same issue with my early 2011 MBP. In fact, I am on my second logic board, the first having been replaced under Apple's repair program after the first crash. So, I wanted to ask you as (as well as others who have used this fix) whether you have faced any issues with the MBP since you did this, since it has been 7 months since your post. Thanks in advance.
if anyone wants macbook parts apart from the mother board contact me cuz i killed a macbook but i paid less than 100 dollars for it anyways
Do you still have it? I may be interested
Great article!!
Is it necessary to disable the resistor? I know that by doing so you'll save heat and battery, but if I don't have any concerns about that are the software mods sufficient?
I ran it for a few weeks with the software mods only. I found I had to rerun the script almost every time I rebooted or it wouldn’t work. I decided to remove the resistor and it’s been flawless since.
If you don't remove the resistor it will sometimes give weird performance issues and flashes on the screen. I removed mine by taking a small flat head screwdriver and heating it with a heat gun and then pushing on it for a second or two lightly and it came off.
I have a late 2011 17 inch Macbook Pro, and have had the logic board replaced once already (under Apples extended program) although that expired in December 2016, and the problem with the AMD chip reoccured just a couple of days ago! This is such a fantastic laptop and I have no reason to upgrade it as it performs fantastically with an SSD and 16GB ram. I've just performed this mod, both the EFI mod and hardware resistor removal and I was amazed to discover it worked! I figured I've got nothing to lose and everything to gain - now my AMD chip doesn't appear in the list exactly as described, and it boots way quicker too.
One thing I would say when removing the resistor - that thing is so damned small and I was worried I was going to damage nearby components by trying to get this tiny thing off. All it took was a very small flat blade screwdriver applying just a tiny bit of pressure to the side of the resistor whilst applying heat to one of the legs on the resistor - after that the leg detached and I was able to just move the resistor back and forth a tiny bit to detach it from the other leg and a nice clean removal! I haven't done the jumper mod yet so my display wakes up after sleep so I just need to remember to do a shut down each time instead of a sleep but that mod is for another day...
hi i would like to do this
Build a USB boot drive with Arch Linux.
Boot the MacBook Pro from said USB drive (hold option key at startup to choose it).
Follow the directions to get in the right Arch Linux boot mode so you get to the console.
Hack your EFI by adding a file telling your Mac to disable the Radeon GPU.
Reboot into Safe Boot mode (Shift key all the way through startup).
Shut down using the Apple Menu > Shut Down option.
but my macbook doesnt boot from external drives it also hangs there is that going to cause my trouble?
thank you
Ugh!!!! So I was thrilled to follow these steps and resurrect my 2011 Macbook Pro 17" laptop. I even picked up a Samsung 512GB SSD. Everything worked flawless... except the display keys would not dim the screen. Ok, no biggie. After googling a bit I found that resetting the NVRAM/PRAM should fix this.
I now have a booted laptop with a black screen! It has the keyboard backlight on and the second internal drive is chugging away, but no display!!! I've reset the NVRAM a couple of times and the SMC too. Still no joy.
Any ideas?
Whew! A HUGE thanks to Adam at RealMacMods.com for giving the direction I needed. I had purchased there packaged up files to boot and mod the Gfx driver use over at https://realmacmods.com/macbook-2011-radeon-gpu-disable/. After I screwed things up, I reached out to him. He provided these instructions:
Running the tool creates an EFI variable that tells the OS not to switch to the AMD GPU. Removing the resistor kills the power to the GPU.
The variable is stored in the NVRAM, so if you clear NVRAM it clears the custom variable.
The brightness issue is present in High Sierra, but not in Sierra or below. The only viable solution in HS at this point is an app called Brightness Slider in the app store. It's free.
Saved my bacon!! Thanks again Adam!
That's awesome, and thanks so much for posting the follow-up here!
Good thing I didn't try to reset my pram!
The biggest issue im having is the lack of sleep functionality on my laptop - the mod has made the computer usable again, but it would be amazing if there were a way to get the computer top be bale to sleep again. any tips on this? running high Sierra here.
To have sleep/wake functionality working again in HS (no black screen on wake) you have to do the jumper mod. Search realmacmods site and you will find it. It's a simple mod, just a wire jumper between a resistor and a capacitor. I've made It on mine and It worked perfectly!
hey bro,, can please guide me how to do this step? i have mbp 15 inch early 2011
I have had absolute success dissabling the bad GPU through code only, thanks to many hours of research and trial and error. There are more than one way to disable it, and you keep the dimming ability of the screen & sleep ability ( in my last reply I did not include that last bit). The quick fix takes less than 10 minutes. I am replying as I read this interesting page lol... I spent many hours without support trying to figure out what to do with my non-functional laptop and the only thing I have yet to figure out is how to load windows onto it. I would love to hear from anybody who has had luck in that department. You also can reboot successfully as many times as you want without problem (keep in mind that with major updates that most of the time it will be necessary to redo the fix). Keep your head up and don't give up! Mine was a 2.4GHz MacBook Pro (MD322LL/A)
Thank you, thank you, thank you so much sprocket12 for sharing your instructions received by Adam from RealMacMods. YOU MAKE MY DAY!!!!
I've tried the manual steps from RealMacMods and removed the resistor but after doing that the MBP was booting but I had nothing but a black screen . I thought that I screwed something on the main board while removing the R8911 restore.
I found your comment and bought the moded disk image from RealMacMod (The best 10$ spent of my life ;)
I follow your steps and BINGO! I now have a display and I have executed the script included and the faulty GPU is disabled
The only thing that I have to do is to solder the jumper for getting High sierra to work.
By the way, does soldering this jumper for high sierra will also fix the problem with the keyboard brightness keys that not working?
thanks again guys!!
I can confirm this one.
With a black screen at startup, I purchased the automated utility from realmacmods. Used rufus to create a bootable usb drive with the provided iso. Following the procedure from sprocket12 I managed to fix the screen.
A big thanks to jeff and realmac mods for putting out this information!
I have the same problem now, chip removed MacBook was working fine running Catalina with a patch, happened to close the lid without realising and went into sleep mode, tried every option possible but still black screen!! still chimes on boot, I am losing patients now
Anyone know if the issue is the same for the brightness on Moave as it is on High Seirra?
Great and easy, I took the shortcut and paid the $10, wow in less then 10 minutes I have a functional Mac again! My air is ok but i love my pro. I can see where the sleep function will drive me nuts so i will keep researching on how to get that working again or a work around. Thanks so much for your direction. I too only use a magnifying glass and your pics to remove the resistor with a small flat screwdriver. verified no connecting element left and replaced cover! Thanks again as you just saved me 1500 getting the new macbook air!
Hey David have you tried the mod from ReakMacMod for High Sierra ?
From their site : “ ADDITIONAL STEP FOR HIGH SIERRA
High Sierra requires an additional hardware mod. This jumper wire is different between 15″ and 17″, both are shown below. Without this mod, your screen WILL NOT turn on after going to sleep. On the 15″ we just need to put a small jumper wire (enamel wire) between PIN 2 of R9704 and PIN 1 of C9711. Logic board does not need to be removed for this step. Only bottom cover removed.“
Thanks for your wonderful contribution. I have been going nuts since my early 2011 17" MBP started misbehaving. I do most of my work in Bootcamp, and disabling the discrete GPU allows windows to boot, but the display resolution is too poor for any work, since Windows does not use the inbuilt GPU.
Can you assist me with short answers to the following?
1. If I remove the resistor, and thus permanently disable the discrete GPU, will bootcamp (Windows) suddenly start seeing and using the inbuilt GPU?
2. I found a brand new logic board for a late 2011 17" MBP on eBay at an insane price. What is the likelyhood that this new logic board will eventually develop the same discrete GPU problem?
Thanks.
Hi to all,
I just encounter this issue in my MBP 15", if some one share with me automated utility to disable your AMD Radeon GPU, download from https://realmacmods.com/product/macbook-pro-2011-radeon-disable-utility/
I am trying to purchase but unfortunately site not responding.
thank you
Two days ago (Sunday, November 13, 2018), I also attempted to buy the $10 download from RealMacMods. Managed to have the credit card charge make it through and set up my account/password (I think), then suddenly the site went down. This morning (Tuesday) I was able to get to the site but within a few minutes, it apparently went down again. They must be having tech problems. I'll wait until this afternoon at which point I'll try and contact someone at Elite, since there seems to be some commercial relationship with them.
I definitely want to try this solution and am willing to pay them to do the work themselves with my 2011 17" MBP.
Thank for helping me with my fears, I was able to gather the strength to go after that R8911 - wow that thing is small... I just touched it on each end a few seconds at a time with a soldering gun (and a loupe to help with magnification) and eventually it came off... everything working great so far.
Quick question though - I am running El Capitan, if I upgrade to Sierra (or do any system updates) will the hack go away, needing to re-solder R8911... or am I good to go? What about getting rid of the boot chime (it needs a NVRAM change for it to work, but don't wanna mess with it because of the resistor)?
Adam at realmacmods is a genius. Really helpful support and it was a real treat to see the display burst into life again. For $10 that's fantastic value for money.
I removed the resistor first (long story) so assumed I now had a dead machine but the wait 60s and hit enter, then wait 60 more before hitting enter again actually worked. Magical.
The USB needs to be FAT32 and Master Boot Record. Remember to use the provided 16.01 .iso provided, not the current one (dur).
Posting this from newly resurrected 15"MBP. 10.12 Sierra runs well; there are indeed sleep/wake and brightness issues in 10.13. But with an SSD and 8Gb RAM the 2011 MBP rides again!
Has anyone run into an issue where the backlight goes off and doesn't come back on, even with the jumper modification, downgrading the OS, reapplying the EFI variable fix and removing the resistor, i've run into this on 3 different logicboards. I've got 7 or 8 more logicboards, to hopefully not destroy, has anyone had problems with the backlight circut doing this mod?
Hey - old post but I'm having the same issue. Screen is working - I can see the desktop if I shine a light through the apple logo but cannot get backlight to come up. Have tried MAC OS upgrades, downgrades, Ubuntu only - always the same. Haven't tried jumper for High Sierra issue (too hard for me) but I'm not convinced this is the issue. Such a shame. Did you fix this?
Thank you, this saved my MacBook Pro 17" !
Just one thing, I did the USB using ArchLinux but when i did this command line :
printf "x07x00x00x00x01x00x00x00" > /sys/firmware/efi/efivars/gpu-power-prefs-fa4ce28d-b62f-4c99-9cc3-6815686e30f9
I got an error. After searching the web, i finally came up with the solution :
printf "\x07\x00\x00\x00\x01\x00\x00\x00" > /sys/firmware/efi/efivars/gpu-power-prefs-fa4ce28d-b62f-4c99-9cc3-6815686e30f9
I used "\" before every "x" and it worked !
Thanks again.
Thanks the printf solution you have worked for me!
Hello,
I had the same issue and I tried this.
Unfortunately after removing the the resistor R8911, my mac boots now but a complete black screen.
Had someone the same result ?
Thanks
Hi Seyo,
I got the same issue. Did you fix it already?
Hi Seyo,
The same problem here on my Early 2011 board. I have one Late 2011 where everythings works fine, then I made a Early 2011 (I'm not sure but as I remember also everything was fine in the beginning after removing R8911). Then I changed the board from Late 2011 to Early 2011 case because of the non glare LCD in the Early 2011. The Late 2011 board works good with the rest of the Early 2011 and the non glare LCD. Then I also swap the battery, everything OK with the Late 2011 board :-)
After that I go on with the Early 2011 and the screen was black. I tried some things (SMC reset, NVRAM delete, shorten the pins from R8911 again with SMC reset and NVRAM delete...) nothing works. Then I made the High Sierra mod and the screen works again! But only with full brightness and regardless of which Mac OS is installed (El Capitan, Sierra or High Sierra). Again I shorten the pins from R89111, put away High Sierra mod, SMC reset, NVRAM delete, boot from USB stick with the 60 sec./enter tip, nothing helps.
The only solution which works on the Early 2011 board seems to be the High Sierra mod (jumper wire between pin 2 of R9704 and pin 1 of C9711). Unfortunately it is not possible to adjust the brightness with F1/F2 keys. With El Capitan/Sierra I see the scale when hitting F1/F2 but nothing happens, with High Sierra no scale when hitting F1/F2 keys and of course no change of the brightness.
Maybe I find the time (and courage) to swap back the boards to the original screens and take a look what happens. But I'm very happy with the Late 2011 and the non glare LCD at the moment, there everything is fine also the tunable brightness. I'm a little bit afraid, that I also got this problems with my Late 2011 board.
Bye
Michael
Short addition. My Early 2011 works again without the jumper wire (tested with Sierra, El Capitan and Snow Leopard), BUT brightness is only full, or null ;-) So if I press F1 as long as there are 2 or 3 blocks at the 15 blocks scale lighning, screen turns completely off, then I had to press F2 until 12 or 13 blocks are active again at the scale, then the screen turns back on again?! It seems also that it was necessary to change the memory configuration after I removed the jumper wire. The screen starts to work again, after I put out one memory module and run the Macbook with only one memory module! After that I shutdown Mac OS and put the second memory module in again and the screen keeps going on to work.
From my point of view with this Early 2011 mainboard, I will mount again the jumper wire, because with this configuration every Mac OS which I've tested works (Snow Leopard, Lion, El Capitan, Sierra, High Sierra and even the official unsupported Mojave), of course only with full brightness, but wakes up after sleep mode.
Maybe someone has an idea whats going on here, or it helps others who are fighting the black screen.
Bye
Michael
My macbook now is completed black screen, its still running. I have resurrected it from removing the resistor . I was away home few days and forgot to charge my Mac then the battery ran out. It was charged but the battery was remaining at 0%. I was trying to SMC reset and accidentally did NVRAM as well. How stupid I am... Now i feel so frustrating......
I am on Sierra before it happened.
The easiest way to get your screen back to work after NVRAM reset is the USB stick (Automated Utility $ 10,--) from RealMacMods. Unplug the HDD, no DVD in superdrive, connect the USB stick, switch on, wait about 60 seconds, press enter, after some waiting (< 60 seconds) you should geht the Linux screen and you may run the script to deactivate AMD graphic again. I have done this a few times while testing.
Unfortunately, it does not work, i think my battery is died.
It is possible to do all the RealMacMods steps without battery. I have already done this with a Early 2011, which has no battery inside.
Hi all. I'm the "Jim" from earlier in November who commented on problems with the Real Mac Mods website going down after I successfully purchased the $10 DIY download. Long story short, the website eventually resolved itself and I decided to send my late 2011 MBP in to them since the teenyness of the DIY effort was not something I finally decided to undertake. Adam at Real Mac Mods has done a spectacular/miraculous job of reviving my $3500 machine. Cannot thank him and Real Mac Mods enough. $85 plus shipping is far and away the best bargain going today.
That's awesome! Thanks for the follow-up, and the glowing recommendation of RMM!
Thank you Jeff and RealMacMods for this wonderful article and simple step by step instruction, how to do.
Today i did to My MBP 15" and its working fine without any issue.
Thanks once again.
Thanks so much for this useful guide. I've sent in my MacBook pro to a very skilled technician for the mods. The software side I did already and works well, though I did the manual way as per realmacmods.
Anyone know if the jumper wire will affect other operating systems such as Linux and Windows? Mine is running High Sierra and will have the screen issue after waking up from sleep, but once the wire is in place I have no idea if other operating systems will have issues with brightness/sleep.
Thank you Jeff and the people from realmacmods. I have a working machine again!!
Hi. I desoldered the resistor. Bad thing is my mac was running win 8.1 clean install and had no way to voot a mac os. Now the screen is dead. Hard drive and fans makes sound though. Any suggestions would be greatly appreciated
Hi,
Big Thanks to Jeff and Adam! I managed that my Late 2011 15" Macbook Pro works again. I made a new Lion installation and after that a upgrade to Sierra. At the moment I haven't done the additional step for High Sierra. Does anybody know if the High Sierra hardware mod influences older OSX versions (Sierra, El Capitan...) or do the old versions also work with this mod?
Bye
Michael
My 2011 MacBook pro's Radeon GPU said today: enough is enough after 7 years. Thanks for your excellent post problem solved! Thanks so much for all your help.
I also used the HW mod for my 2011 17 inch Macbook Pro.
The GPU is not listed anymore, and everything works fine. But my battery run time is still to short 1 hours and the temperature to high for a fully disabled GPU. The Cooling runs at 4200rpm nearly all the time and the temp is still at 75 °C.
Any ideas what I can do to check if the GPU is really powered off? or how I can cut the power for the GPU without breaking the Macbook?
Mine was like this too. Over time it fixed itself. Some tips, you can try cleaning the heatsinks or reapplying thermal paste. If the gpu isn't listed, it is not being picked up by the system (like taking a pci card out of its slot in a desktop) it isn't being powered by the computer. If you use some temperature software for the computer you will still see that the GPU is still getting hot, but if you look at the temperatures of the cpu, they are the same. This is due to the heat pipe putting some heat into the gpu before it reaches the fans.
Thank you for a wonderfully detailed article about this problem. Would simply removing all the AMD Radeon extensions in S/L/E(System/Library/Extensions) and removing the resistor as described in your article be a satisfactory solution as well?.. as opposed to getting involved with Arch Linux and all of those steps ? Removing just the AMD Radeon extensions in Sierra 10.12.6 does seem to work OK, for without those extensions, the MacBook Pro naturally turns to the Intel HD 3000 graphics engine for video. Of course any OS update might bring back the problem, but if one avoids all updates, would this work as well as the Arch Linux approach?
I've inherited a free late 2011 Macbook pro with a seemingly graphics problem. I've read your logical comment about removing those AMD Radeon extensions plus that resistor. It seems to be the very simplest approach. Does yours now not show that Radeon in the profiler after you did your particular mods?
Thanks,
Steve
Hello, I did successfully the software-modification, macbook 8.2 is booting up & works on integrated graphics. Then I did the hardware-mod, but after the surgery the fans spin hard (even when I am at the booting screen). Once OS has booted up, it seems the CPU is heavenly working (kernel_task 600%?) Did I do something wrong in hardware mod? Any suggestions?
In my experience the pegged kernel_task is a symptom of no battery or a failed battery.
Does anyone have a good set of directions for the High Sierra jumper? I started down this road of the Real Mods fix only to find out after I ripped the R8911 resistor that my screen wasn't going to work after it was done. Any info would be greatly appreciated. Thanks guys.
Hello Jeff,
It was worked perfect for me.
Thanks for your tips.
I had been able to revive my Mac with a slightly different approach called the grub fix. It's also an EFI fix, but uses the outb operand in the boot. Thing is, though it deactivates the dGPU, it's still very much powered on and consumes energy, that after a series of restarts, and continuous operation, it severely affects the battery. I believe Apple also causes the battery to if it's 2 years older, since I'm on a second battery and it was fairly new when it started after an update with El Capitan. I didn't bother upgrading to Sierra or HS; I didn't need them anyway, and after a year or so of extended use, my 15" MBP 2011 became so sluggish, I could hardly use it for actual heavy duty stuff. Launching a single Adobe app has become a pain, though browsing and watching movies at the same time remained relatively manageable.
I got a 2nd hand 2015 which was fairly pristine at a good price, which I am now using for work. But, after a failed NVRAM reset because of the frakking battery issue, I couldn't get the thing to start up on Mac OS anymore using the old grub hack that used to work. Whenever I start up using the USB stick, the screen goes black. I've read up on it, and tried a few things, until the HD itself got corrupted.
Sufficed to say, I gave up on that, and decided to install just Ubuntu, since I'm just using the 2011 to browse and watch movies, reserving the 2015 for the more tedious tasks and preserving it in the process.
The hack I ended up doing is a combination of hacks I found, simplified. I used the [nomodeset], [outb] and i915.lvds operands in the grub in a series of grub hacks on the USB, and editing the grub on the installed Ubuntu. The hack disables the dGPU cleanly and simply enough, without having to remove the resistor, which is something I avoided.
https://askubuntu.com/posts/1145090/revisions
https://forums.macrumors.com/threads/installing-ubuntu-on-2011-mbp-with…
What do you think about this method?
https://computeco.de/Demux
Price is about $40. (Programmer+Software)
This worked for me, however after a few months with no issues, I rest nvram and now my Mac boots to a black screen! Any ideas?
TIA
No guarantees... I've done the hack but not the issue you're describing. That said, if you can talk a friend or family member w/ a macbook into letting you put your hard drive into their computer, you could - with GREAT care not to reboot on their machine! - go in and rebuild the efi file as instructed here. Then shut down their computer with OUT rebooting it, pull your hard drive, and put theirs back in. Only then reboot their machine. Put the hard drive back into yours and hopefully you'll be visible to yourself again. I have NOT tried this, and maybe am overlooking a thing or things.
I took the plunge and did this to a Macbook late-2011 15" 2.4ghz notebook I'd bought for a massive $20. The issue wasn't visible for the first few days I had the mac, and I don't blame the couple who sold it to me even if they knew. ANYway...
MintBook, anyone?
Because initially, I was unpleasantly surprised that - except for safe mode - High Sierra ran about one tenth as fast (if that) as it had before. Unusable. I'd bought the $10 installation files you linked to deal with the efi settings, but maybe should have read more on the kext files? Anyway.... I tried everything else. But I also like Linux. So last night I wiped that sucker and installed Mint 19.x Linux on it.
It runs quite well. Still seems maybe a tiny bit slower than I might have expected. The fans are also running full blast, this in spite of the fact that the computer itself is actually cool to the touch. (That last is my favorite thing about the hack; a cool-running MacBook?!?) I did find a couple of apps which supposedly will help me deal with the fan, but complicating that is that when that resister was removed I suspect it knocked out some of the temperature sensors these apps are expecting to find. One of them I installed keeps uncertainly throttling down and up in small intervals. I think there's a way to tell it to ignore certain sensors, but wish I knew which ones are disabled now. If anyone does know, please pass on that info?
In short, if you have an old MacBook and do the hack, then don't like the slower result... there's always turning it into a MintBook or UbuntuMac or whatever other Linux flavor one wishes to try. Removing the efi issue removes one of the larger impediments to running Linux off the hard drive on an Apple laptop.
My experience...
See CMIzapper's Tiresias chips for 15" and 17" MBPs. The chips piggyback right onto the EFI chip and rewrite it automatically so no danger of bricking the unit on "accidental" NVRAM reset. Chips also provide handy pads from which to install a pair of wires to regain brightness control under High Sierra. Works a treat.
The mod worked for me on a 17" 2011 Macbook Pro. Thanks for the info! I got a black screen after removing the resistor and installing the backlight wire for High Sierra. I found a set of instructions in the comments about re-installing the software mod by sprocket12 in the comments section of your page. After I did this, it works fine now.
Apple had "repaired" the board by replacing it with another board with the same problem that also failed. After that, they said there was nothing that could be done. I guess they meant that there was nothing that they were going to do turn my bricked machine into something useful.
Jeff Geerling
You are a lifesaver. Did both USB boot fix and the hardware extraction worked great! Should give my MBP another 5 years(?) and beyond. Thank you
Just wanted to give a shout out of thanks for posting about the RealMacMods guys. Went to their site and had them do the repair for $85 each for two macs I had with this problem. I have completely working computers again!!!
I don't have the mad skills you guys have to do what your blog shared, so their doing it for a small fee was more than worth it. Thanks for sharing!
Hi all
just sharing that all the tips and comments here are proven to be working until now. I just desperately mod software and hw following the shared instructions and it all work smoothly now.
realmacmods stuff 100% working on my machine. i tried in on mbp15 2011 yosemite 10.10.5 and sierra 10.12.5 ... \\
thousand thanks to you all.
Thank you to Jeff for pointing me down the right path, and offering the hand-holding to get this done. Works great now, thank you!
BTW I tried to reflow the GPU first. I was laying down the heat for over 3 minutes. It was so hot it was discoloring the board. didn't work. but doing the bypass did work. although I do get just the slightest blip of video artifact during boot, just to remind me every time that she's not quite all there there. ;)
But she's got it where it counts.
How about getting a small drill bit & breaking the resistor in two?
What a relief! Had the board on my 2011 17" replaced by apple when they had the program running to do so - but it lasted a just over a year. So many times I wanted to dump it in the trash or sell it for scrap. I bought the package from Real Mac Mods - well worth it. Removed the resistor. But ended up with a black screen on re-start. Used the bootable USB made with instructions from the download. Ran through the steps again to create EFI file and shut down. Re-started and working perfectly!
Woop woop! Thanks so much! I used the solder for the very first time to give this a crack, and it worked! I really appreciate the thorough tutorial, between you and the macmods guys, it was very clear what i needed to do. Massive gratitude!