Today I released a video about how—and why—I 3D Printed my Grandpa and put him on my bottle of ketchup. Watch it here.
I sculpted a bust of my Grandpa in high school, gave it to my grandparents, got it back after he died and my Grandma moved out of her house (I wrote a tribute to my 'Grandpa Charlie'), and I kept on moving it around my office because I didn't have room for it:
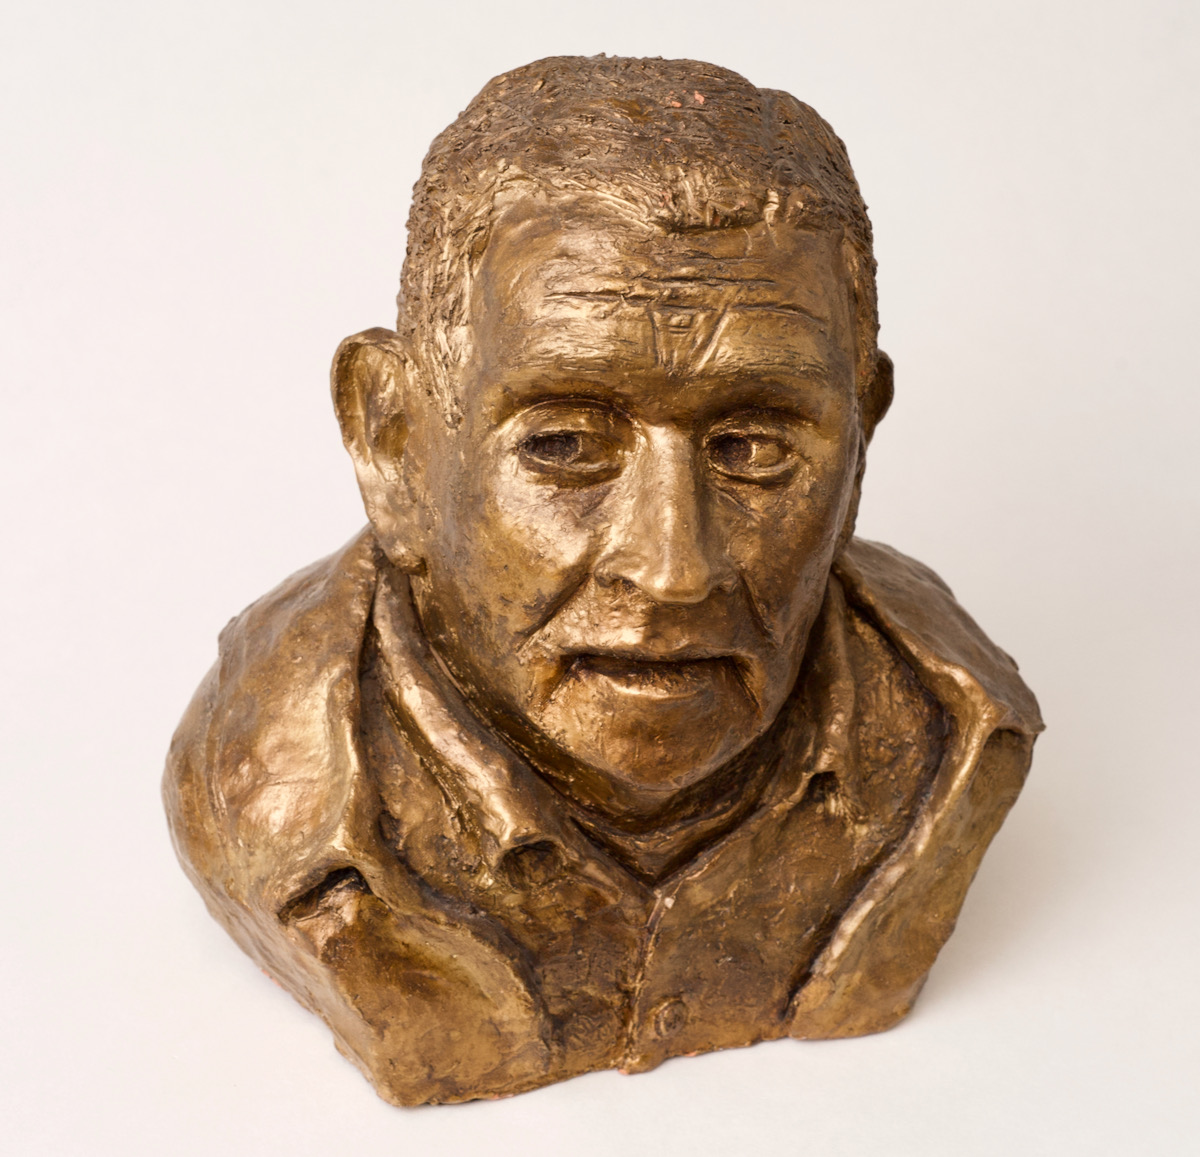
Grandpa by Jeff Geerling, terracotta, 2001.
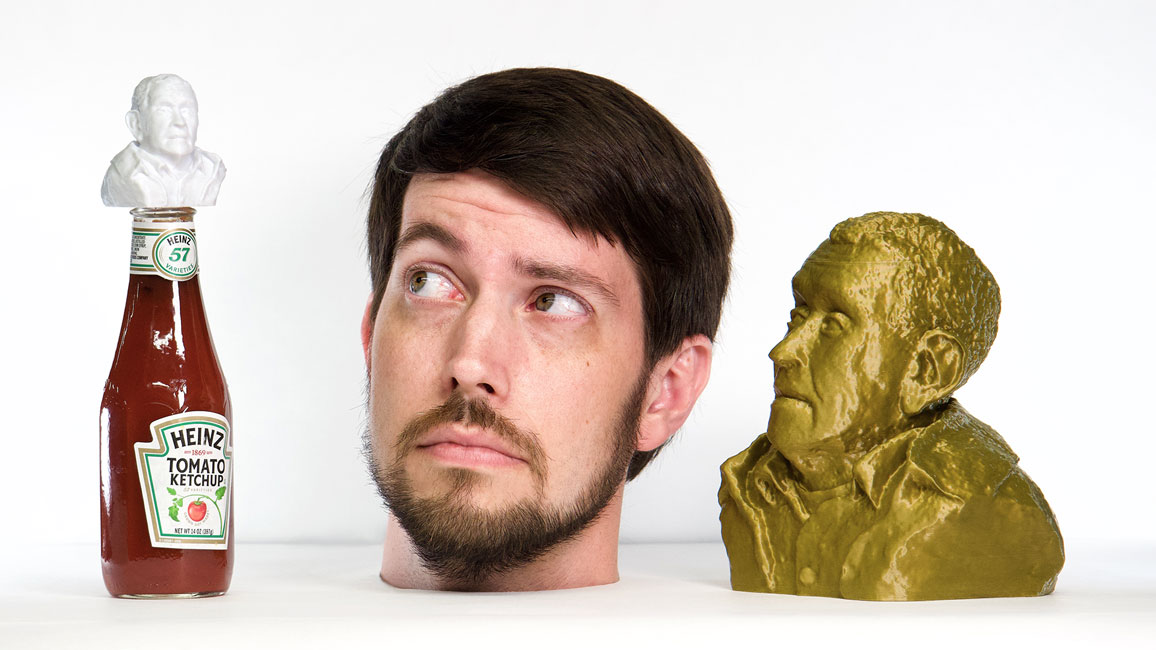
I decided it had to go, but asked my extended family if anyone wanted the statue (thinking it would be sad to destroy it). One enterprising cousin suggested he could 'copy' the statue in smaller form using photogrammetry:
- I'd take many pictures of the statue
- He'd convert it into a 3D model using software algorithms
- He'd print a smaller (and much lighter) copy of the bust for any takers
The video above goes into more detail about the entire journey, but in this blog post I wanted to give some detail about the photogrammetry process itself.
Coming into it, it seemed like some form of magic. And after generating a highly-detailed 3D model from a physical object with nothing but my camera and my laptop, it still feels like magic. But at least it's highly deterministic magic that can be grasped.
Taking Pictures
Any Photogrammetry adventure begins with capturing photographs of a 3D object.
In my case, the object was a bust of my Grandpa, which weighed 16 lbs (7.26 kg) and was about 1 foot (30 cm) wide.
I could've set the bust on a surface and walked around taking pictures of it, relying on software to 'clean things up' for me.
But as a programmer, I know garbage in equals garbage out, and the cleaner the images, and the more precisely they are taken, the less work I'll have to do later cleaning up artifacts or touching up an imprecise model—at least that's my theory.
So I built a rotating turntable out of two round pieces of wood and a lazy susan bearing:
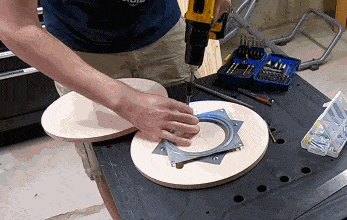
I set it up with a pure white background (a sheet of posterboard), and measured out 10° increments on a piece of tape I put on the DIY lazy susan, so I could rotate it precisely.
Finally, I took a series of 148 pictures, from four elevations:
I pulled those pictures into the computer, tweaked the exposure a bit so the white background was blown out a tiny bit (pure white), and had a set of 24 megapixel JPEGs ready for the photogrammetry process—over 3.5 billion pixels of data to work with!
First Attempts (Failures)
Since I have a Mac (a 2019 16" Macbook Pro with an i9 processor at the time), I don't have any Nvidia CUDA cores at my disposal (locally, at least). And it seems some of the more GUI-driven photogrammetry programs (which often require CUDA cores) are Windows-only.
But I eventually found the free and cross-platform app Regard3D, and I followed the official tutorial. I was able to get a result, but the resulting 3D mesh was really messy:
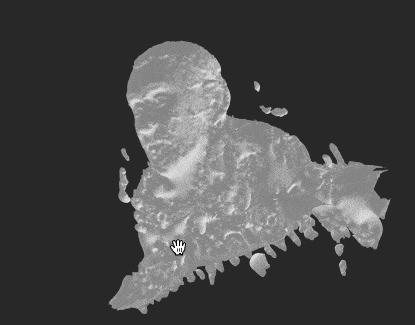
You could see my Grandpa, but he seemed to be frozen in a bed of goo. It would've required a lot of work in Meshmixer to get a faithful reproduction of the original bust.
I sent my cousin the same set of pictures, but was also having trouble getting a good initial model.
Second Attempt: COLMAP + OpenMVS
Finally, I found this blog post on COLMAP + OpenMVS from Dr. Peter L. Falkingham. He wrote a .bat script that uses the two open source tools (on Windows, at least) to generate a 3D model from a set of images.
I needed to install COLMAP and OpenMVS, and luckily, I also found an excellent Instructable by joecooning, Free Photogrammetry on Mac OS: From Photos to 3D Models, and followed his instructions to install them:
Install COLMAP
Download the latest COLMAP-dev-mac-no-cuda.zip file from the COLMAP GitHub releases page, expand it, and place COLMAP in the Applications folder.
Install OpenMVS
- Install OpenMVS' dependencies with Homebrew:
brew install boost eigen opencv cgal ceres-solver. - Install CMake.
- Install XCode.
- Clone the VCG Library:
git clone https://github.com/cdcseacave/VCG.git vcglib - Clone OpenMVS:
git clone https://github.com/cdcseacave/openMVS.git - Create a separate build directory to build OpenMVS:
mkdir openMVS_build && cd openMVS_build - Build OpenMVS:
cmake . ../openMVS -DCMAKE_BUILD_TYPE=Release -DVCG_ROOT="pwd/vcglib" -G "Xcode" - Use xcodebuild to compile the app:
xcodebuild -configuration Release
Run photogrammetry.sh
Use this shell script (embedded below) to run the photogrammetry process inside a directory full of images of the object you wish to turn into a 3D model:
After running the script, the new 'model' directory should contain a .jpg texture map image, a .mtl (material settings) file, and an .obj (3D object) file.
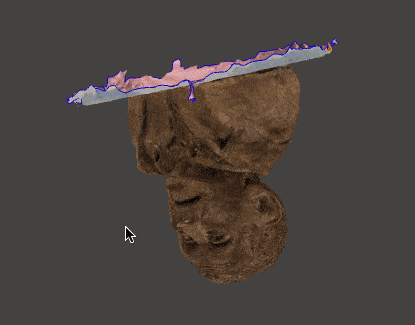
I imported the .obj file in the free Meshmixer app, and WOW, it was pretty much dead-on... besides the fact that the object was upside-down:
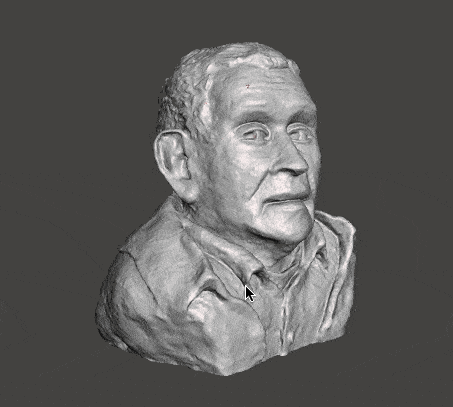
The Final Result
So I spent a bit of time cleaning up the bottom edges in Meshmixer, and doing a 'plane cut' to slice off the bottom and discard all the artifacts from the lazy susan/turntable. Then I made the object a solid (this isn't strictly necessary for 3D printing, but it's easier to work with in my case) and exported it.
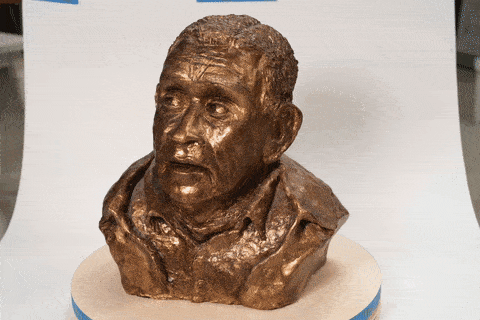
It looks pretty amazing, even capturing some of the tiny details that the naked eye would likely miss at a glance!
Here's one brief clip of a 3D print I made of this model (generated with Octolapse and my Nikon D700):
To see a ton more detail about the story behind this bust, and the different designs I made for my family, please watch the video.
Comments
Just documenting here a few suggestions from people much more versed in photogrammetry:
I tried to use an xBox Connect and Microsoft's 3D scan, but it did not detect the device and I haven't yet dug deeper or found decent (preferably open source) software.
polarizing dont work on metals
If you have iphone 11 or later using LiDAR and some free apps you can get the same in a couple of minutes max.
you can use the front and the back camera, but the one that unlocks the phone has 10000 points resolution (they say). ;)
I'll have to try it sometime and see what kind of result I get—it's amazing how the costs of these kind of things keeps going down to the point where everyone has what used to be a tens-of-thousands of dollar scanner built into their phone!
I don't think iPhone 11 has lidar on the back.
Jeff, I am amazed by your many talents and interests. I can’t keep up with you, but I am always amazed! Thanks for sharing.
Hey Jeff, you might want to look into Apple's new Photogrammetry API, currently in beta. I went the same route as you and tried many different options but Apple takes the cake on this one. Very easy to use with amazing quality and detail, especially when the photos are taken with the companion iOS app that uses two cameras (if available) and gyroscope to create a depth map. Oh and the 3D models are created in under 20 minutes. I even tried it on drone footage! Happy to chat if you'd like to learn more. Take care.
Nick
Is photogrammetry CPU or GPU intensive task. A friend asked to build him a pc for this...
Ideally you'd be able to offload much of the work to a GPU. Right now Nvidia's CUDA cores are the most useful for a lot of photogrammetry apps, so I'd go with an Nvidia graphics card (the more CUDA cores and performance, the better) if you wanted to build a rig dedicated to it.
Tnx Jeff!