There are many Raspberry Pi projects where I spend a few hours (or dozens of hours) building something with a Pi, and realize at the end that not only could I have purchased an off-the-shelf product to do the same thing for half the component cost, but it would work better too.
But this is not one of those projects:
The Raspberry Pi and its HQ camera make a surprisingly potent webcam, and if you want to cover the basics, and rival the image quality of all but the highest-end dedicated webcams, you can do it for under $100.
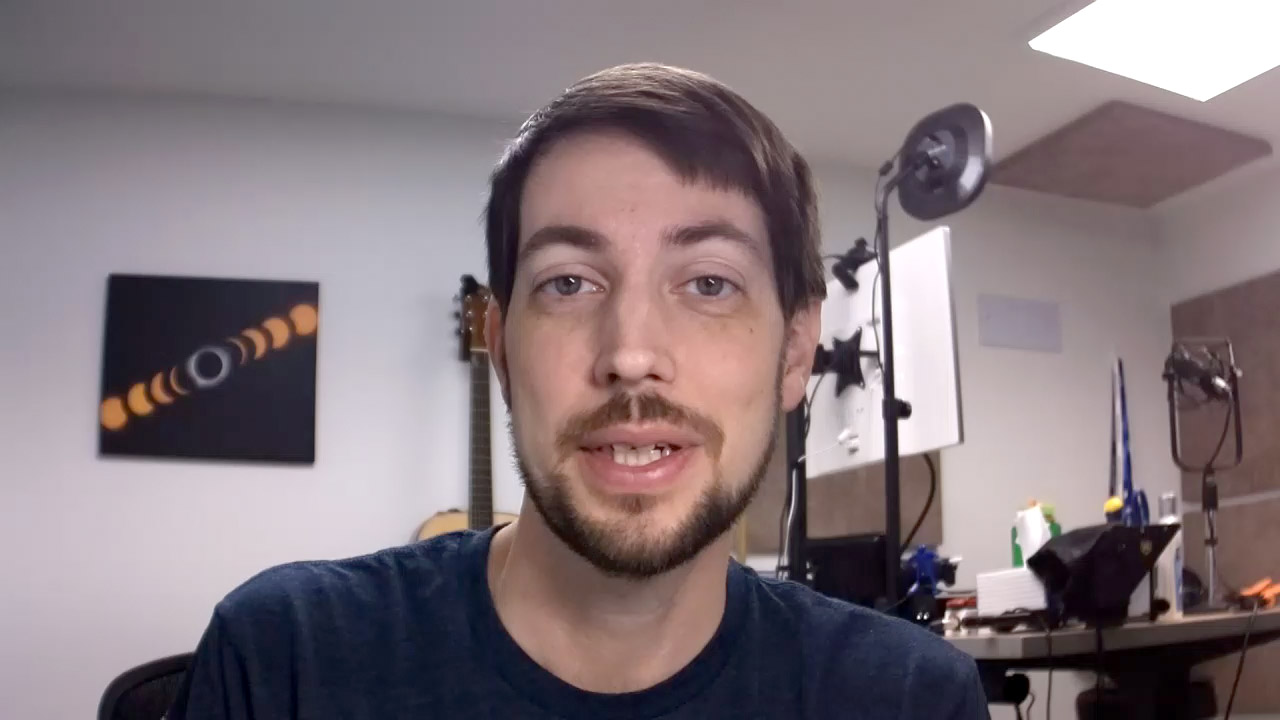
Above is a single frame from a recording I did with the HQ Camera on my Raspberry Pi Zero W connected as a standard USB webcam using the Camera app on Windows 10 on my Dell laptop.
That particular Dell laptop is the infamous XPS model with a 'nose cam'—a camera placed in the most unfortunate location: under the screen, so it looks straight up your nostrils at a low angle:
Dell fixed the camera position in newer XPS laptops, but most laptops still have a pretty poor excuse for a camera in their thin display bezel—there's just not enough room in there for a good sensor and lens.
Video for the Pi Webcam
I go beyond the content of this post with demos, an assembly guide, and more, in my video Raspberry Pi Zero is a PRO HQ webcam for less than $100!. Go check out the video for a ton more detail than I could cover here.
A real USB webcam
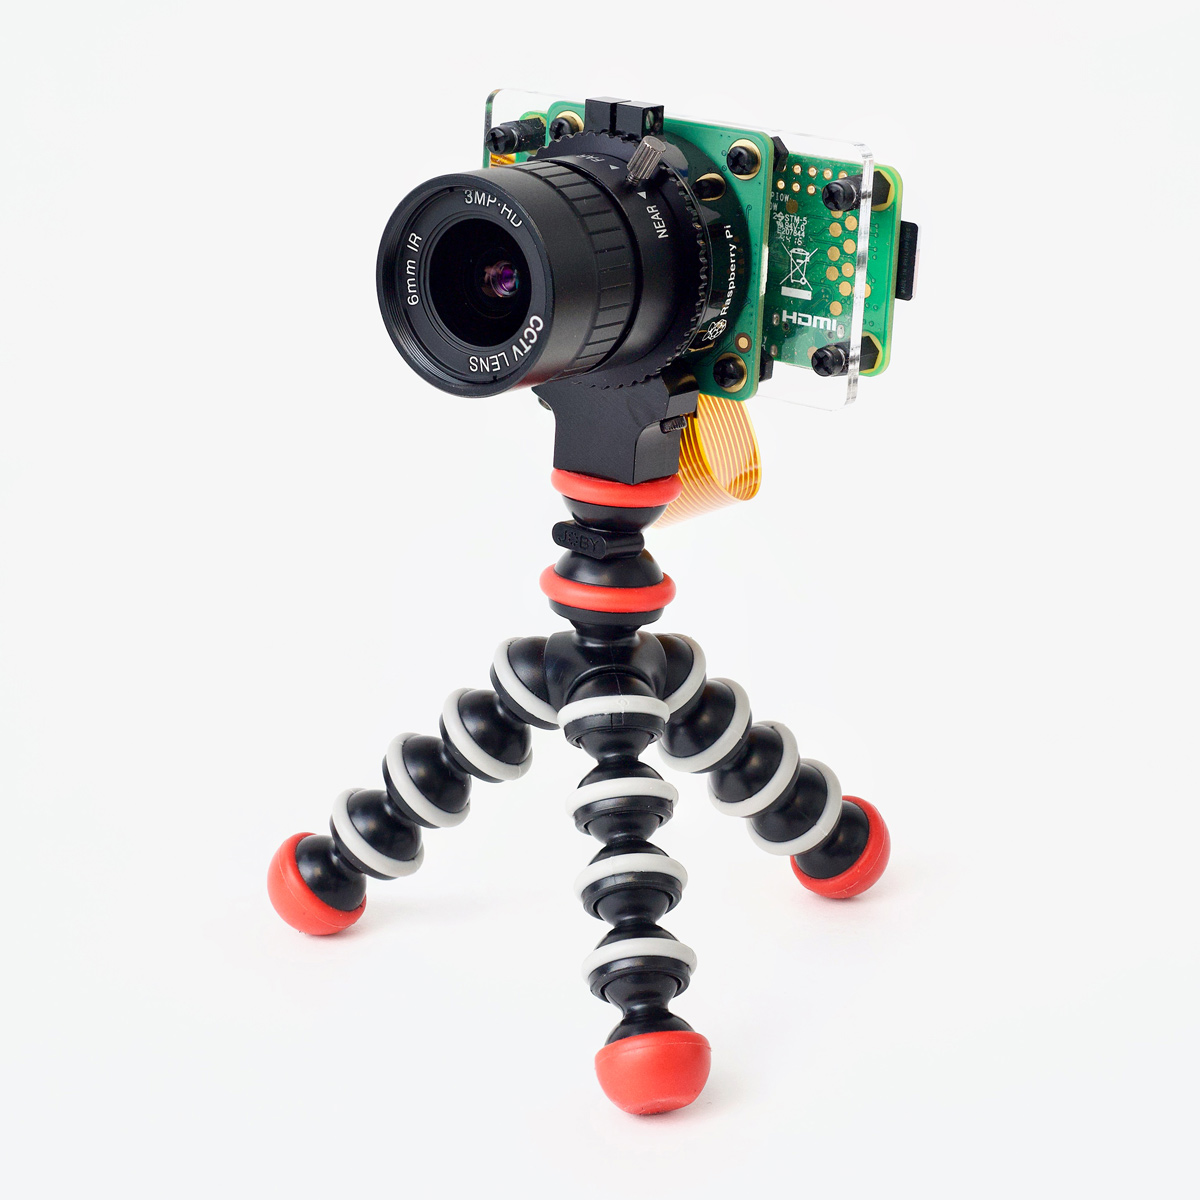
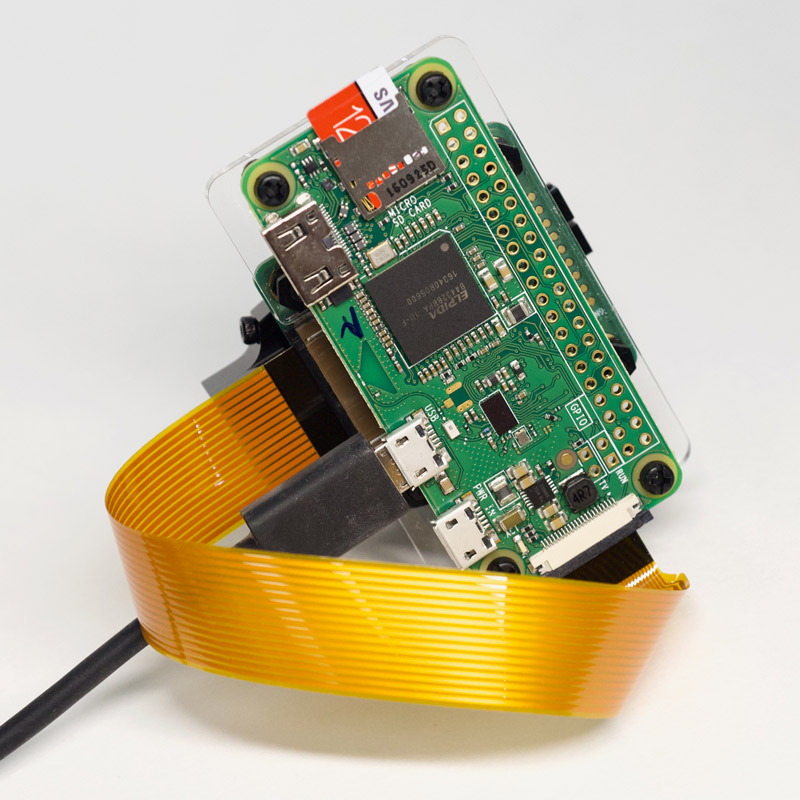
Using the power of the Pi's OTG port, you can build a true USB webcam—not some hacked-together IP camera that requires extra software to work, requires a flaky ffmpeg stream over the network, or only works with a specific app. The Pi Zero's USB port allows power to be delivered to the Pi, and data communications at the same time—perfect for powering a simple camera:
There are now many posts and Gists detailing the process of enabling this OTG webcam, most notably David Hunt's blog post: Raspberry Pi Zero with Pi Camera as USB Webcam.
But most of these resources dive straight into configuring dtparams, modifying boot configs, compiling C code using make, and enabling serial interfaces... and all I wanted was a quick way to turn my Pi into a reliable little USB webcam!
So I spent a few hours working everything into an open source project that uses Ansible to deploy the software to the Pi with simple, understandable automation. It can be run either on the Pi directly or from another computer: Raspberry Pi Webcam on GitHub.
This project installs a lightly-modified fork of one of the popular uvc-gadget repos with the software that makes everything work (you can configure what fork it uses)—but my intention is only to make the installation quick and easy so more people can use the Pi as a webcam, even if they aren't programmers.
During the pandemic this year, it's frequently hard to get a webcam, but I've noticed Pi Zeros and HQ Camera modules have been well-stocked as the year has worn on. If you can't buy it, build it!
I'm hoping that more people in the community can work to make the underlying uvc-gadget application (which has a ton of disparate forks right now) easier to configure and more stable (right now it only works on the Pi Zero unless you run an older release of Raspberry Pi OS!.
Anyways, the Raspberry Pi Webcam README has all the details for setup of the webcam, including every part that I used to assemble my own webcam.
The process takes about 20-30 minutes, including assembly:
- Flash Raspberry Pi OS to a microSD card.
- Boot that card in the Pi, complete the setup wizard, and run the pi-webcam playbook on it.
- Shut down the Pi.
- Assemble the camera module to the Pi.
- Plug the Pi Zero's USB port (not PWR IN) into your computer's USB port.
After 30 seconds or so, any standard video software should identify and be able to use the webcam.
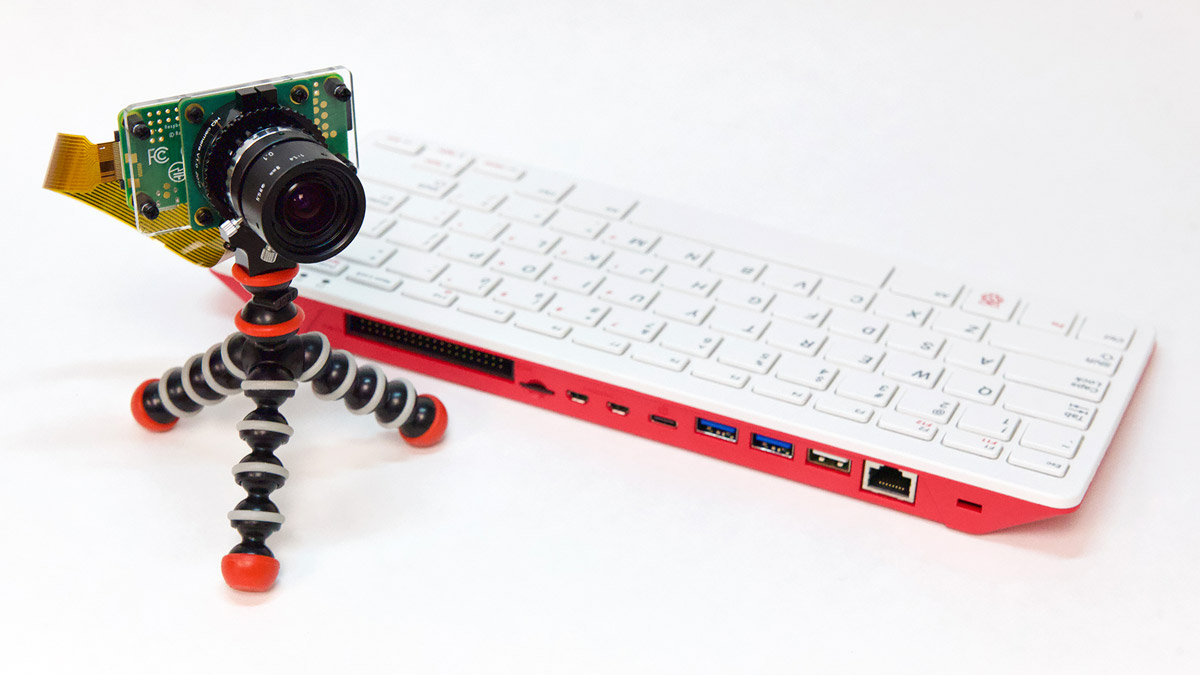
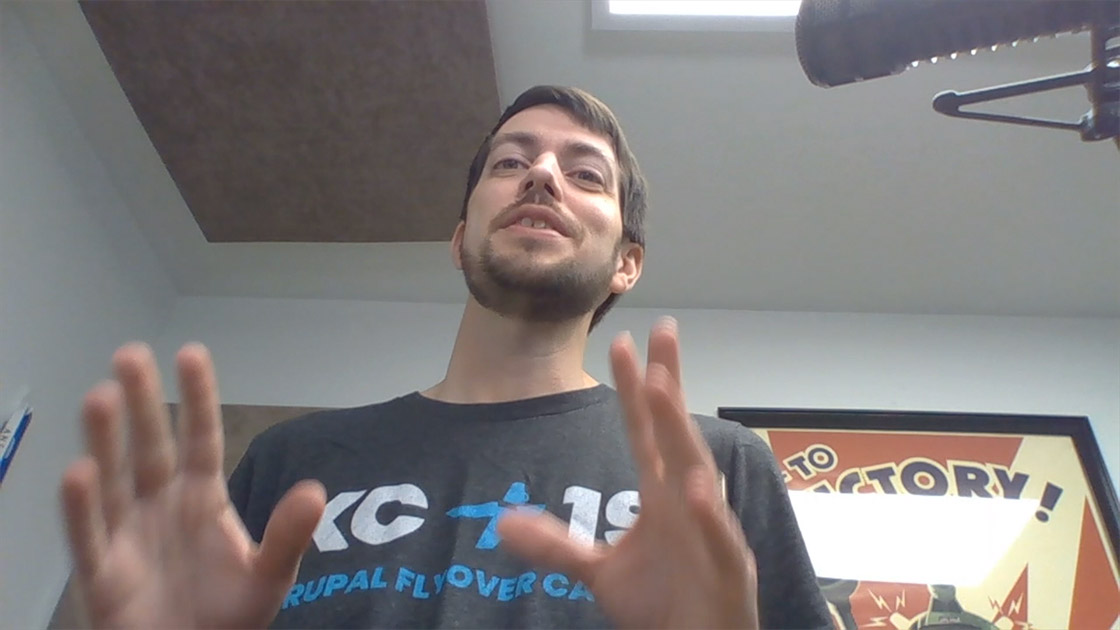
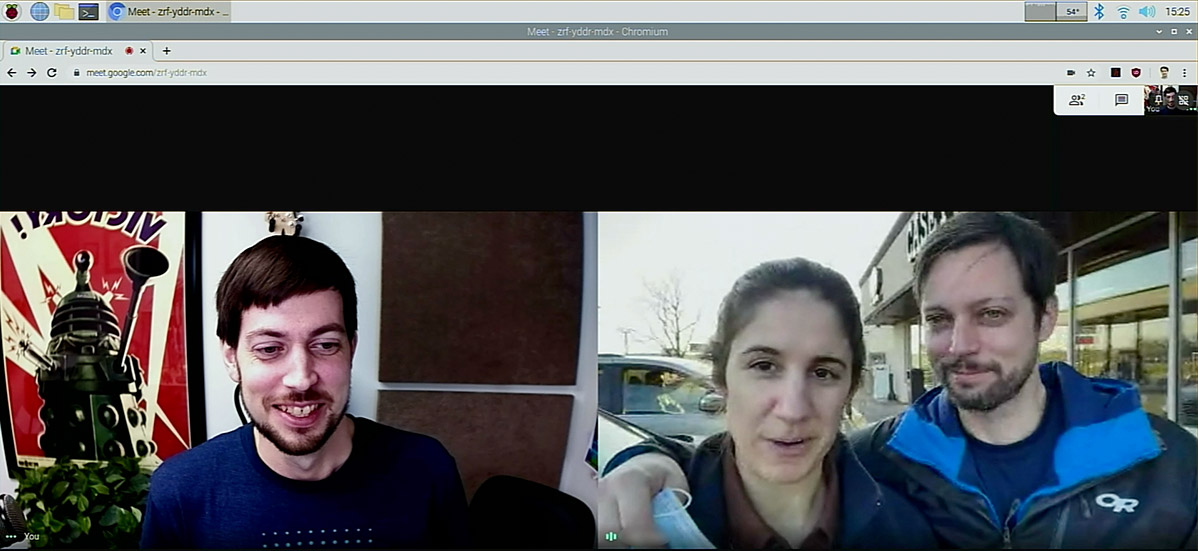
And in case you were wondering: Yes, the Pi Webcam works great with a Pi 400—I used it to record a few video clips and also to chat via Google Meet online:
Question: What about showmewebcam?
I like that project, and am following its progress as well. Though I don't like the idea of downloading a random Pi OS image and dropping it on a general computer like the Pi, especially if said computer has a camera attached to it. I'm not implying anything malicious, I just like having more fine-grained control and understanding over what I'm installing.
That said, the showmewebcam project does have some nice features like faster boot, and setting the ACT LED to turn on when the camera is in use, and off otherwise.
Not all is perfect
There are a few tradeoffs, of course, and I'd be remiss to not mention them here:
- No built-in microphone: You will need to use a separate mic or your computer's built-in microphone.
- No autofocus: For me, it's not an issue as I use it in fixed positions with subjects (like myself, or a project on a workbench from above) that aren't moving out of the focal plane.
- Dropped frames and latency (especially on older Pis at higher resolutions): I set the default to 720p which works great for most cases, but if you want to push to 1080p you can run into dropped frames or even latency, which requires adding audio delay so it is in sync with the video (e.g. via Audio Hijack or OBS).
For many, the tradeoffs are worth it. For people who need a more portable solution, it might not be as nice to always have to mount the Pi and set its focus. Plus it is a slight bit larger than your typical cheap webcam.
Adaptability adds to the appeal
The other nice thing about the Pi and the HQ Camera module is that it is fully programmable and of decent quality, and so in addition to its life as a webcam, I've been using the combo for timelapses, background footage, and even wildlife video and astrophotography (more on that soon!).
Some people have questioned the utility of the HQ camera module, but I embrace it—having a couple of these cameras, along with adapters for my Nikon F and Sony E mount lenses, along with a Telescope 1.25" C-mount adapter means I have a software-controllable camera that I can easily use with any of my lenses or telescopes to explore some new photography and video ideas.
Many of my Pi projects end up costing more than over off-the-shelf products with a worse end-user experience—but I learn a lot in the process, and the projects inspire more personal creativity, and that's worth a lot more to me.
But in this case, I'm happy to report my Pi Webcam actually is a better value, in some regards, than boring old webcams—especially since you can usually find the Pi in stock!
Comments
I can recommend this as a simpler alternative:
https://github.com/showmewebcam/showmewebcam
That's a dedicated buildroot based image to turn your pi into into a webcam, without the issues of shutdown - just disconnect without any risk of corruption.
How's the low light performance of the high quality camera? That's the only concern that's stopped me biting so far, but the pi Zero and standard camera in the official case makes for a neat webcam size package, but it needs good lighting.
Heh, see the "What about showmewebcam?" inline note in the article—I do like the idea, and that project seems to have a lot of momentum as well, so I'm following it with interest. I still don't like the idea of flashing someone else's built OS on my computer especially when my computer has an Internet connection and a camera attached. But it's a matter of trust, and if I can just build my own version from my own toolchain, I might be willing to run with that project more.
Given that the filesystem is laid bare for all to see after writing the image to the sd card, and that the image has no network stack, I'm curious what you think the danger is here. This project is on github too -- seems like a great way to get sued if it does something nefarious. Don't forget that Raspian OS is also "someone else's built OS" -- I think you did a video recently about the claim it was "calling home" to Microsoft? Maybe there's a new video here for ya to make --- DANGERS of random PI images!
I tried your project first, but later tried showmewebcam. It was far far easier to set up (copy image to sd card and boot -- done), much faster boot time -- (like 10 seconds at most maybe less?), and you don't have to worry about file system corruption because root boots as read-only. Shell via screen is a treat too! However, I can understand you wanted to back your baby, especially after all the time you must have put into it!
Comes with some nice utilities to tweak the camera settings in real-time too, but maybe yours does as well?
The only problem I have is with the camera module itself: It doesn't have a white balance temperature setting -- just preset choices that don't always work well. Oddly there's a "manual" choice, but I couldn't figure out how to make adjustments to it.
One bonus is that this camera doesn't have a UV filter like with all? webcams, so you can use it to test/see remote control leds, or use it with something like Shootoff with a uv laser ammo. Now I can test my roomba's sensor lights to see if any have burnt out! :)
"The only problem I have is with the camera module itself: It doesn't have a white balance temperature setting -- just preset choices that don't always work well. Oddly there's a "manual" choice, but I couldn't figure out how to make adjustments to it."
The manual setting for white balance is weird! You can adjust the green and red channels to find the balance, it's not a good solution (yet) but maybe you want to pop a ticket on GitHub to get the kelvin scale manual whitebalance?
Thanks for sharing this project. I just tried it and found it incredibly easy to install and highly configurable.
Just buy a better web cam without the hassle. What a stupid projecg.
🙄
Your intelligence is summed up as an emoji. Even the text-emoticon have done much better.
If you’re going for the most pretentious comment award you’re trying way too hard.
You can follow your own advice silently if this doesn't appeal to you. What a stupid comment.
and a better webcam would cost? this project is about getting quality for a reasonable price. and the pi is a multi purpose device, and the better webcam, hmmm..; pretty ignorant commentary
Time to balance out the stans here. To use this webcam: Step 1) Plug in usb into your tower pc w/ vodka cooling that you all have. Step 2) wait 10+ seconds for the pi to boot. Step 3) wait a couple seconds for the cam to prepare. Step 4) Done, ready to win any slowruns. lel.
This .... is pretty much exactly what I was looking at doing with my plethora of spare pis. I wonder how difficult it'd be to work with a raspberry pi 4 instead of a zero - I've already put together the Adafruit 3d printed case from thingiverse.
If you go with the Pi 4, you need to make sure to download the older February 2020 Pi OS (then called Raspbian) release. See this issue in the tracker: Not working on Raspberry Pi 4B, 3B+, 3B, A+.
thanks for the heads-up!
Only $100 for a webcam is a deal? You know that a normal USB webcam can be had for $20 right? I’m all for the Raspberry Pi but “plug the Pi camera in and flash a SD card” is a pretty pointless application when there’s cheaper alternatives available.
The whole point is that there are many ~$100 (and much more expensive) webcams, and the $20 webcams are a whole level of quality worse than the $100 tier. The Pi camera in this post competes well with the same-priced cameras, with the added benefit that it's fun to make, is more of a conversation piece, and can be used for many other purposes as well :)
The point isn't that this is the cheapest webcam in the world. There are zillions that are cheaper. It's that it is a very good webcam for the same price as a number of other very good webcams—most of which are hard to actually find for $100 right now.
Not to mention the ability to swap lenses as needed. My Logitech C920 is fine for zoom calls, but there are times that I'd like to swap over to a fish eye to show off a 3d print in progress.
Seems like an interesting potential webcam to use with Theremino as a spectrophotometer.
Hi Jeff,
we fixed all the mentioned problems (high cpu load/temperature, limit to 720p) and much more over at showmewebcam. Additionally it is quite easy to build yourself, if you don't trust a random image file :) Finally, you can still log in over either SSH or via the USB serial console. Feel free to join us or use our fixes.
It sounds like I'll have to at minimum test it out on one of my Pis soon :)
I like the fact that
showmewebcamis actually getting active development—so many of these other projects end up just getting abandoned after the original author gets it working once!I ended up buying on of these. https://www.amazon.com/dp/B07R3JZSBZ/ref=cm_sw_r_cp_apa_fabt1_ZeiVFbYV1…
How'd you like it?
Great project. The thing I most like about it is how it gives this collection of hardware real usefulness right away along with a "restore point" I could use if I end up hacking on it to do more once I get it working. Thanks for putting this together.
One suggestion: Could you put the links to the parts in this article?
I actively avoid clicking truncated URLs in YouTube descriptions both because of advertising redirects and because it's a crummy experience. On iOS it tries to launch into YouTube.app's built-in web view and on desktop I get an interstitial "are you sure you want to leave YouTube?" web page.
So by going your route, do you get manual control (Well programmatic control at least) over things like Shutter Speed, ISO, etc.?
That would be a huge benefit to this over webcams.
Yes but not out of the box on this project, at least not yet. There is another project that currently has some more configurability, but a bit of a different approach to installation, showmewebcam.
Love this! I already had a Pi Zero lying around and I've been looking for any excuse to buy the HQ camera. Works perfectly on my Macs and Pi 400. Thanks and keep updating on any other HQ camera uses you find...
I just set this up and it's working great so far! is there a way to set the white balance for this though? the White balance is a bit off and I'd like to be able to adjust it in the Pi itself since I'm using it for google meet and there's no way to change it there.
I'm still pretty new to Linux and Raspberry Pi, so I might need a bit of hand holding (I've dabbled in Linux over the years and this is my first Pi).
Any help would be appreciated.
Thanks!
If you can connect to the Pi, it seems like you could run commands like the following on the Pi:
But follow this issue for more progress making picture control customization easier: Allow configuration of resolution, framerate, white balance, brightness.
Cool! Thanks!
Would this project work on the CM4 using the regular I/O board?
You know... I haven't tested that, but it would be interesting to find out! It seems like it should.
I would be very interested to know. I'd like to use this or a 3 A+ to make a pan-tilt webcam with the Pimoroni pan-tilt hat.
How exactly would one connect a Raspberry Pi 3 A+? I know you have to set the overlay in /boot/config.txt, but is the power port OTG enabled, or do I have to use the USB A port? If I have to use a custom cable on the A port, what's the correct pinout?
Or, could I use something like this with a standard USB C cable: https://www.adafruit.com/product/4053
Hello Jeff,
You wrote that it works in Teams.
I setup the camera and yes, it works fine with Windows 10, in the Teams client I even can see my own preview, but none of the other meeting participants can see my video.
Did you use the Teams client or the web browser?
Thanks,
Balazs
Please see the following issue to see if it resolves the problem in Teams: Low FPS in Google Meet and issues in Microsoft Teams.
Interesting project, but you can really get very nice USB cams for under 30 bucks - https://www.amazon.com/gp/product/B072MMH33F to name one. Works perfectly on a pi.
Built it with a Pi ZeroW and an old Pi camera module I had in the drawer. Worked perfectly.
My only question is can you advise if it's possible to tweak the settings for the camera? I have it in a Pi Zero case and would like to rotate the picture 90 degrees.
I looked at the parameters for uvc-gadget and v4l2-ctl but don't see how to rotate the image. It seems I can change the contrast and perhaps the brightness.
Had the same question - the feed from the v2 https://www.raspberrypi.org/products/camera-module-v2/ when plugged into a computer (Macbook in my case) has the image rotated clockwise, as if in a "portrait" mode. Assuming this is the difference between the HQ module and the v2 module. Still completely functional, but I wonder if there's an easy fix? Or way to rotate for user preference? Perhaps a quick edit to a config file? Thanks again, really enjoying your channel and getting into the pi.
Just found this on the github and will give it a try this week https://github.com/geerlingguy/pi-webcam/issues/16
Yes, that worked. For some reason after I edited the file and ran "sudo reboot" the PiZero didn't respond when it came up, so I unplugged it and plugged it back in. From there everything worked as before but now with 90 degree rotation.
I had searched for a rotate command with "v4l2-ctl --help-all | grep -i rotate" and came up empty. So I'm glad the link you provided gave a solution. Now if you have a command to get rid of double-chins . . .
Haha, I would take that 'make me look pretty' command too, if anyone finds it :D
Jeff-- Just want to say how much I've enjoyed a number of your videos (I know, I should support you on Patreon, and I will). Keep up the great work.
My wife gave me an Arlo video doorbell for Christmas and it installed and ran very easily. But I imagine you have realized a Pi camera could do the same (if it has enough compute power). Have you considered such a project?
--Hal
There are a few projects like https://piwebcam.github.io which have more configurability for an IP-camera setup. For cloud-based video notification services, something like Ring or Arlo has a leg up for the battery integration and features that make it really quick to set up and easy to keep updated.
But you could build a system based on Pi cameras without too much struggle!
I have a Pi 2B & a Pi 4B (8GB). If I were to use either one of those for this project, would they fix the dropped frames & latency when set to 1080p? I was thinking of getting a usb male to male adapter to plug into my Pi and my Windows, but I want to know if it's only compatible with the data micro-usb port on the Pi Zero. Thanks!
Hi Jeff,
Thanks for pulling all this together and sharing with us.
Do you know, or do you have any ideas, how this could be used to do background replacement in the PI, rather than using the Teams, or Zoom feature? Not all of the Video Chat tools I use are able to do this at all, or well in some cases. It would be great if this processing could be added to the PI, and work well without a green screen.
Thanks!
I found this https://elder.dev/posts/open-source-virtual-background/ but not sure if the Pi is up to the job to do the image processing required in the PI. What do you think?
Not running on the Pi, but if you have a newer NVIDIA gpu in the PC, you can run the broadcast app for an AI based green screen that works with teams, zoom, etc.
https://www.nvidia.com/en-us/geforce/broadcasting/broadcast-app/
Nice work!
Had some problems adjusting the focus of the camera. Found out that the camera i bought , the 6mm 3MP needed the back focus attachment ring not tightly screwed in but about half way to get a picture at all!
Thanks for this Jeff - a good idea and looks like good work to simplify things for the rest of us. I'm going to build this and then come back with 1000 questions.
Didn't work.
Hi Jeff.
Thanks for your excellent explanations. I used it on my Rpi zero w. it works fine for the first time when I plug the Pi into my laptop and pi boots up. I use a separate power source besides my Rpi. when I unplug and re-plug the connection, the laptop does not recognize the uvc camera anymore until I restart the Pi. do u have the same problem?
Does this work with the standard Pi Zero Camera Module?
Yes.
can u add autofocus using something like a ir proximity sensor....
ya u can try u may add a laser to sense the distance from the persoj and then using the servo adjust the focus of lens......
Hey Jeff,
I'm having trouble changing the resolution to 1080P on a raspberry pi 4. I followed your original guide and got it working with 720P default.
To switch to 1080P, my understanding is that you go through all the steps of the original guide, including running the Ansible Playbook, but DONT SHUT DOWN.
I was able to edit both the piwebcam and multi-gadget,sh scripts, then shut down.
The camera is recognised by windows but there is no image in the camera app as before with 720P.
Can you tell me what I'm doing wrong?
Thanks!
I'm trying to use this to build a microscope, but not being a programmer, I'm running into a problem: after installation of git, Ansible and everything else, following the instructions to the letter, when I try to run ansible-playbook main.yml, it comes up with an error - 'couldn't resolve module/action 'make'. This often indicates a misspelling, missing collection or incorrect module path. The error appears to be in /home/pi/pi-webcam/tasks/uvc-gadget.yml' line 9, column 3...' but looking at that particular file, line 9 column 3, assuming counting from 1, just says 'Build uvc-gadget.' I tried modifying that particular line in the file to add '.yml', but it's not working. Does anyone have any suggestions?
Hey Jeff, Great work mate.
Could you share some info on how to set the awb-mode. The automatic white balance is changing the video colors all the time for me.
Thanks
Thanks for doing this Jeff. I've been binging on your Youtubes recently, and this little RPi Webcam project I put together the other day once some bits were delivered pushed me over the line to sponsoring you on Github.
I foudn the Adafruit tutorial about setting up a Pi into read-only mode, with a nice little script to automate it, nailed it for me - now I can pull the USB cable without worrying that the uSD card gets corrupted.
https://learn.adafruit.com/read-only-raspberry-pi
Hi Jeff,
Thanks for all this. I followed all the steps and I am stuck.
I have the Pi Zero W connected via USB to a Linux mint via USB as per your guide.
I can get into the Pi via VNC and I can use the camera that way to take pictures but google hangouts doesn't recognise the camera as an option.... so the camera is there and running but I can't see it as a USB webcam, or at least not with hangouts.
What could be the issue? What can I try? How does the playbook work? Can I run it via VNC? Do I run it, shut it down and try every time or after running it once it stays "alive" regardless of shutting down the pi?
Cheers
Jeff, you're truly a diamond in the IT world.
Thanks for another amazing tip on how to use my Pi and also for the all the Ansible stuff.
[this might be beyond the scope of this thread, but here it goes]
I've been using this camera setup with Zoom and Google Meet for the past year and it has been great! Yesterday I upgraded my Mac to 12 and suddenly it does not work. It sees that it is connected as a USB peripheral, but no applications seem to see it as a camera. Any idea of what might be the issue? (tested with a 2020 MacBook Pro 13", and a MacMini M1 2021).
... and not interested in discussing the virtues or foibles of Macs. my other machines are a RPi400 and XPS 13 (Ubuntu)... and about half a dozen of RPi4s, RPi3s... all the way to the original RPi. (now that I think about it, it is more than "half a dozen").
Looks like there's a problem with MacOS 12 and the mjpeg usb camera system. It looks like the broadcom driver supports h264 streaming but that's not in the uvc gadget yet.
Ok, Mjpeg was a red herring. In https://github.com/showmewebcam/showmewebcam/issues/164 we found that the problem is the enumeration of the USB configuration. There is a fix in showmewebcam, just need the same fix here.
I'm sure Jeff already moved on to a PiZero2 3D camera or something though.
Haha, no, haven't done that, but good to know it's fixable.
I've added a link to that issue from the one I'm using to track compatibility: https://github.com/geerlingguy/pi-webcam/issues/54.
Hi Jeff,
thank you for this nice tutorial and your work! I realy need this solution for a project, but I can‘t get this working - at least not with win10/11 nor with linux as host. Maybe it is just outdated, but it also doesn‘t work with older versions of raspbian.
The uvc-camera is detected as well as the serial device, but after recording one frame the pi Zero just disconnects. You still use your fork of David Hunt‘s uvc-gadget which is outdated as well - please have a look at his github repo where he referes to another repo - but even after updating to the latest uvc-gadget Version from PeterBay - it is still the same.
Would be nice if you could update this project or you or somebody else could share an Image of a working version - please.
Sounds to my like an underpowered device, when that happened i had to change the connected usb cable / the connected Port or to plug a powered hub in between.
Doesn‘t work anymore- please could somebody Share a image of a Running version with Pi Zero?
So what Pi could run this at 1080 60 frames? I understand that the Zero won't cut it, will a Pi3 do? or it has to be a Pi4?
At least am I running the hq camera module off a pi zero 2 w, without any droprates at 1920 by 1080.
Dear Jeff,
thanks a lot for your great videos - especially this one!
I thought about doing the following and this video is quite close to this and was an inspiration for me:
I am live drawing on an iPad and want to make the iPad's screen content available in Microsoft Teams (as a USB camera).
There are adapter solutions to do that but I thought using a Raspberry Pi Zero as an USB dongle could do the job better.
The parts I have seen (not tried):
1. https://github.com/FD-/RPiPlay allows you to mirror the iPads screen (via AirPlay) on a screen attached to a Raspberry Pi
2. uvc-gadget (this page and vide of you) can provide a PI cam's video as an USB camera to a PC
So basically instead of real cables I imagine a "pi zero USB dongle" which mirrors (Airplays) my iPads screen content and provides it as a USB camera signal to my PC (where I can use it in MS Teams). If you want instead of connecting a monitor via HDMI to the raspberry pi the monitor is my "Camera" app on my Windows) PC. Pi zero would be great, since no power supply is required, just USB.
Notes:
- It's my works PC so I am not allowed to install other software there. A USB camera (pi) could be okay and minimal invasive.
- Immedately I could also make a screenshot (from the iPad screen) via the Windows Camera app and e.g. use it in my documentation (no copying over over the internet or other more complicated ways).
- And yes I am aware, that I could use MS Teams on the iPad as well. I just want to stay at my PC and use the iPad as a drawing pad and have the drawing right away on my PC.
So far I could not find anybody doing this. Also I have not enough experience to put this together myself.
I thought you might like the idea and it could be an idea for a future video of yours or you have a feeling if this is possible at all.
Any comment is appreciated otherwise I am happy that I could drop my thought / question (for the first time).
Greetings from Munich, Germany
Joe
Hey there! This Raspberry Pi Webcam project is pure gold! I totally resonate with your realization about spending hours on Pi projects only to find out a cheaper off-the-shelf solution exists. But not this time – the HQ Camera and Pi Zero combo as a USB webcam is genius! btw, I picked mine up at vilros.com
Your step-by-step guide is a game-changer, especially for those of us who aren't hardcore programmers. Ansible deployment is a stroke of brilliance, making it accessible to a broader audience. And kudos for considering security concerns with alternatives like showmewebcam – your cautious approach is commendable.
I appreciate your candid take on the tradeoffs – the lack of a built-in mic and potential latency issues. Your honesty helps us set realistic expectations. The adaptability angle is fascinating, too – turning the Pi into a webcam, timelapse tool, and even for astrophotography? Count me in!
It's reassuring to hear that during these webcam shortages, the trusty Pi is still in stock. Your post has inspired me to give this a shot, especially since it's a learning experience with a tangible, useful outcome. Looking forward to exploring the creative possibilities you've hinted at. Cheers for sharing this gem of a project!