I've been a Mac user for years, and I've repaired hundreds of different Macs, from the early II series to the latest 2015 and 2016 model MacBook Pros, iMacs (and other Apple hardware to boot!), and there is almost never a hardware situation where I've thrown in the towel and told someone to ditch their Mac.
The 2011 MacBook Pro has, for almost a decade, been the exception to that rule. There was a major flaw in the AMD Radeon GPUs included with that model year's logic board which seemed to cause GPU failure either due to overheating, internal chip problems, BGA solder joints getting broken, or a combination of the above. The problem was so rampant, Apple was forced to set up a free repair program for affected MacBook Pros—though the 2011 model has since been dropped from that program. I've handled three 2011 MacBook Pros (none of them my own—I had an Air back then), and all three of them were scrapped because of the GPU issue.
My sister just turned over her 2011 15" MacBook Pro, which she said was running slow, and I dug in. First off, it was using a slow 5200 RPM hard disk; after replacing that with a nice, fast SSD, and ensuring she had 8 GB of RAM in the laptop, I was pretty pleased with my work, and was about to shut down the laptop and send it on its way. But then, I noticed the display would 'glitch'. Horizontal banding, some weird color issues... things I had seen before.

Replacing the slow hard drive with an SSD makes this thing feel brand new!
Beginning of the Debugging Journey
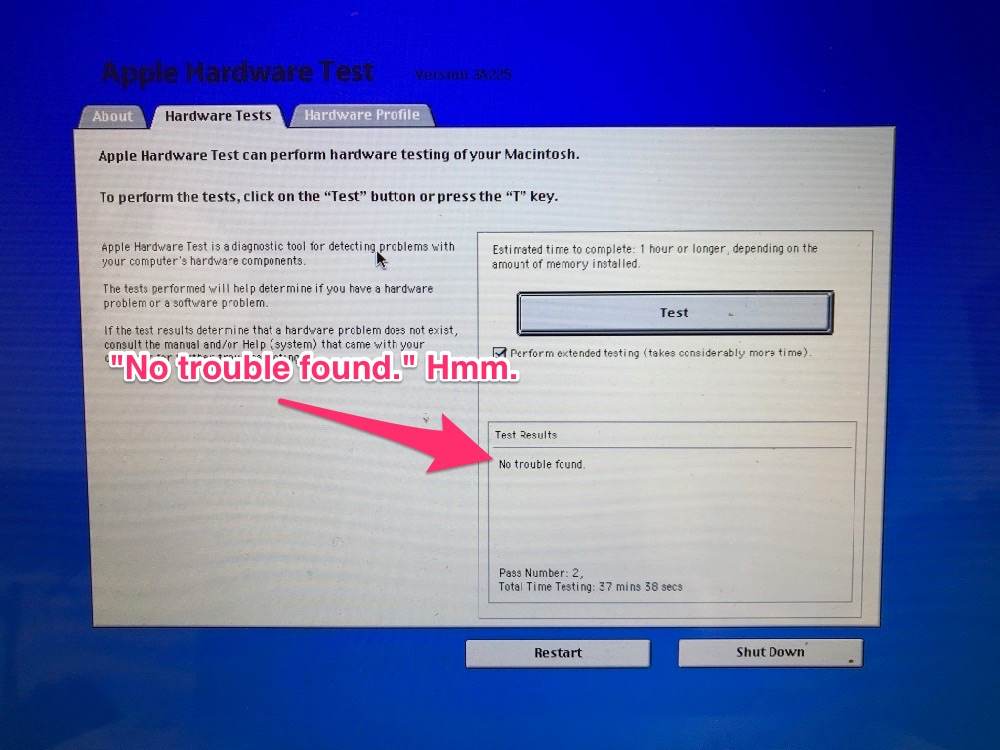
Fearing the worst, I rebooted into the Apple Hardware Test mode (right after startup sound, hold 'D' key). I ran the quick test, which found no errors. So I ran the full (super long) test... no errors again. Huh—usually the GPU issue would present itself during the AHT, but not this time.
So I rebooted. Apple logo, then progress bar, then grey screen. Ten minutes later, still a grey screen—and the fans are spinning madly. Not good.
So then I tried:
- Safe mode (hold down Shift from startup sound through to login or desktop)—same thing, stuck on grey screen after Apple logo + progress bar.
- Recovery mode (hold down Command + R from startup sound to Apple logo)—same thing, again.
- Internet Recovery mode (hold down Option + Command + R from startup sound to Apple logo)—same thing, again.
Getting nervous, I then tried single-user mode (hold down Command + S from startup sound until you see the matrix text going past as the Mac boots into its FreeBSD underpinnings)—and was happy to find at least this worked fine. I did an fsck -y to check the hard disk. A few records were off, but they were repaired successfully. I didn't see anything obviously wrong, but knowing from past experience that problems usually surface only when the GPU/Radeon .kext files (Kernel Extensions) are loaded... I was assuming the worst.
I was going to pop out the SSD and RAM, and suggest my sister sell the laptop for scrap... but then I thought twice—I would look if there was any possible way to resurrect this thing.
Obviously everything else was working fine—Internet Recovery proved wifi/networking was okay. Single user mode proved disk, RAM, CPU, and even integrated graphics were okay. The only thing that seemed wrong was the Radeon GPU. Surely there's a way to bypass it!
Lucky for me, I found this answer on Stack Exchange: GPU problem - Boot Hangs on Grey Screen.
Attempting to drop the Radeon .kexts
That answer had a fairly comprehensive guide to—using software changes only—disable the Radeon GPU and get the Mac happy again.
After running through the guide twice, I eventually got the Mac to boot... to a grey screen again. But this time it would reboot itself within a minute or so, so that was different! Alas, after hacking around a bit more with System Integrity Protection disabled, the reboot cycle eventually became quite short indeed:
(This got old, fast.)
Hitting dead ends when attempting the software fix, I was about ready to throw in the towel... but then I scrolled further in that Stack Exchange answer, and noticed a link to this interesting article: MacBook 2011 Radeon GPU Disable - Real Radeongate Solution.
Being somewhat handy with a soldering iron (but having never done SMD work—basically, soldering little bits and bobs that are the size of a speck of dust!), I thought I'd give it a go. Better than telling my sister to junk the laptop!
Hardware hack to cut off the GPU entirely
I'm not going to rehash the entire article from RealMacMods (after all, they found the process, and they also offer it as a service for $85 for anyone not willing or able to do it himself!), but I did want to highlight a few parts where I think it's important to further illustrate what needs to happen.
The first part of the process involves prepping the software side of the Mac by doing the following:
- Build a USB boot drive with Arch Linux.
- Boot the MacBook Pro from said USB drive (hold option key at startup to choose it).
- Follow the directions to get in the right Arch Linux boot mode so you get to the console.
- Hack your EFI by adding a file telling your Mac to disable the Radeon GPU.
- Reboot into Safe Boot mode (Shift key all the way through startup).
- Shut down using the Apple Menu > Shut Down option.
Again, see the source article from RealMacMods for the gory details (they even offer a $10 download to package up the fix for you—well worth it if you're not used to a command line!).
Once that's done, it's time to get your hands dirty, by permanently modifying the MacBook Pro's logic board!
First, to prepare the patient for surgery:
- Unplug the Mac, put it on a nice, non-scratching, non-static surface, and flip it over. (I use a cutting mat on my workbench... which is an old desk).
- Unscrew the 10 tiny phillips screws on the bottom.
- Pull off the back cover (should come off quite easily unless it's dented somewhere), and place it aside.
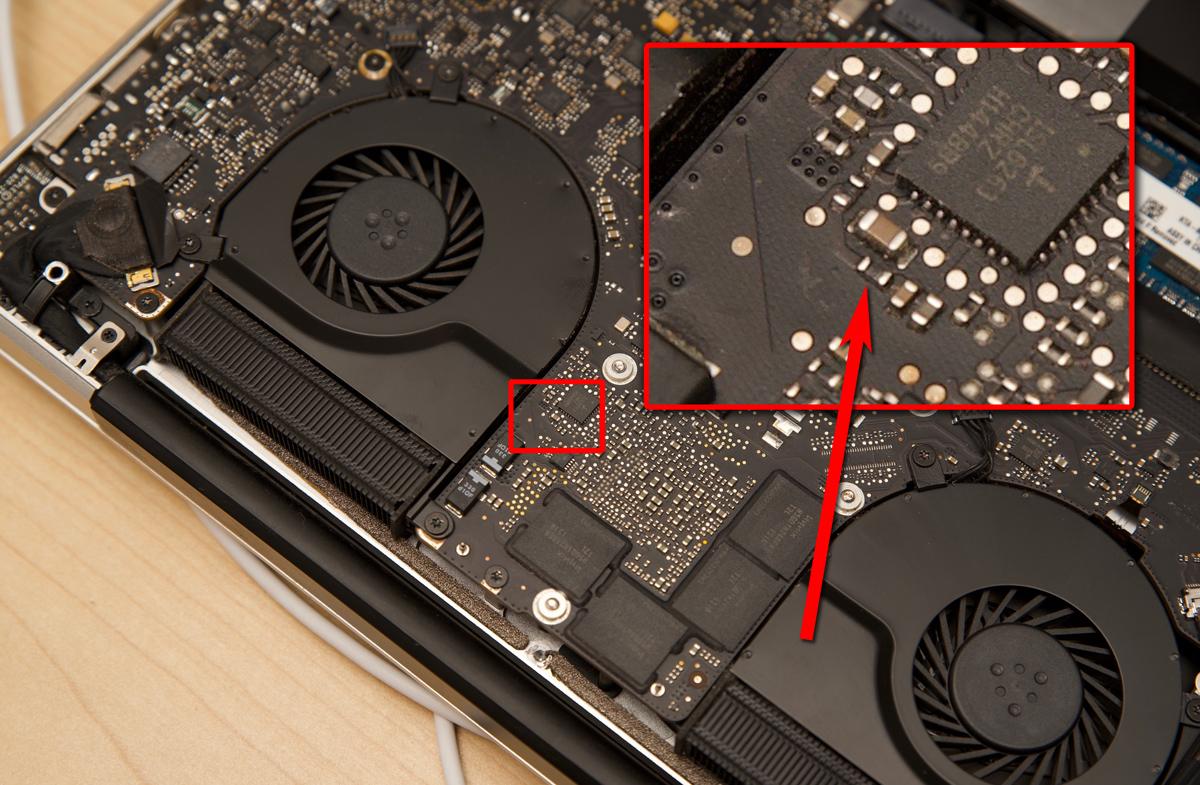
At this point, you're going to want to make sure you have the tools to make this operation not-impossible—you need to desolder / remove a tiny resistor ('R8911') from the logic board, and you need a few tools to do that:
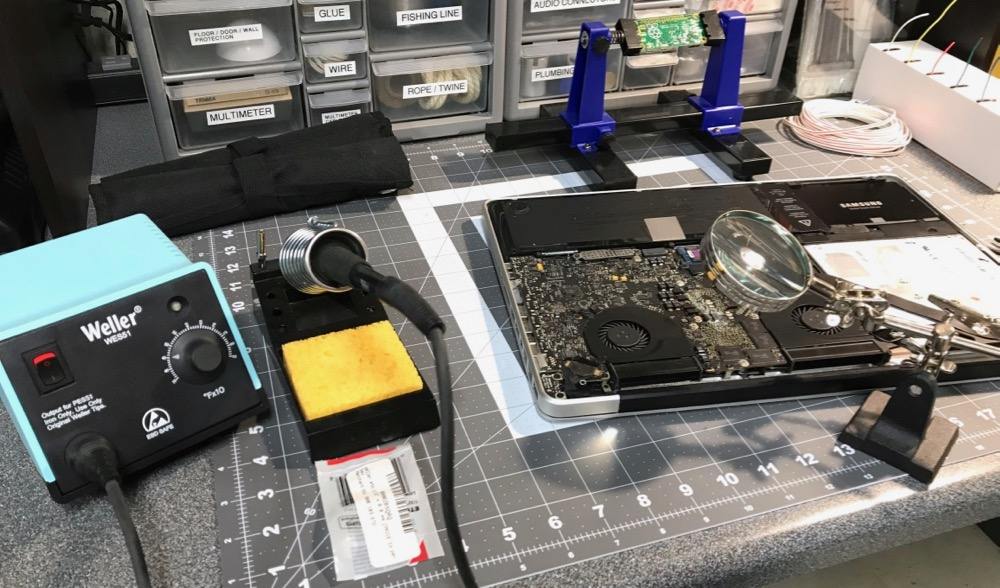
Pictured: Weller soldering station, helping hand with magnifying glass, and a precision tip for the soldering iron.
You can use a handheld magnifying glass... but if you're like me, you're going to need both hands to steady the soldering iron when desoldering the tiny, tiny resistor from the logic board. How tiny? Take a look through the magnifying glass:
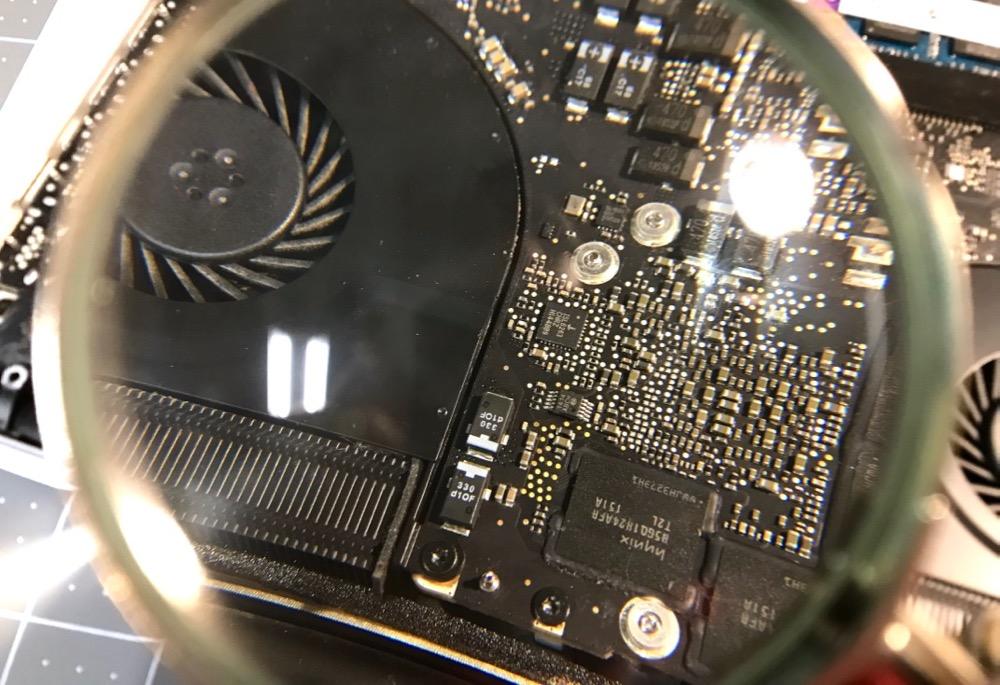
Still don't see it? Let's zoom and enhance:
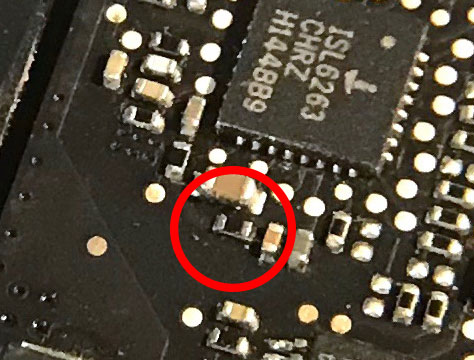
And a wider shot, for perspective:
So, with the resistor identified, it's time to turn on the iron (I set mine to 500°F and tinned the tip with a tiny bit of lead-free solder) and get to work! I hold the iron in my left hand, and provide a little resistive force to steady it with my right hand. Touch the tip of the iron to each metal side of the resistor (where the joints are), alternating one side to the other for about 1-2 seconds each, until you notice the resistor starts to become free from the logic board. Once that happens (after about 15 seconds in my case), put the tip against the side of the resistor facing the open space on the logic board, and push, with a very slight upward (away from the logic board) force.
You might need to keep heating the resistor a bit before it pops free. And if you're like me, you might shoot the little resistor a few inches across the logic board! Just be sure to do the following after it comes off:
- Make sure there's not a solder joint between the two pads where the resistor used to be. If there are, heat the pads with the iron tip until you can 'wick away' the solder a little. Just enough to not join the two pads together.
- Set down the iron / put it in it's holder, and get the resistor off the logic board. Hopefully you can just lift the bottom-cover-less laptop, turn it over, and you see a tiny black speck fall to you work surface.
After you get the resistor off. Take a second and marvel at it's minute size. And realize there are thousands of these things soldered to the logic board!
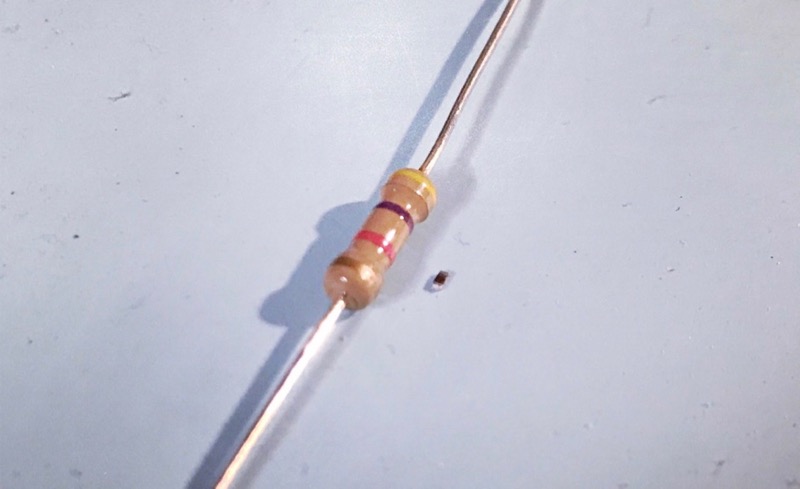
Those are specks of dust in the image—except for the very-slightly-larger black spec next to the standard through-hole resistor. The resistor is small enough I can't pick it up with my fingers—or even a standard needle-nose pliers!
With the resistor gone, one step remains: replace the bottom cover, plug it in, and turn it on!
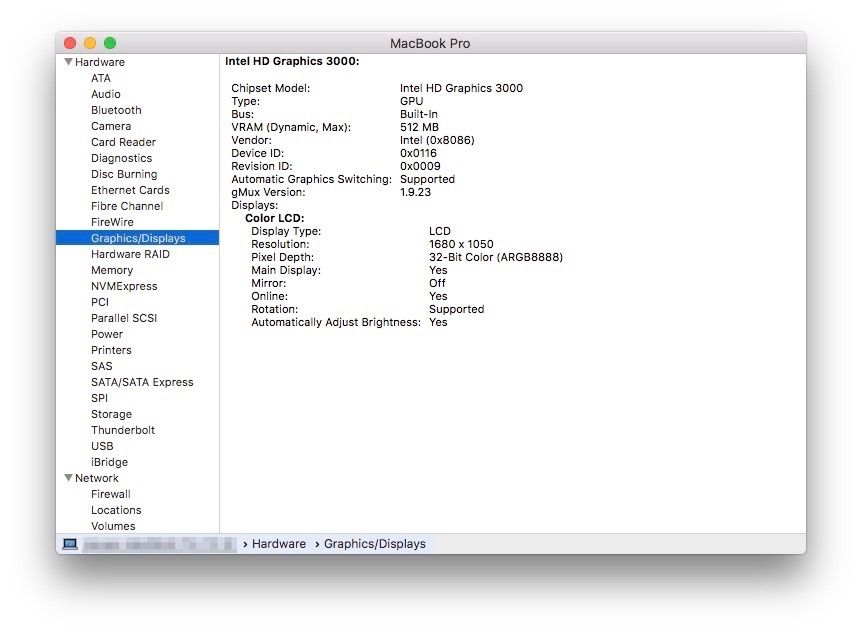
I did so, and less than 40 seconds later (the SSD makes the boot process fast!), the Mac was as good as it's ever been, sans AMD Radeon GPU:
One last thread that was worth a read-through for more background and debugging information was from the RealMacMods forum, After GPU repair issues (R8911 removal). After removing the resistor, be very careful when upgrading the OS or making other major changes (be sure to keep current backups!). And, as suggested by RMM, try to avoid resetting the NVRAM, just in case that makes things go a bit south.
Comments
Wow! I got the Radeon GPU swapped out in 2014 and the computer has been working great until a few days ago. I bought the SW package from RMM, installed it and removed the R8911 and the computer is up and running again!
Just one question, is there any risks downgrading from High Sierra to Sierra? Seems like the brightness and wake issues in High Sierra are non-existent for Sierra.
Thanks!
Hi to everybody! I need to ask if someone have been successful installed Windows 7 , for exemple, in a macbook pro 2011, that has been hacked to fix Radeon problem? Always I've tried to install, when it boots, goes to black screen, because Windows does not load the Intel HD 3000 video card. It looks that it always load in boot the Radeon video card. How to bypass or fix this? I need to have both systems to work, and virtual machine its not an option to my case. Thanks to the autor of this site, and thanks to all! I'll appreciate any help.
Ive been trying to do so too but failed miserably. Have you been able to do it?
Hello! Any chance you have figured out a solution to this problem? The only thing that keeps me from fully using my 15" MacBook Pro (MD322LL/A 8,2 10.14) is the lack of being able to boot directly into windows 10 like I used to be able to. I gave up until I have more time but am hopeful after stumbling onto this page. Maybe another user has a solution? Mine was purely coding so far and I have returned all other functionality to my mac. Please help, it would be appreciated!
Hi All, the same problem with Windows 8.1. However I have noticed that if I boot the USB Windows Installer with EFI the installation is going on without a problem, but at the very end it says that a generic error occurred and it cannot finish the correct installation, and again there is no way to force Windows to load the Intel graphic card.
Any possibe suggestion is welcome!
Thank you.
So after a couple of weeks having the laptop without brightness control and no light after sleep I found out that the culprit is the GMUX device which toggles between the GPUs and controls the backlight signal, in High Sierra a kext was updated to depend it seems on having the Radeon GPU but if you removed R8911 it's like its not even there so the system will just ignore the lines of code that talk to the GMUX. Good news is that the GMUX and the backlight controller are still there, follow post 179 which takes the kext that changed from Sierra and uses it for High Sierra https://forums.macrumors.com/threads/disable-a-failed-amd-gpu-on-a-2011… with one exception, on step 21 do csrutil enable (to re enable SIP protection which is important for safety) since we don't need the utility there to power off the GPU since following this method powers it off already (that page assumes the deactivation was done via another method). Note that if there are more updates it will need to be reapplied, it has also been confirmed as working on Mohave so maybe these computers can still run these OS.
I did this and it works good but the mod requires an additional step if you are using high sierra. That additional steep is to install a jumper wire so that the backlight will turn on after the computer wakes up from sleep. Follow directions on realmacmods.com for "MBP 2011 GPU Repair." Click on "Show Manual Steps" to see details. Note that the jump wire is different for 15 inch and 17 inch computers.
Hi Kevin, have you personally tried the jumper mod ? I have disabled the AMD by removing the R8911 and wonder if installing the jumper would bring back the brightness and wake up from sleep in High Sierra ? I have a Late 2011, 17" MacBook Pro.
This may have been covered elsewhere, but I finally managed to get the standard software method (as outlined on github etc) working on my MacBook Pro, after deciding that this mod was beyond me. I think the main issue is that if your MacBook Pro boots to a grey screen it’s impossible to get into recovery mode, which means that you can’t disable csrutil, and this then means that you’re unable to change the VRAM properties. Instead, I booted the machine from a bootable USB of macOS while holding cmd + S, then disabled csrutil from there. The rest of the software mod was then as described.
Thanks for the quick reply Sam. I also managed to use the older AppleMuxControl.kext file from Sierra v 3.13 and Hallelujah brightness and sleep are back! I am so happy with my Mac. I was wondering that if I need to upgrade from High Sierra to Mojave using dosdude1's patch, what challenge lies ahead considering that the R8911 diode is not in place? and would it be worth upgrading? Thanks for your time.
Hey Yasser, I'm using Catalina on an Early 2011 17". Before I had R8911 removed, sleep and brightness worked fine (!) (something about dosdude1's implementation of AMDRadeonX3000.kext?) but after taking out R8911 to reduce dGPU power draw I had also to get the jumper wire done (as on the RealMacMods site) to fix wake after sleep. Before that I tried swapping AppleMuxControl.kext for several versions from Sierra, and also tried Stecker870's "MacBook-Pro-15-Zoll" AppleGraphicsControl.kext, but none gave back my brightness adjustability. I ended up using a utility called FunctionFlip to change the brightness keys to F1/F2 while leaving alone the rest of the special keys along the top of the keyboard, so that I could assign the brightness keys to brightness up/down in QuickShade. The only quirk is that QuickShade doesn't work on the cursor, but I'm willing to accept that since I don't use low-brightness modes very often.
If you can not boot into recovery due to grey screen lock- You can boot into recovery, directly after booting into single user and temporarily disabling the GPU with "nvram fa4ce28d-b62f-4c99-9cc3-6815686e30f9:gpu-power-prefs=%01%00%00%00" this is all based on the fact you can see the text you input, which for me was difficult because the screen was distorted. It took several tries for success, then reboot into recovery.
Followed the proceedments real close and all I get now is a Black screen.
So sad!..
I have done the disabling AMD hack thing. But now my battery light will not light...fans are on a constant high spin. Also I cannot enable to battery percentage in high Sierra. Any suggestions.
Just glad I can now use my MBP 2011 15" however this battery/fan issue is a tad annoying.
thinking of buying this chip cutter - https://www.amazon.com/gp/product/B001YHH8Y4/ - but that resistor looks so small that i am not sure this tool would be able to get into the space around it. There's no way i'm going to try the soldering method, so this is the only way i'm going to attempt this . Would value your opinion first, thanks!
Many thanks for this tutorial. I ama Windows user. Got my hands on an old MB pro 2011. It ise MB Pro 15 early 2011 i7. I did the nvram thing below and was working fine.
https://gist.github.com/cdleon/d1eff7246a25193304284ecec40445b0
I have also removed the resistor.
I installed mojove etc and also the screen brightness hack etc.
Today, I forgot and did the "Command + Option + p + r" because left shift key wasn't working and it said do that.
Now whenever I boot I can hear the chimes but see completely black screen. Can I recover from this?
I also created the archlinux thing but I can't even boot to recovery etc. Holding option key doesn't do anything either.
So reiterate the question: If one clears the NVRAM after doing the resistor removal and end up with black screen. Anyway to save the situation?
Many thanks for any help you may provide.
Same situation. I removed the resistor, the mac went into black (sound and keyboard light are OK.).
NO idea what is happening.
Hi, thank you for this tutorial !
My question : I would like to do a clean install on a new ssd. Should I be doing anything in particular to keep this repair ? A risk of having a black screen ?
Macbook pro 15" early 2011, high Sierra (can I install Sierra ?). I removed the resistor.
Thanks !
I divided my HDD into two partitions and installed El Captain and after - Sierra - on the second partition. It was just to keed my initial Snow Leopard without modifications in case something will go wrong.
Everything works perfect, and I don't need to apply modifications again. Installations were done with removed resistor.
Yes, it is not completely clean setup, but it is also not update, cause El Captain was installed on new partition.
Brightness buttons work on Sierra after all.
Hi guys!
Has anybody experienced an issue with FaceTime built-in camera? I have 15" MBP, High Sierra 10.13.6. After I open facetime app, green light next to the camera goes on, but I can see just nothing, black window.. I tried also other apps but also not working..
Thanks for any advice!
Hi, I have a Macbook Pro 17" late 2011 with the same sympthoms, It received a new logic board under warranty which has since failed as well. I'd like to get it up and running again if possible. I have succesfully done the software steps, but after checking for the resistor, I found that my logic board differs somewhat from the one pictured. I have located the ISL6263 chip, which sits in the same location but it is mounted rotated 90 degrees clockwise. The surrounding passive components are also distributed differently. Therefore I have no clue which resistor to remove. Anyone have any ideas? I'm fine by running Ubuntu on it if that means that I don't have to do a hardware mod. But running MacOS would be preferred.
Thx in advance for any tips.
Arjan
I was also fine running Linux on my MacBook. I ad the same issue where Apple fixed the board under warranty but then it failed again anyway. I posted below that I was actually able to get my 2011 MacBook to run macOS again by installing the patched version of Catalina from DOSDude1. I'm very curious if anyone else can get this same method to work. If you try it please check back here and post your results.
I have two success stories to share about the 2011 MacBook Pro. Like many others, I had a bad AMD graphics chip in my MacBook. After a while, the screen developed ugly horizontal lines and the computer became mostly unusable. I tried to re-install MacOS with no success. I tried to install Windows 10 with no success. I tried various hacks but the graphics issues persisted no matter what I did. I was actually ready to scrap the machine. BUT, I had an idea. Why not Linux? So I made a bootable USB drive with Mint Linux on it. Success! I ran the machine on Mint Linux for nearly 8 months. The AMD chip was basically ignored by Linux and just defaulted to the Intel graphics. However, just two days ago I had another idea. Why not Catalina? Yes, a version of MacOS not at all meant for the 2011 MacBook series. Using a hacked Catalina installation USB (Google how to install Catalina on an old Mac) I ran the installer. To my absolute astonishment, the notebook booted up into MacOS as if nothing was wrong. Why did this work? I don't entirely know, but my best guess is that Catalina simply doesn't carry the drivers for the discrete AMD graphics chip and therefore doesn't use it! And so far, so good. I've been able to play Minecraft, browse the web, use iTunes (Music), and have not had any graphics issues. I'd really love to know if anyone else can replicate this. I know the 2011 MacBook Pro is a 10 year old machine at this point, but it's still a usable machine and worth trying to fix!
GOOD NEWS, Brightness Buttons work now with Mojave and Catalina! I use the Patcher from Dosdude1 and there is a new Patch (Backlight Control Patch) which I've testet on a 17" Early 2011 and a 15" Late 2011! Also the Macbook display wakes up from Standby mode with this Patch installed. So it is no more necessary to make this jumper wire on the logic board!
Bye
Michael
In my opinion the linux/grub detour is too complicated (at least if you are only interested in mac os) - following the gist from the cdleon github page works just fine. Then I removed R8911 to keep things cool. And yes, the screen will be pitch black if the pram is reset - but that is no real problem as the relevant nvram variable can be set by following the instructions blindly. I actually did that because I had to reset the pram for an unrelated reason. Best to keep a printout of the instructions somewhere...
I can confirm that backlight adjustment works fine with these modifications in place and the dosdude1 Mojave patcher. There was no backlight adjustment under High Sierra but after manually executing the Mojave patch from http://dosdude1.com/mojave/patchupdates/2011bklt.zip everything works there as well!
Apart from that, electronically inclined mac lovers looking for a solution that survives pram reset and (optionally) has brightness control via the brightness buttons can try to flash their gmux fpga:
https://github.com/Sjenja87/dGMUX_BKeys
I almost did that, but then saw no reason to because the first solution works pretty well.
Hello everyone. I performed the resistor removal process on my MBP, but when I turned it on, the display no longer turns on. Has anyone experienced this problem before? Did I miss a step?
sir I bought a 2011 MacBook Pro. Put macOS Catalina Patcher and the computer works fine.
But when using the computer for a while (like watching YouTube videos) it starts to heat up. Is there a solution for this?No hardware modification has been done on this my MacBook Pro far.
I noticed that my macbook has the error (Screen WILL NOT turn on after going to display sleep).
Disable MacBook Pro Dedicated GPU was also done correctly as told you
http://dosdude1.com/gpudisable/
Can you help to fix this?