In the pursuit of doing crazy things on a Raspberry Pi, my latest endeavor was to see if I could consistently pipe more than a gigabit per second of traffic through WiFi using a Raspberry Pi.
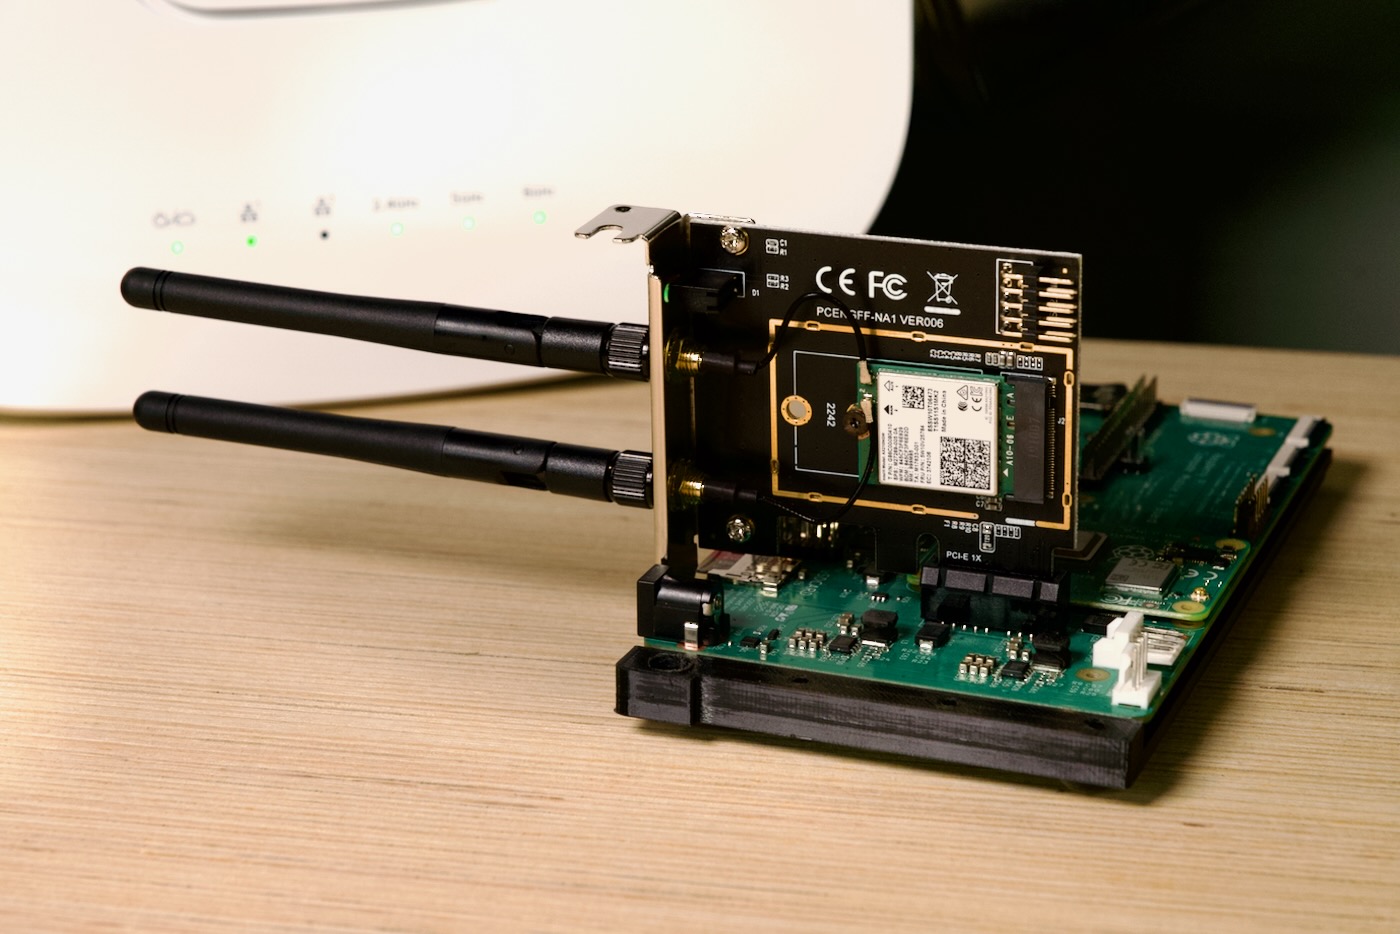
In the past, I had some faltering attempts where sometimes things would work—sort-of—using WiFi 6 (802.11ax, 40 MHz bandwidth, 2x2) using an Intel AX200 M.2 card on the Raspberry Pi Compute Module 4.
But Netgear saw my post about upgrading to 2.5 Gbps networking and decided to send me an upgraded Insight WAX630E access point—the one that does WiFi 6E with full support for 6 GHz and 160 MHz channel width. I had previously tested on an ASUS RT-AX86U (WiFi 6 only) and Netgear WAX620 (also WiFi 6 only), and it was high time I tried everything on the latest version of Raspberry Pi OS.
Here's my test setup:
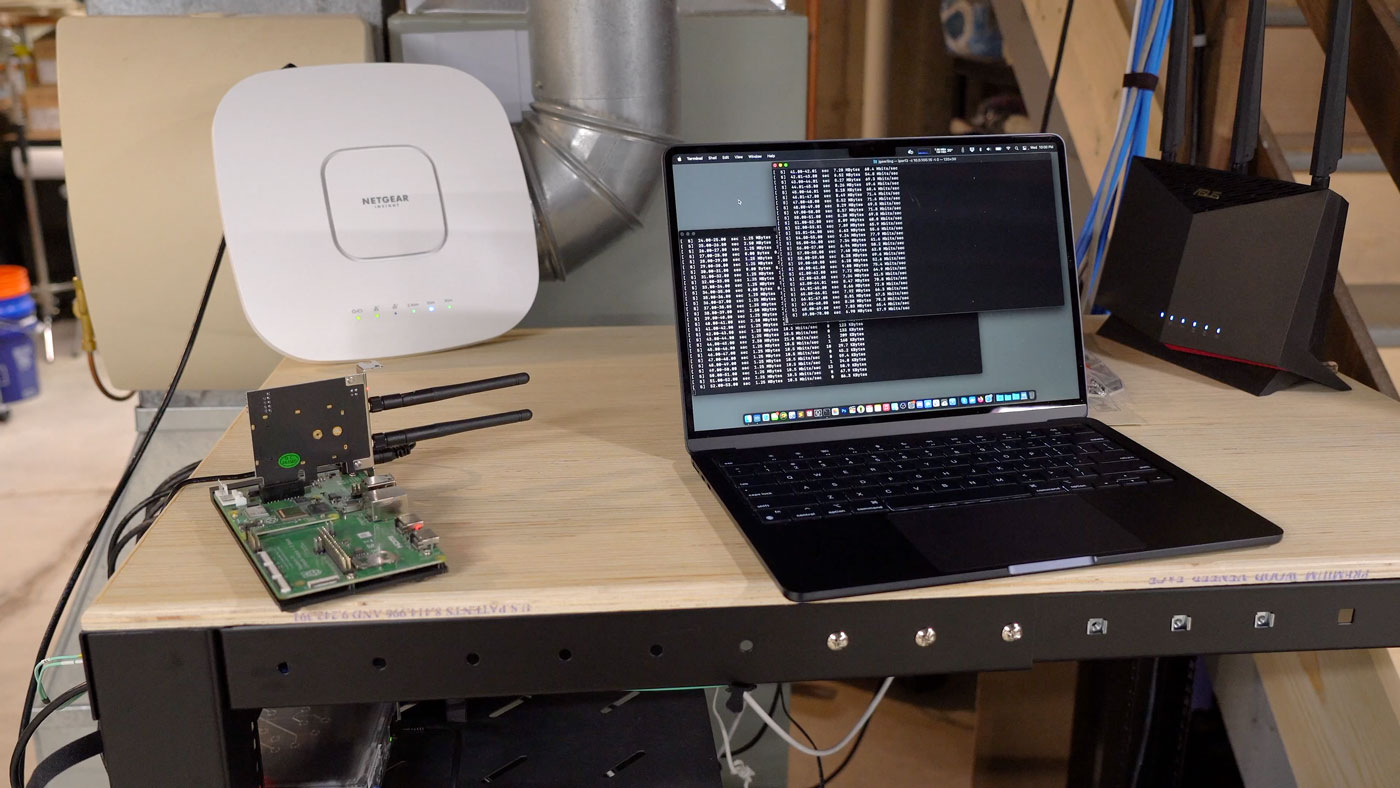
If you want to skip the rest of this post, I also made a YouTube video about how I upgraded my home WiFi using the Netgear WAX630E pictured in the background, how I got the Pi working on the 6 GHz network with an Intel AX210, and how I benchmarked it against my M2 MacBook Air. You can watch that video here:
Getting to 6 GHz - wpa_supplicant
I set up a normal connection inside wpa_supplicant.conf, but that connected through the Raspberry Pi's own internal WiFi (wlan0). So I made a more specific supplicant file for wlan1 only, and put in the following config:
network={
        ssid="mynetwork"
        psk="PASSWORD_HERE"
}
At first I tried a mixed 2.4/5/6 SSID on the Netgear, but I realized the AX210 would first connect to 2.4 GHz and then to 5 GHz, but not the 6 GHz. So I tried splitting the networks, so I had three SSIDs:
- mynetwork-2.4g
- mynetwork-5g
- mynetwork-6g
And I tried forcing the issue by changing the ssid to mynetwork-6g. But it wouldn't connect. Eventually I discovered the version of wpa_supplicant that currently ships with Debian 11 / Raspberry Pi OS 11 is 2.9, and that version doesn't fully support WiFi 6E.
So I upgraded it following this advice on the Raspberry Pi forums:
- Create a backports file for apt:
sudo nano /etc/apt/sources.list.d/backports.list - Put this inside:
deb http://deb.debian.org/debian bullseye-backports main - Update apt caches:
sudo apt update - Install the version of
wpa_supplicantfrom backports:sudo apt install wpasupplicant/bullseye-backports
I restarted after that was done, but WiFi still wouldn't connect! So my next step was to run wpa_supplicant in debug mode, to see what was going on behind the scenes:
pi@wifitest:~ $ sudo pkill wpa_supplicant
pi@wifitest:~ $ sudo wpa_supplicant -dd -i wlan1 -c /etc/wpa_supplicant/wpa_supplicant-wlan1.conf
...
wlan1: Selecting BSS from priority group 0
wlan1: 0: c8:9e:43:13:4a:81 ssid='mynetwork-6g' wpa_ie_len=0 rsn_ie_len=20 caps=0x511 level=-27 freq=6135
wlan1:    skip RSN IE - key mgmt mismatch
wlan1:    reject due to mismatch with WPA/WPA2
And that apparently, was because the default settings in wpa_supplicant seem to align with WPA/WPA2. The Netgear was set up to use WPA3 Personal.
Getting to 6 GHz - WPA3
Following this ArchLinux guide, I found the solution was to add two more options in my network configuration in wpa_supplicant-wlan1.conf:
network={
        ssid="mynetwork-6g"
        psk="PASSWORD_HERE"
        key_mgmt=SAE
        ieee80211w=2
}
After doing that, the Pi connected over the 6 GHz network, and at the full 160 MHz channel bandwidth:
pi@wifitest:~ $ iw dev wlan1 info
Interface wlan1
    ifindex 4
    wdev 0x100000001
    addr 84:5c:f3:f6:e9:29
    ssid mynetwork-6g
    type managed
    wiphy 1
    channel 37 (6135 MHz), width: 160 MHz, center1: 6185 MHz
    txpower 22.00 dBm
    multicast TXQ:
        qsz-byt qsz-pkt flows   drops   marks   overlmt hashcol tx-bytes    tx-packets
        0   0   0   0   0   0   0   0       0
Further, I placed the Pi setup about a foot from the AP in my basement, so it could get the best possible signal:
pi@wifitest:~ $ iwconfig wlan1
wlan1     IEEE 802.11  ESSID:"mynetwork-6g"
...
          Link Quality=70/70  Signal level=-19 dBm
With that, it was time to run a speed test!
pi@wifitest:~ $ iperf3 -c 10.0.100.15 -p 5432
Connecting to host 10.0.100.15, port 5432
[  5] local 10.0.100.26 port 41196 connected to 10.0.100.15 port 5432
[ ID] Interval           Transfer     Bitrate         Retr  Cwnd
[  5]   0.00-1.00   sec   164 MBytes  1.38 Gbits/sec    0   3.76 MBytes
[  5]   1.00-2.00   sec   186 MBytes  1.56 Gbits/sec    0   3.97 MBytes
[  5]   2.00-3.00   sec   188 MBytes  1.57 Gbits/sec    0   3.97 MBytes
[  5]   3.00-4.00   sec   186 MBytes  1.56 Gbits/sec    0   3.97 MBytes
[  5]   4.00-5.00   sec   188 MBytes  1.57 Gbits/sec    0   3.97 MBytes
[  5]   5.00-6.00   sec   185 MBytes  1.55 Gbits/sec    0   3.97 MBytes
[  5]   6.00-7.00   sec   186 MBytes  1.56 Gbits/sec    0   3.97 MBytes
[  5]   7.00-8.00   sec   186 MBytes  1.56 Gbits/sec    0   3.97 MBytes
[  5]   8.00-9.00   sec   188 MBytes  1.57 Gbits/sec    0   3.97 MBytes
[  5]   9.00-10.00  sec   186 MBytes  1.56 Gbits/sec    0   3.97 MBytes
- - - - - - - - - - - - - - - - - - - - - - - - -
[ ID] Interval           Transfer     Bitrate         Retr
[  5]   0.00-10.00  sec  1.80 GBytes  1.55 Gbits/sec    0             sender
[  5]   0.00-10.01  sec  1.80 GBytes  1.54 Gbits/sec                  receiver

iperf Done.
Indeed; using --bidir to flood TCP traffic both ways, I was seeing over 650 Mbps up and down concurrently, so I have a new wireless speed champion in the house.
It's annoying that my brand new M2 MacBook Air which cost about eight times as much (even accounting for the CM4, IO Board, M.2 to A+E-key adapter, and Intel AX210 card) gets WiFi speeds in the 700-900 Mbps range over the same network, since Apple is sticking with slower WiFi 6 radios in their current Mac lineup.
Comments
Thanks Jeff for that great information.
Jeff,
Your articles are always the best for easy to understand, clarity, exacting detail and brevity. I always stop and read them or watch your YouTube videos. I gleen so much new knowledge from your project explanations.
Thank you Sir.
Do you have a guide to iperf3 testing. It’s easy enough to use I think but wondered if you recommend any specific clients eg for iOS
Do you leave it running as server on one of your servers for convenient testing
I usually just install it via
homebrewon my Macs (brew install iperf3), andapton Ubuntu (sudo apt install -y iperf3). On Windows I download it from the iperf website then run it via Powershell.I haven't found a way to run it on iOS though. There's probably an app that'll do it at least.
Found This On Github :-
https://github.com/ndfred/iperf-ios
Nice!
CM4's PCI Slot Seems Really Useful For Using Various Cards, Like This Wi-Fi 6 Card, SSDs, And Sometimes Graphics Cards (If You Remember😜). Let's Hope That We Will See More Different Types Of Cards Working With CM4.
Great Job!👍
Jeff I love your work. Where did you get the plastic part you attach the PI compute module to? I ordered everything else but would love to have a plastic base to attach the base board to.
I 3D printed that base from a part on Printables or Thingiverse (can't find it right now), but it was an ITX adapter plate for the CM4 IO Board.
According to https://www.intel.com/content/www/us/en/content-details/626913/intel-wi…, AX210 supports all protocols essential to fast roaming 802.11r, 802.11k, 802.11v. (https://learn.microsoft.com/en-us/windows-hardware/drivers/network/fast…). Can you provide information about whether fast roaming is supported with AX210 on Raspberry Pi CM4?
Try to add a couple more parallel streams in your iperf test, the speed may go up. You can also try it in the reverse direction.
Can u guide on how to turn this into a bridge, so we could use the ethernet to access wifi 6e speeds on wifi 5 devices?
I've been trying to us an Intel AX210 as a base station and it seems that there is no way to set the region manually so it rejects all attempts to set the channels to operate on. AFAICT, the only way it sets it's region is by listening for other WIFI6 APs to figure out which region it is in. My experience is that this is true. I can't get it to set a region and I can't get it to select a channel and run as an AP. This is NOT open source friendly hardware for DIY AP construction. So far I don't know of any WIFI6 radios that can be used to build a DIY AP using Linux. Did I miss something? Is there a WIFI6 radio for DIY AP construction?
Please see the thread on my pipci database about the AX210; there are a few other people who seem to have had some success.
Hey Jeff you'll probably never see this. I have two of these exact APs, my ISP connection is 1400 down 40 up (coax struggle is real), my lan is full 2.5G from cable modem to the AP, I cannot get speeds over gigabit (~900 down, full 40 up). I have tried on desktop and iphone 15PM. Just wondering if you had to change any settings in the webgui of the AP to get it over gig down otherwise I need to trace everything on my end and check cables I suppose, something is stuck at gigabit. Thanks!
Are you measuring speeds over WiFi? Different radios and chips (and environments) will have different results. You need to use the widest channel bandwidth possible (80 MHz might not be able to hit over 1 Gbps wireless), and your device needs to have one of the better WiFi chips (like the AX210) in pretty close proximity to hit 1.5 Gbps.
Also, if you have much other traffic on the 6E 6 GHz band, it will probably cause the maximum speed per-client to be a bit less.