After seeing GreatScott's video on creating great 3D Printing timelapses, I knew I had to make better 3D Print timelapses using one of my DSLRs.
I had already tried using my pi-timelapse script with a Pi Zero W and the Camera Module v1 and v2, but the quality is just so-so, plus it's not synchronized with the 3D printer, therefore at least on the Ender 3 V2, the printed object goes all over the place:
What I wanted was a stable and sharp timelapse of the entire process with high enough resolution to use in HD videos I produce for my YouTube channel.
So how did I get it working with my old but trusty Nikon D700? Read on...
Setting up the D700
I followed FormerLurker's excellent (and official!) guide, Configuring an External Camera with Octolapse, but I'll review the important parts here.
What's Octolapse? It's a plugin for the free and open source OctoPrint 3D printer web interface, and it allows extremely customizable control over time-lapse creation for 3D prints.
After plugging the D700 into the Pi and turning it on, I logged into the Pi, which is always running headless on my network, using SSH, then I installed GPhoto 2 using:
sudo apt-get install gphoto2
Then, because gphoto2 needs sudo privileges to run (since it's working through USB), and it's annoying to deal with the sudo password that's required by default if you install the OctoPi image on your Pi, I followed the instructions to add the following line to the end of my sudoers file using sudo visudo:
# allow 'sudo gphoto2' to run without supplying a password
pi ALL = (root) NOPASSWD: /usr/bin/gphoto2
Then I rebooted my Pi, and made sure the Pi saw the camera:
pi@octopi:~ $ gphoto2 --auto-detect
Model                          Port
----------------------------------------------------------
Nikon DSC D700 (PTP mode)      usb:001,005
And then I told GPhoto 2 to snap a picture:
$ gphoto2 --capture-image
After this completes, it will store an image file named something like capt0000.nef on the camera's memory card (in my case, an SD card in an SD to CF adapter).
You can also snap a picture and have it downloaded to the Pi:
$ gphoto2 --capture-image-and-download
Make sure to configure the camera to store JPEGs unless you need to be able to do more post-processing on them as RAW files. It's a lot faster to transfer and process JPEGs for a time-lapse, though for normal photography I'm shooting RAW all the time!
Automating the Shutter Release
There are a few different ways you can capture and process time-lapse sequences with Octoprint. The easiest (and the recommended way to do it the first time, so you can make sure things work like you'd expect!) is to plug in a USB webcam, and use it.
Second to that is the guide I linked earlier. But the best option for print speed, to prevent print errors (e.g. due to oozing filament while the camera captures an image), and for overall workflow for most cameras is to not transfer the captured image back to the computer, and to do that properly, you should follow the guide for Configuring a DSLR With No Download.
I created two scripts for my D700 following the guide, both inside ~/scripts:
#!/bin/sh
# File: ~/scripts/initialize-camera-save-to-sd.sh
#
# Camera Initialization Script
# Sets the capture target to the SD card
# Written by: [email protected]

# Put the arguments sent by Octolapse into variables for easy use
CAMERA_NAME=$1
# Set camera to save images to flash memory
# IMPORTANT:  The capturetarget setting may vary.  Run 'gphoto2 --auto-detect --get-config capturetarget' to determine the appropriate setting
gphoto2 --auto-detect --set-config capturetarget=1
And:
#!/bin/sh
# File: ~/scripts/trigger-snapshot.sh
#
# Camera Capture Script - Leave on Camera, Don't download
# Requires a camera initialization script with the following command:  gphoto2 --capture-image --set-config capturetarget=1
# Written by: [email protected]
# Put the arguments sent by Octolapse into variables for easy use
SNAPSHOT_NUMBER=$1
DELAY_SECONDS=$2
DATA_DIRECTORY=$3
SNAPSHOT_DIRECTORY=$4
SNAPSHOT_FILENAME=$5
SNAPSHOT_FULL_PATH=$6

# trigger the camera and exit immediately
gphoto2 --auto-detect --trigger-capture
Make both scripts executable:
chmod +x initialize-camera-save-to-sd.sh trigger-snapshot.sh
And then test both scripts and make sure they work:
./initialize-camera-save-to-sd.sh
./trigger-snapshot.sh
The camera will store photos on its card as if you hit the shutter button yourself.
Configuring Octolapse
At this point, I created a new camera profile for my D700 following the Configure Octolapse instructions. I chose the 'External Camera - Script' Camera Type, and provided the path to the trigger script (/home/pi/scripts/trigger-snapshot.sh), as well as the path to the initialization script (/home/pi/scripts/initialize-camera-save-to-sd.sh) in the 'Before Print Start Script' option.
I also chose the 'Disabled' profile under the Rendering tab before Saving the configuration changes and jumping back to OctoPrint's main UI.
At this point, you could run a test by enabling 'Test Mode' in Octolapse's settings to make sure the images were being taken at the right moment in each layer without actually printing anything... but I figured I'd just go for broke and run a real print. After it was done, I popped out the card in my D700, copied all the images to my computer, and decided to splurge and buy GlueMotion ($17.99 on the Mac App Store) to work on producing a final time-lapse.
And here is the result:
I typically use ffmpeg to put together images (see the ffmpeg command here), but it can be burdensome making sure the images are sequenced correctly, cropped to a specific frame size, etc. GlueMotion makes that process really easy on my Mac, and seems to run just about as fast.
Plus, it can work easily with NEF (digital RAW) files if I want to go that route and preserve more image data (e.g. for prints that are very reflective and could use some tweaking to make them look even nicer in the time-lapse).
Other Notes
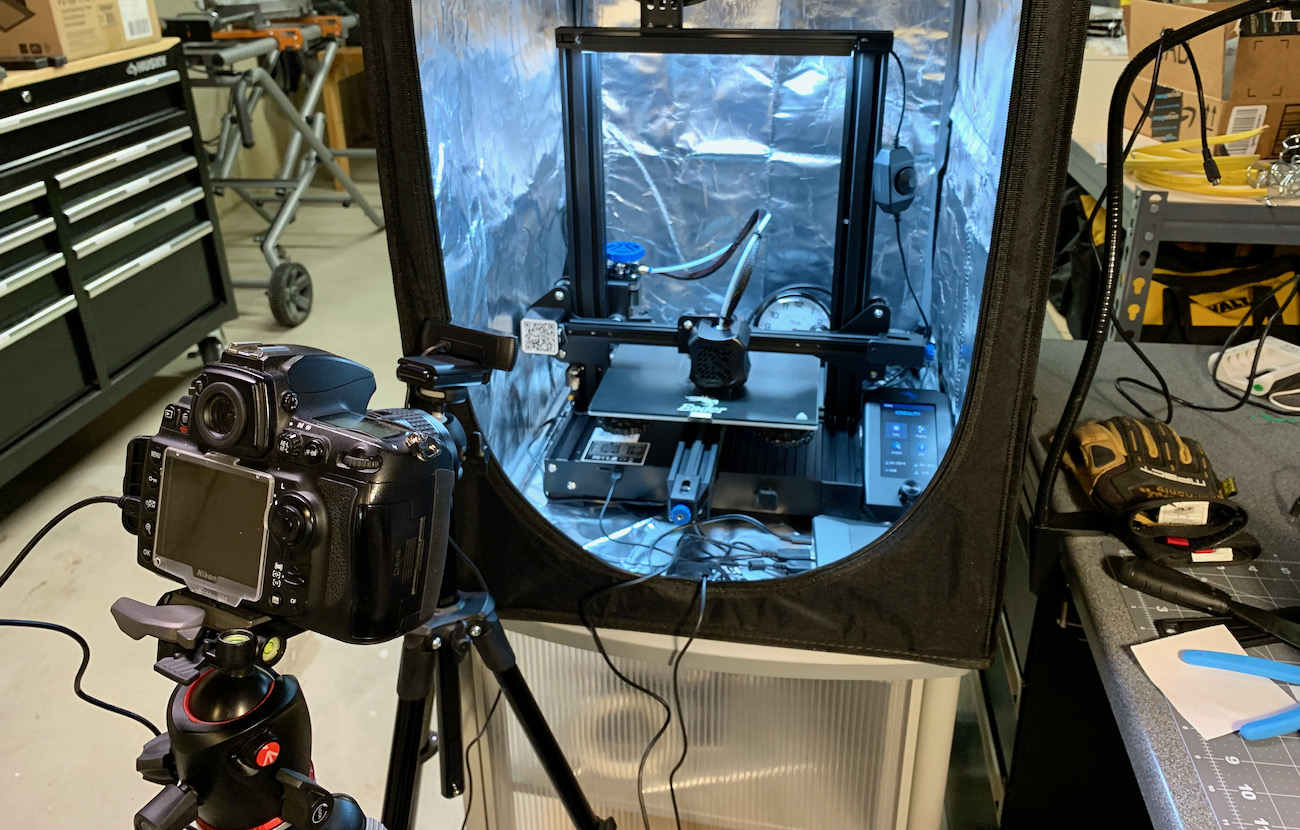
If you plan on doing a lot of timelapses or for very long prints, you should invest in an AC adapter for your camera. In my case, I bought this Glorich EH-5a AC Adapter which works out of the box with the D700, and allows me to shoot all day (and night!) for those really-long time-lapses.
Also, to ensure the consistency of the images, there are a few other tricks I employ:
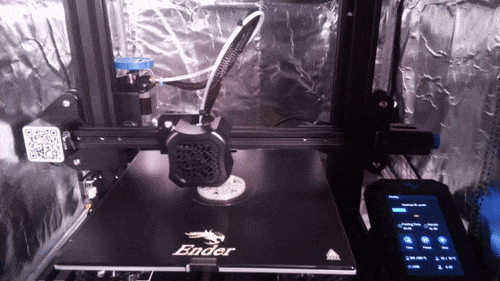
- I have the printer inside an enclosure (this helps with many things, but most notably the consistent lighting).
- I have an LED light bar attached to the top of my printer (specifically, this one), and it stays on during the print unlike the motion-sensor lights in my workshop where the printer is located.
- I set my D700 into M mode, and adjusted the ISO, shutter speed, and aperture manually. In my case, ISO 1600, 1/15 shutter, and f/16 to give a bit of depth of field with my 60mm macro lens.
- I also set my lens to manual focus, after setting the focus on a test object with the print bed manually extended out. A solid tripod is also a must, especially if you have a heavier camera like the D700.
I'll definitely continue posting any more interesting things I learn in the process of 3D Printing and working with OctoPrint and Octolapse!