Update, January 2019: I would like to point out that using Drupal VM to build production servers is not officially supported, and though it may work pretty well, you are own your own if you do use it in that capacity. Please see Drop 'official-ish' support for using Drupal VM to run production servers for more details. What follows was mostly a tech demo for a MidCamp session, and has only been used by a small fraction of the Drupal VM userbase.
In preparing for my session Developing for Drupal 8 with Drupal VM at MidCamp later this month, I wanted to build out an example of a canonical "this is the way I'd do it" Drupal 8 site using nothing but Drupal VM and Composer. And I wanted to build both my local development environment and a production environment on DigitalOcean, all using the Ansible automation playbooks built into Drupal VM.
I also wanted to brush up Drupal VM's production environment management capabilities, so I made a few more tweaks to Drupal VM and the main Ansible role that powers the Drupal deployment and installation, and released Drupal VM 4.4 with some great production environment improvements!

Before you get started, you need to have PHP and Composer installed on your computer. On my Mac, I installed PHP via Homebrew, and Composer using the manual global installation method. But as long as you can run a composer command and have an up-to-date version of Composer (run composer self-update to check!), you should be all set!
Table of Contents
- Create a Drupal project with Composer
- Build a local development environment with Drupal VM
- Build a prod environment with Drupal VM
- Pull the prod site down to local
- Update the site with Ansible
- Open issues
Also, here's the video of the MidCamp 2017 presentation which gives a high-level overview of everything in this post:
Create a Drupal project with Composer
- Create a new Drupal 8 project using drupal-project:
composer create-project drupal-composer/drupal-project:8.x-dev projectname --stability dev --no-interaction(replaceprojectnamewith the name of your site). - Change directories into the new
projectnamedirectory, and take a look around—you should see some Composer files, as well as awebfolder. Thewebfolder contains your project's document root, where Drupal and contributed modules and themes will live. - Add a few modules you know you'll need on the site:
composer require drupal/admin_toolbar:^1.0 drupal/pathauto:^1.0 drupal/redirect:^1.0 - Add in development modules as
--devdependencies (these modules should only be present in the codebase locally, never on production!):composer require --dev drupal/devel:^1.0
Now that we have a full Drupal 8 codebase, it's time to start committing things to it so we can deploy the site in the future, or roll back changes if we decide we don't need them. So let's set up a git repository:
- Run
git initto track your project in a brand new Git repository. - Run
git add -Ato add all the files that should be version-controlled to the new Git repository. - Run
git commit -m "Initial commit."to store all these changes in the project's first ever commit!
Build a local development environment with Drupal VM
A Drupal site is pretty boring if it's just a bunch of PHP files! We need a development environment suitable for local development on any Mac, Linux, or Windows PC, so we can add Drupal VM as another --dev dependency (we don't need Drupal VM in our production codebase, just like we shouldn't need Devel or other local development dependencies). Following the documentation on using Drupal VM as a Composer Dependency, the first step is to add Drupal VM via Composer:
- Add Drupal VM:
composer require --dev geerlingguy/drupal-vm - Create a VM configuration directory—in my case, I'll call it
vm:mkdir vm. Create a new
config.ymlfile inside this directory, and add some sane defaults (these will be baseline defaults for extra security hardening and performance—we'll override some things for flexibility and debugging later, in a Vagrant-specific config file):--- # Composer project settings. drupal_build_composer_project: false drupal_build_composer: false drupal_composer_dependencies: [] # Drupal install settings. drupal_site_name: "My Production Website" drupal_core_path: "/var/www/drupal/web" drupal_install_site: true drupalvm_cron_jobs: - name: "Drupal Cron" minute: "*/15" job: "{{ drush_path }} -r {{ drupal_core_path }} core-cron --quiet" # Other overrides. php_version: "7.1" php_sendmail_path: "/usr/sbin/sendmail -t -i" installed_extras: - drush - varnish # Other secure defaults. dashboard_install_dir: '' apache_packages_state: installed # Restrict the firewall to only ports that are required for external services. firewall_allowed_tcp_ports: - "22" - "80" - "443" firewall_log_dropped_packets: true # Set Apache to listen on port 81 (internal only), and Varnish on 80. apache_listen_port: "81" varnish_listen_port: "80" varnish_default_backend_port: "81"Also, since we added in some modules, we can have Drupal VM automatically install them the first time we build the site, by adding them to
drupal_enable_modulesinconfig.yml(note that you can override any of the config in Drupal VM'sdefault.config.ymlin your project-specificconfig.yml):drupal_enable_modules: - admin_toolbar - admin_toolbar_tools - pathauto - redirectThere are some configuration settings that should be different in the project's local environment, and Drupal VM automatically uses a
vagrant.config.ymlfile when building the local Vagrant VM. So we'll add those local-environment-specific overrides in avagrant.config.ymlalongside theconfig.ymlfile:--- # Local Vagrant options. vagrant_hostname: local.example.com vagrant_machine_name: local-example vagrant_ip: 192.168.88.22 # Configure the synced folder. vagrant_synced_folders: - local_path: . destination: /var/www/drupal type: nfs # Undo some of the extra-hardened security settings in config.yml. drupal_account_pass: admin drupal_db_password: drupal mysql_root_password: root php_sendmail_path: "/opt/mailhog/mhsendmail" installed_extras: - drush - mailhog - varnish dashboard_install_dir: /var/www/dashboard extra_security_enabled: false firewall_allowed_tcp_ports: - "22" - "25" - "80" - "81" - "443" - "8025" firewall_log_dropped_packets: false # Set Apache to listen on port 80, and Varnish on 81. apache_listen_port: "80" varnish_listen_port: "81" varnish_default_backend_port: "80"Create a 'delegating Vagrantfile', which will be used by Vagrant to connect all the dots and make sure Drupal VM works correctly with your project. Create a
Vagrantfileinside your project's root directory, with the following contents:# The absolute path to the root directory of the project. ENV['DRUPALVM_PROJECT_ROOT'] = "#{__dir__}" # The relative path from the project root to the VM config directory. ENV['DRUPALVM_CONFIG_DIR'] = "vm" # The relative path from the project root to the Drupal VM directory. ENV['DRUPALVM_DIR'] = "vendor/geerlingguy/drupal-vm" # Load the real Vagrantfile load "#{__dir__}/#{ENV['DRUPALVM_DIR']}/Vagrantfile"Also, to ensure that you don't accidentally commit Vagrant-related files in your project's Git repository, add the following to the
.gitignorefile in your project root:# Ignore Vagrant files. .vagrant/At this point, after running through Drupal VM's Quick Start Guide, you should be able to run
vagrant up, and in just a few minutes, you can visit the URL defined inconfig.ymlforvagrant_hostname(in this case,local.projectname.com) to see a fresh new Drupal 8 site!- Make sure you commit your changes that added Drupal VM to the project:
git add -Athengit commit -m "Add Drupal VM to the project."
Note: For easier provisioning and local usage, be sure to install extra Vagrant plugins:
vagrant plugin install vagrant-vbguest vagrant-hostsupdater vagrant-cachier
Build a prod environment with Drupal VM
Having a local development environment is well and good... but it would be great if Drupal VM could also manage a production server to match the local environment identically! Luckily, Drupal VM can do this quite easily. Most of the steps below follow the documentation guide for Deploying to a production environment.
- Create a new Droplet/Linode/other type of cloud-hosted Virtual Server. You should make sure to include your SSH public key when building the server (or manually add it to the root account with
ssh-copy-idafter the server is built). See the Deploying to prod guide for details. Define configuration that should only apply to the production environment: create a file named
prod.config.ymlinside thevmdirectory, with the following configuration:--- # Deploy from the project's Git repository. drupal_deploy: true drupal_deploy_repo: "[email protected]:geerlingguy/drupalvm-live.git" drupal_deploy_dir: /var/www/drupal # Set the domain for this site appropriately. drupal_domain: "prod.drupalvm.com" vagrant_hostname: "{{ drupal_domain }}" # Only add the production docroot virtualhost. apache_vhosts: - servername: "{{ drupal_domain }}" documentroot: "{{ drupal_core_path }}" extra_parameters: "{{ apache_vhost_php_fpm_parameters }}"For improved security, you should store sensitive passwords (and any other variables like API keys) in an encrypted vars file. Drupal VM recommends using Ansible Vault to encrypt a
secrets.ymlfile containing said passwords and keys. Create asecrets.ymlfile in thevmdirectory using the commandansible-vault create secrets.yml, then put the following inside (replacing the actual passwords with your own secure ones!):drupal_account_pass: add-your-secure-password-1-here drupal_db_password: add-your-secure-password-2-here mysql_root_password: add-your-secure-password-3-hereCreate an Ansible inventory file, in the
vmfolder (alongside other Drupal VM configuration), namedinventory, with the contents below (replace1.2.3.4with your server's IP address, andmy_admin_usernamewith the admin username you'll set in the next step):[drupalvm] 1.2.3.4 ansible_ssh_user=my_admin_usernameBootstrap the server with your own administrator account and SSH key (this is a one-time process when you build the server):
- Copy the example bootstrap vars to a plain vars file:
cd vendor/geerlingguy/drupal-vm/examples/prod/bootstrap/ && cp example.vars.yml vars.yml - Edit the
vars.ymlfile with your own information (e.g. your desired user account name, a password, etc.). - Go back to your project's root directory.
- Run the
init.ymlplaybook:ansible-playbook -i vm/inventory vendor/geerlingguy/drupal-vm/examples/prod/bootstrap/init.yml -e "ansible_ssh_user=root"- You may need to accept the host key the first time you connect to the server. Type
yesto accept the host key. - You can delete the
vars.ymlfile you created in step 1. Just remember the administrator account's password in case you need it in the future!
- You may need to accept the host key the first time you connect to the server. Type
- Note that this manual step may be fixed at some point in the future. It currently can't be automated correctly using the same exact setup that's used for Vagrant locally.
- Copy the example bootstrap vars to a plain vars file:
- Run the main Drupal VM playbook to provision the entire server:
DRUPALVM_ENV=prod ansible-playbook -i vm/inventory vendor/geerlingguy/drupal-vm/provisioning/playbook.yml -e "config_dir=$(pwd)/vm" --become --ask-become-pass --ask-vault-pass- Note the addition of
--ask-become-pass(this will ask for the password you set in thevars.ymlfile for the admin account you configured when bootstrapping the server). - Note the addition of
--ask-vault-pass(this will ask you for thesecrets.ymlAnsible Vault password so Ansible can temporarily decrypt the contents of that file).
- Note the addition of
After 5-10 minutes (or longer, depending on how many things you're installing!), the playbook should complete, and if you visit your production VM's URL, you should see Drupal 8 installed, yay!
Note: You can also have Ansible forward SSH keys if you use
ssh-agent; this is helpful when doing things like cloning from a private Git repository, because otherwise you'd have to manually place a key on the server before running the Ansible playbook. To use SSH Agent forwarding, add anansible.cfgfile in your project root, and put in the following contents:[ssh_connection] ssh_args = -o ForwardAgent=yesYou also need to add any keys you want
ssh-agentto use viassh-add -K(check what keys are currently loaded usingssh-add -l).
Pull the prod site down to local
Now the rubber meets the road. It's nice to be able to build a new site, but sites are nothing if they aren't maintained. The first step in maintaining a live Drupal site is to be able to pull the database and files down to your local environment so you can test your changes with production data.
Drush will be our weapon of choice, and using it to pull down the database is very simple, using the sql-sync command. The first step is to describe two aliases to Drush—we can add them to our project so anyone else working on the site gets the same aliases by creating a file in our project in the path drush/site-aliases/aliases.drushrc.php, with the contents:
<?php
/**
 * @file
 * Drush Aliases for Example.com.
 */

$aliases['local.example.com'] = array(
  'root' => '/var/www/drupal/web',
  'uri' => 'http://local.example.com',
  'remote-host' => 'local.example.com',
  'remote-user' => 'vagrant',
  'ssh-options' => '-o PasswordAuthentication=no -i ' . drush_server_home() . '/.vagrant.d/insecure_private_key'
);

$aliases['prod.example.com'] = array(
  'root' => '/var/www/drupal/web',
  'uri' => 'http://prod.example.com',
  'remote-host' => 'prod.example.com',
  'remote-user' => 'my_admin_username',
);
?>
Then, to make sure Drush uses your project-specific settings and aliases, add a drush.wrapper file in the project root with the following contents:
#!/usr/bin/env sh
#
# DRUSH WRAPPER
DIR=$( cd "$( dirname "${BASH_SOURCE[0]}" )" && pwd )
cd "`dirname $0`"
./vendor/bin/drush.launcher --local --alias-path=${DIR}/drush/site-aliases "$@"
Now, if you run drush @prod.example.com status, you should see the live server status information. And if you run drush @local.example.com status, you'll see the local environment's status. To pull the production database down to your local environment, run:
drush sql-sync @prod.example.com @local.example.com
Confirm you want to destroy the local database and replace it with the one from production, then after a minute or so, you should be able to work on your local environment to develop using production content and settings!
For files, you can use Drush's trusty rsync command (e.g. drush rsync -y @prod.drupalvm.com:%files/ @local.drupalvm.com:%files), but for most sites, I prefer to install Stage File Proxy instead. That way you don't have to fully replicate the (often ginormous) files directory on your local machine just to see the site as it looks on prod.
Once everything's in sync, it's a good idea to:
- Run
drush @local.example.com updb -yif you might have updated code or modules (so database updates are applied) - Run
drush @local.example.com cim -yif you have configuration that's updated in your local codebase - Run
drush @local.example.com crto reset caches, since you'll want the local environment to start fresh
Load http://local.example.com/ in your browser, and you should now see that your local Drupal VM environment has all the wonderful content from production!
Update the site with Ansible
One of the first things I do on a Drupal 8 site is get all the configuration exported and checked into Git so configuration changes can easily be deployed to production. The first thing I'll do is create a config/default folder inside the project root (note that it's outside the project's docroot directory, for security reasons!). Then edit web/sites/default/settings.php and change the $config_directories['sync'] setting, which should be near the bottom of the file:
$config_directories['sync'] = '../config/default';
Then run drush @local.drupalvm.com cex to export the configuration, and git add -A, then git commit all of it to the repository. From this point on, any changes you make to the sites configuration when doing local development—from adding a content type, to removing a field, modifying a view, or even something mundane like changing the site's name—can be exported to code via drush cex then deployed to production!
Note: You'll also need to update this value in the production site's
settings.phpfile (just this once). You can either useansiblewith thelineinfilemodule to do this, or (for just this once, I won't tell anyone!) log into the server and runsudo vi /var/www/drupal/web/sites/default/settings.phpand go to the bottom, replacing the sync line with$config_directories['sync'] = '../config/default';.
Change something simple, like the site name, or enable or disable a module, then run drush @local.drupalvm.com cex to export the update configuration. If you run git status you'll see exactly what changed. After you commit the changes to your Git repository then push them, it's time to deploy to production, yay!
Let Ansible do the hard work:
DRUPALVM_ENV=prod ansible-playbook -i vm/inventory vendor/geerlingguy/drupal-vm/provisioning/playbook.yml -e "config_dir=$(pwd)/vm" --sudo --ask-sudo-pass --ask-vault-pass --tags=drupal
This is the exact same command we ran earlier (to build the server), with one small addition: --tags=drupal. That flag tells Ansible to only run the tasks that are related to the Drupal site configuration and deployment.
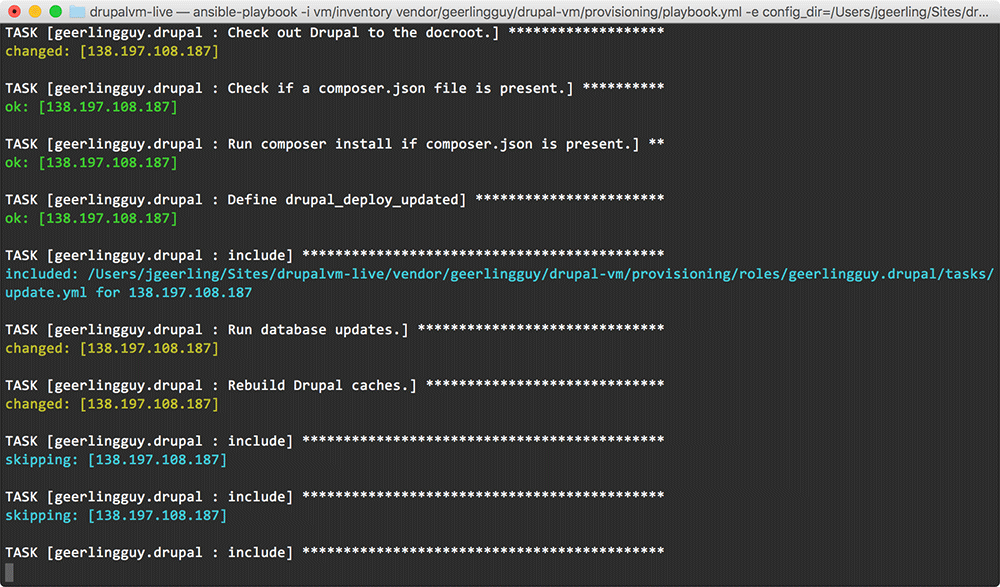
After a few minutes, you should see that there were a few changes reported by Ansible: the Drupal codebase was updated, database updates were run automatically, and caches were cleared. As of March 2017, other tasks (like configuration import, features revert, etc.) are not automatically run by Drupal VM, but that may change by the time you do this! My hope is to have this feature added in soon.
Open Issues
Currently the setup outlined above has a few issues—issues which currently block me from using Drupal VM on most of my own Drupal 8 standalone servers. Here are some of the the blockers I'm still working on (and you can help with!):
- 100% hands-free provisioning (even down to creating a DigitalOcean Droplet, Amazon Web Services EC2 instance, etc.).
Not being able to tell the production instance to 'deploy from Git'.I fixed this while writing the blog post :)- Slightly inflexible support for Ansible Vault usage—it's best practice to encrypt and securely encapsulate all production 'secrets' (API keys, passwords, etc.), but the way things work currently, you can only throw everything inside one
secrets.ymlfile. Note that you can also addENV['DRUPALVM_ANSIBLE_ARGS'] = '--ask-vault-pass'to your delegatingVagrantfileso you can runvagrant upwith asecrets.ymlfile in place.
In the mean time, I often clone Drupal VM, then slightly fork it specifically for certain projects (e.g. the DrupalCamp St. Louis website). This way I still am using a familiar setup, but I can tailor it exactly to the particular deploy setup and strange infrastructure quirks required for a given site.
Comments
Interestingly, while I was working on this post (and a major overhaul of Drupal VM's production-environment-support readiness), I noticed that Lakshmi Narasimhan actually ran through the existing Drupal VM documentation (which I need to improve a bit in light of changes I made while working on this post) and wrote a post on DIY Drupal hosting: Drupal VM. Thanks for that post, and it reminded me of a few other rough edges that I'm working to iron out!
Great piece. I've been wanting to do this.
A couple notes: 1) In step 2, of build local, I'm not sure from reading this which directory I'm supposed to be in. 2) In step 4 of the same place, I'm not totally sure I should be adding those lines to the new config.yml I just created in the vm directory.
Thanks!
@psteve - great questions! Assume that you would run any command (unless otherwise written) in the project root directory. So in the project root, you'd have the
vmfolder with aconfig.ymlfile for your project's general Drupal VM settings. And you'd put thedrupal_install_modulesconfig in that file as well.Another use for development environments is to share it with others. That's where this approach has a bit of a downside— it requires people have Composer installed on their host machine, and that new people introduced to the project run 'composer install' before simply running 'vagrant up'. I'm aware that adding drupal-vm as a Composer requirement is meant to make installation easier, but what is your recommended way to make composer a (dev not prod) requirement of drupal-vm instead? Looking to maintain the 'git clone project', 'vagrant up' two step workflow to a local development environment.
In that case (where you only want VirtualBox and Vagrant to be requirements, and nothing more), you can still use the same codebase, just with Drupal VM running standalone; see Drupal VM running 'Outside-In' for Windows development.
Hi Jeff,
Thank you for Drupal VM, the clear documentation and all the blog posts!
I noticed that you didn’t add "extra_security_enabled: true" to config.yml. Maybe it’s nice to add this or a note that you can add this to have basic security setup (for a beginner like me).
I have 3 questions (I cannot find this in the docs or readme files but maybe I’m missing something):
1. When I make changes to one of the configuration files (e.g add solr to installed_extras in config.yml) should I run the whole playbook again, run playbook.retry (with --limit @/path/to/docroot/vendor/geerlingguy/drupal-vm/provisioning/playbook.retry), use --tags (e.g. --tags=geerlingguy.solr) or something else?
2. Can I install software manually on my server with aptitude (like Let'sEncrypt/Cerbot and Linode’s longview)?
3. Security updates: should I update packages with aptitude or use a Drupal VM?
Jasper
Regarding `ssh_args` in the inventory file: I was running into errors with the simple `-o ForwardAgent=yes`. There weren't particularly helpful error messages -- it just looked like the key file wasn't being found and other simple SSH connections were getting dropped or timing out. Sysadmin told me that some processes were getting killed due to excess resource usage.
Apparently, `ssh_args` in the inventory file overrides the default Ansible `ssh_args`, which include some performance settings.
This solved the problem:
[ssh_connection]
ssh_args = -o ControlMaster=auto -o ControlPersist=60s -o ControlPath=/tmp/ansible-ssh-%h-%p-%r -o ForwardAgent=yes
Credit goes to this stack overflow comment:
https://stackoverflow.com/questions/24124140/ssh-agent-forwarding-with-…
After I created
secrets.ymlwithsensible-vaultthen localvagrant provisionwould fail expecting unnecessary vault password. So Iansible-vault create vm/prod.secrets.yml; touched an unencrypted, emptyvm/secrets.yml; and changedvendor/geerlingguy/drupal-vm/provisioning/vars/config.ymlper pull request.Hi Jeff,
Thanks for sharing Drupal VM production deployment. In my case where VM and Sites are in two different directories, in such case how should I deploy Drupal from VM directories into the Digital Ocean and AWS. Appreciate if you could share your experience or any documentation.
Hi Jeff. Awesome article....Congratulations!!!!
In this article,, you talk about "A question, Build a prod environment with Drupal VM" and you recommend "Create a new Droplet/Linode/other type of cloud-hosted Virtual Server.......".
But we work with a shared prod environment. Would it be possible to deploy in production using drupalvm with a shared environment?
If yes, could you explain how it would be done?
Note: in my shared environment I do not have a connection by ssh either.
That would be a bit more difficult; Ansible generally uses SSH to do all of its work, and if it's a shared production environment and you have no root or sudo access via SSH, much of what Drupal VM does won't be helpful. It's more meant to help if you have a regular VPS or server and want to set everything up for one or more sites from scratch.
There are some things it does which can be broken out and used independently (like the
geerlingguy.drupalAnsible role for deploying Drupal codebases), but you'd still need to be able to manage the server using Ansible.