tl;dr: Watch the example/demo video below to see how the Mobius performs in a variety of driving conditions:
For the past few years, I've seen countless 'fail' videos, linked videos on reddit, etc. which show both the utility and entertainment value that comes from a dashcam—a camera that records everything that happens in front of your car while you're driving.
When looking around at the options for dashcams, and knowing my preference for reliability and ease of use, I came up with the following criteria:
- Must be able to tie into car's 12V power distribution center so it can start when car's engine is powered, and stop when car's engine is stopped.
- Must be able to record to 32GB+ microSD cards (so I don't have to juggle memory cards), and record in a continuous loop (record over earliest footage).
- Should be 1080p and work well in any lighting conditions (this is a big one that separates decent dashcams from junk).
- Should be small and compact, and not take up much of the visual area of the windshield area when mounted (another area where junky dashcams are not good).
Aside from that, I wanted easy setup, as much customizability as possible (e.g. ability to use outside of a car environment, with a battery, at different resolutions, as a time-lapse camera, etc.), and a low price (since this thing is going to bake in the sun for long periods of time throughout the year, and freeze during other times... it will break, it's just a matter of price vs. durability IMO).
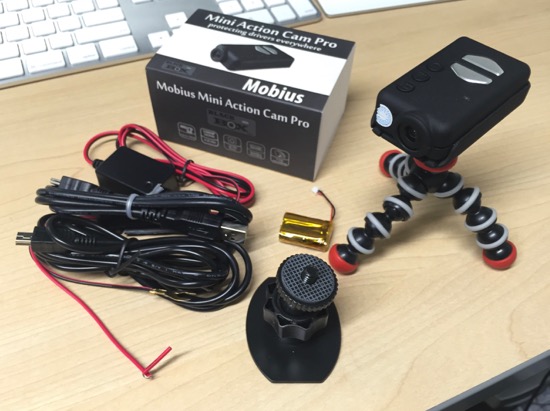
Mobius Mini Action Cam Pro
I decided to go with the Mobius Mini Action Cam Pro, since it ticked off every one of the items in my above list... at least after purchasing a few extra accessories:
- Mobius Mini Action Cam Pro ($75 from Amazon)
- Mobius Action Camera - Super Capacitor ($8 from Amazon): Instead of having to charge the battery and risk a battery exploding in extreme temperatures, I opted for the super capacitor, which you need to swap in after receiving it; it allows the Mobius to be powered completely off the car's ignition and still save any files quickly using a tiny bit of charge stored in the capacitor.
- Mobius Action Cam Sticky Mount ($8 from Amazon): I wanted a simple and discreet windshield mount, so the camera is mostly hidden behind the car's rear-view mirror, and this fits the bill nicely.
- SanDisk Ultra 64GB microSD card ($20 from Amazon): Bigger is better for storing lots of video clips. Also, you need a decent class 10 card to allow full size video and to ensure the card doesn't have issues in extreme temperatures!
- Dash Camera 12V hard wire kit ($9 on Amazon): This allows me to connect the mini USB power straight to an ignition-based fuse in the car's fuse box, and has enough wire so I can tuck the wire into channels and make the installation barely noticeable.
- Add-a-Circuit Low Profile Mini Fuse Tap ($7 on Amazon): For safety, using a fuse tap like this one (for newer cars—older cars may require a different size!) allows the camera to run on any fuse from the internal fuse box. I tapped my cigarette lighter fuse and added a 5A fuse to connect the camera via the 12V hard wire kit.
It can be a little daunting seeing all the bits and pieces of this kit when you get them out of their boxes:
Configuring the Mobius
I have a Mac, and there's no official client from Mobius to set all the various settings on the Action Cam; however, a kind forum member, LorenzoG, on rcgroups.com maintains a little utility that reads from and writes to the config file for the ActionCam so you can configure it using a pretty GUI. There's a thread that contains a download link and all the associated details/instructions for MobiusManagerV2, though you'll still need to know what model lens you have (I have 'A', which is wider angle), and possibly some other details about the particular model of Action Cam you have.
To configure the Mobius on my Mac, I did the following:
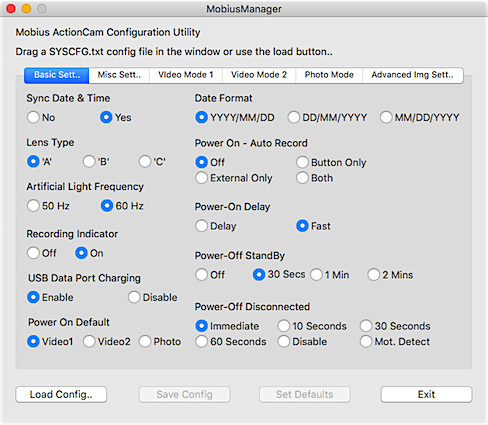
- Download MobiusManagerV2.
- On the Action Cam (with a microSD card inserted), hold down the 'M' mode button, then hold down the Power button, and keep holding them until the LED flashes a few times (maybe 5-10s).
- Pop out the microSD card, and put it in your Mac's reader (or plug the Action Cam into a USB port).
- Open MobiusManagerV2.app (might need to right-click and select 'Open' to bypass a developer certificate prompt).
- Click the "Load Config" button and choose the config file that should be in the root of the microSD card (this reads in the Action Cam's current config).
- Update all the settings so the Action Cam is ready to do 'Dash cam' recording:
- 'Basic Settings' tab:
- Sync Date & Time: Yes
- Lens Type: A
- Power On Default: Video 1
- Power On - Auto Record: External Only (or Both)
- Power-Off Disconnected: Immediate
- 'Video Mode 1' tab:
- Loop Recording: On
- Rotate Video 180°: Yes (since the cam will be upside-down when stuck on the windshield)
- Wide Dynamic Range: On
- Video Clip Length: 5 min (helps to find individual clips more quickly if required... some people do it every 3 min instead)
- Field Of View (FOV): Wide (so you can see everything in front of the car)
- 'Basic Settings' tab:
- Click 'Save Config' to save the configuration back to the microSD card.
- Pop the card (or unplug the Action Cam), then use the same technique to re-read the config from the config file (hold M, then power, and wait until LED activity stops).
All the other settings are up to you—what's best is to set some things, try it out and make sure it works as expected, and if not, change a setting or two and then try again. It's annoying since there's a very limited interface (and no screen) on the Action Cam itself... but once you set things up, you should never have to change it again. I'd rather take a cheaper and much smaller device over one-time ease of use for something that's going to be in my field of view whenever driving!
Installing in the car
There are a few things you should do to get the most out of the Mobius (or any dash cam you intend to permanently install):
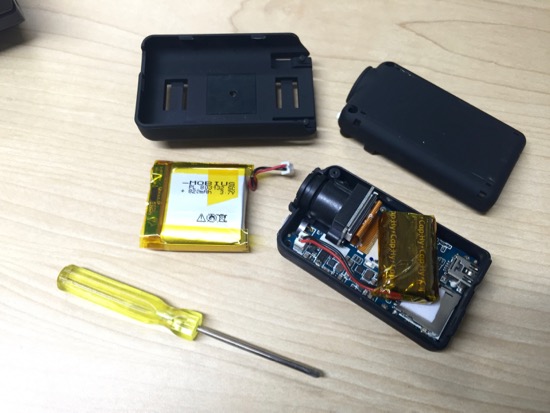
Replace the battery with a capacitor
Before putting the Mobius into the car (where it can get very hot—not ideal for rechargeable batteries like the one included with the Mobius), I opened up the Action Cam (there are two small phillips screws, then you pull up on the screwed in side and separate the two halves), unplugged the battery, and installed the "Super Capacitor" in its place. (The "Super Capacitor is two capacitors with some insulating tape and a plug, which holds just enough charge to let the Mobius save a video file after power to the Action Cam is cut.)
Connect to your car's 12V power discreetly
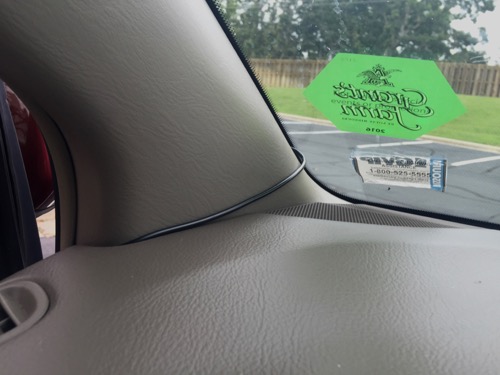
TODO: Still working on this—it's currently hooked up to a USB cigarette lighter adapter, which is powered only while the car is running. Here are few pictures from the in-progress direct wiring install that ties into the car's interior cigarette lighter power adaptor wiring in the fuse box:

USB mini portion of the cable from the mount through the gap between the windshield and the roof trim.
I tucked the wire into the side column and ran out of length before the fuse box, so there's a tiny bit exposed.
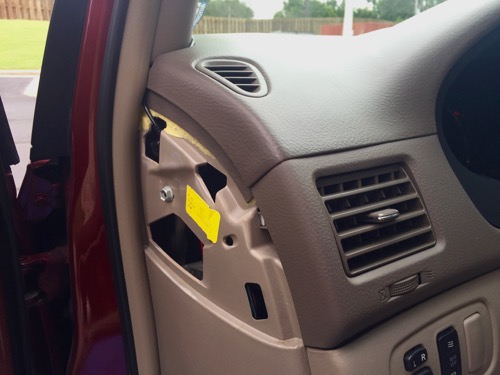
There's a convenient dashboard wiring access panel that allows the wire to be run down to the interior fuse box...
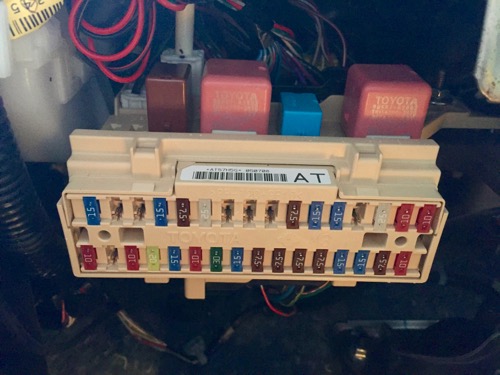
...And here's that fuse box, opened up exposing all the fuses.
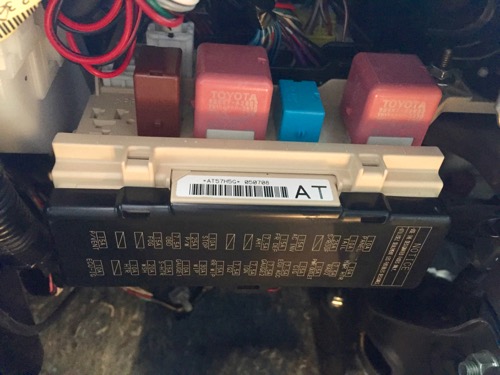
Same fuse box, with the cover which maps what components use what fuses.
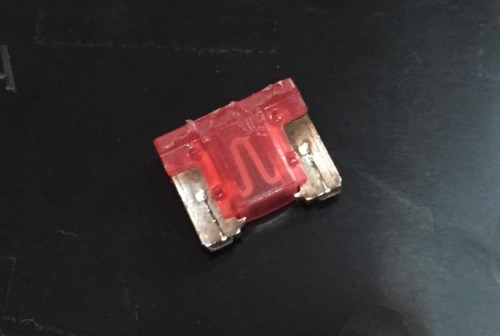
A detail shot of one of the 'low profile' fuses used in this interior fuse box.
I used this Add-a-Circuit fuse tap kit (which includes an extra 5A fuse for the dashcam) to tap into the car's interior cigarette lighter fuse.
Mount to your windshield
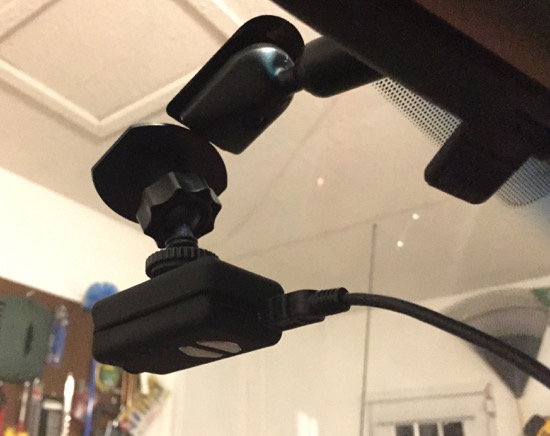
I have only one camera, so I've chosen to mount it in the place that would be most useful in case of any accident or strange sightings—the front windshield. Because I want full coverage of almost everything I see (that's why I bought the 'A' lens with 140° coverage!), I mounted it directly below my rear-view mirror and aimed the camera so it sees from almost the top to bottom and side to side of my windshield/hood. Almost anything I see while driving (outside of peripheral vision) is covered by the camera.
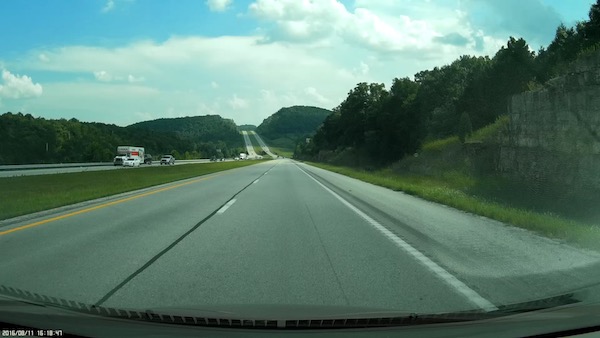
Image showing the wide 140° field of view (FOV) covering the entire windshield area
I chose to use the Mobius Action Cam Sticky Mount because I'm intending to keep the camera mounted semi-permanently. If I wanted a temporary install, I would've gone with a suction cup mount. But key to this choice is the fact the Mobius Action Cam is light (it won't jiggle in the cheaper plastic tripod mounts due to weight), and it comes with a tripod mount adapter (a little 'sled' you snap it into with a standard 1/4" thread female tripod mount).
Use on a long road trip
I've been using the Mobius as a 'B-roll' footage cam for some videos for my YouTube channel (example), but in that environment (climate-controlled, steady 5000°K lighting, no motion), almost any cheap camera would suffice.
The first real test of the Mobius as a dashcam would be a family trip from St. Louis to Branson, MO. We drove about 4 hours to and from Branson, and the camera was powered on the entire time the car was running. I even had time one evening to build a script to automate time-lapse video generation (see more on that process here)!
The camera did get a little warm (the little metal heat sinks were right at the threshold of 'too-painful-to-touch' after longer periods of driving), but it recorded perfectly, with no dropped frames, throughout the trip. It filled up my 64GB microSD card and then started writing over the earlier clips since I had it in 'loop' recording mode. The video rate (at 1080p, 'high' quality) was around 110 MB/minute of video (which is a pretty decent compression ratio).
The video quality was great, too—as we drove through bright blue skies with lots of dashboard reflections and other bright point light sources, the Mobius would compensate by underexposing while still preserving some of the dark shadow details using it's HDR mode. When things were more overcast, the colors were very accurate and everything was easy to see. Throughout the video, it's easy to read license plate numbers on any cars 2-4 car lengths away, and almost all road signage is legible.
General use for daytime driving
Almost any cheap camera can get a decent picture (even without HDR processing) in bright daytime lighting. There's enough light that even teensy tiny lenses and sensors can gather enough photos to reproduce the scene.
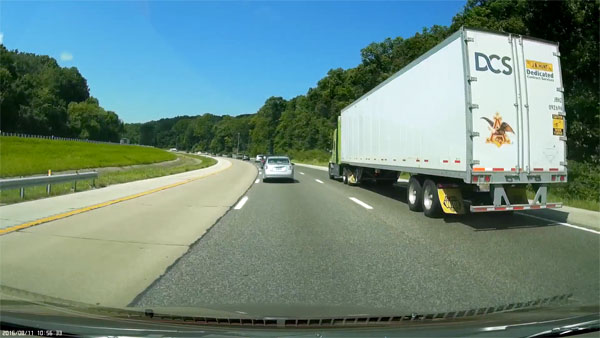
The Mobius is great in daytime lighting, and can compensate for overblown highlights and underexposed shadows pretty well. I would even consider sticking a small polarizing filter on the front of the lens if I wanted to cut out the dashboard-reflection glare that appears when the sun is in front of the car... but even in those situations, the video quality is great and important parts of the scene are always easy to distinguish.
Use for nighttime driving
One thing I wanted to make sure of, since I left the 'recording indicator lamp' turned on, is that the little flashing red light on the back of the Mobius wasn't distracting, especially during nighttime driving. I'm happy to report that I never even noticed it flashing unless I looked for it—it just sits there blinking unobtrusively all the while. Whoever designed the recording LED made the wise decision to mount the actual LED inside the body of the camera, in a recessed pinhole, so it's very subtle (unlike bright annoying blue LEDs on so many 'tech' devices.
Other than that, the actual recording quality isn't anything to write home about... but it is good enough to be able to see relevant details on the road, signage, and other cars. Approaching cars' headlights make them hard to see, but other than that, the camera is pretty high quality. As long as there's some sort of light source (headlights, street lights, or even taillights), you'll be able to make out enough detail for 'archival' or insurance purposes.
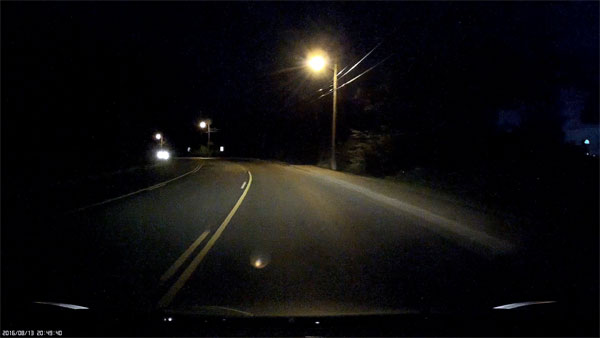
Just don't plan on getting 4K high-def footage for a superhero movie, unless you're going for a really gritty look!
Use as an 'action' cam
I haven't had a chance to really test the durability of the camera, or how it measures up against a much more specialized (and expensive) action cam like a GoPro, when using it for sports, running, biking, etc. But if I do get a chance, I'll update this review with more details.
Audio Quality
The Mobius has a built-in mic, but the audio quality is nothing to write home about. It captures the ambient sounds decently, but the mic isn't sensitive enough to pick up things like subtle engine noise or anything lower than quiet conversation. If you want to have really nice audio to accompany your video (e.g. if you want to record drag racing and get some nice engine throttle noises!), spring for a separate audio recorder, preferably with stereo mics (or use your iPhone—it has a surprisingly decent built-in mic).
Comments
Thanks for this write-up. I've been interested in dashcams recently as well, and think looks like a great solution.