So... recently I acquired a Starlink 'Dishy', and I'm going to be installing it at a rural location near where I live, but since it's a bit of a drive to get to it, I wanted to set up a Raspberry Pi to monitor the Starlink connection quality over time.
I know the Starlink app has its own monitoring, but I like to have my own fancy independent monitoring in place too.
The wrinkle with a Starlink-based Internet connection, though, is that SpaceX is using Carrier-Grade NAT (CGNAT) on their network, so there won't be any kind of IPv4 address I could reach the Pi at, nor does SpaceX yet have IPv6 set up in their network.
So to make remote access possible, I would have to find a way to have the Pi reach out to one of my servers with a persistent connection, then I could 'tunnel' through that server from other locations to reach the Pi.
Internet Monitoring on the Pi
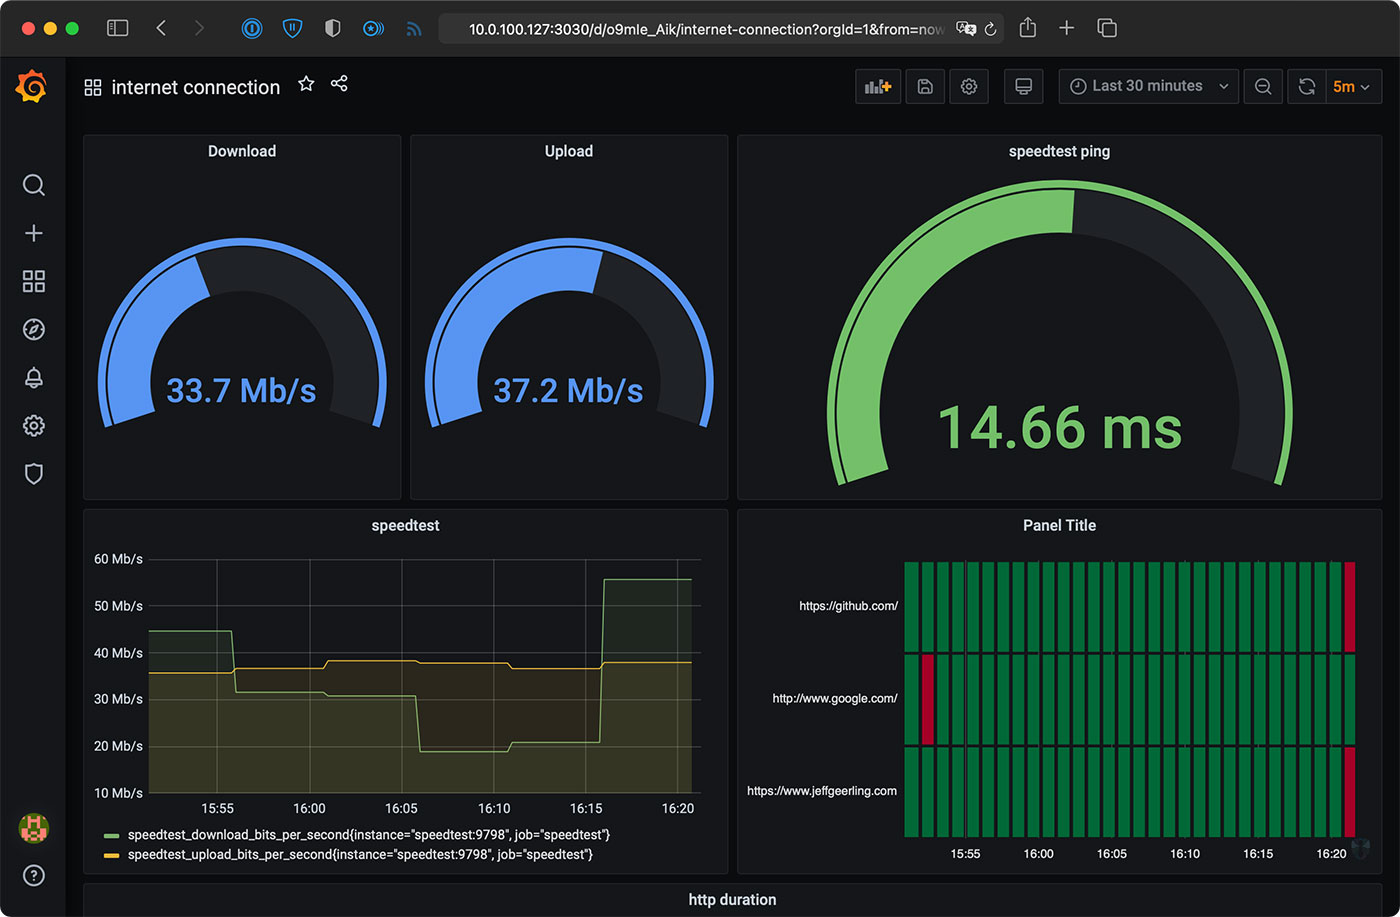
For the first task, I had plans to build a Prometheus and Grafana-based dashboard for metrics on the Pi, and run everything inside Docker containers. So I started looking into it, and found someone already did it for me—I found the maxandersen/internet-monitoring project on GitHub, and used that (though I made a slightly modified fork that works better on Raspberry Pi).
To prep my Pi, I had to make sure I had Docker installed, so I followed the steps:
wget https://get.docker.com -O get-docker.sh
sudo sh get-docker.sh
Once that was done, I added my pi user to the Docker group:
sudo usermod -aG docker pi
I logged out and logged back in so the new group would apply, and installed docker-compose:
sudo apt-get install -y libffi-dev libssl-dev python3-dev python3-pip git
sudo pip3 install docker-compose
Next, I cloned the internet-monitoring project from my fork (which is tuned for Raspberry Pi) and ran the included docker-compose file:
git clone https://github.com/geerlingguy/internet-monitoring
cd internet-monitoring
docker-compose up -d
This exposes a number of ports on the Pi—so make sure you lock things down as you see fit on your own network—but the most important is the Grafana URL, which is:
http://10.0.100.127:3030/
(Substitute your Pi's IP address or hostname for the 10.x IP address I am using here.)
If you visit that URL and log in with the default credentials (admin / wonka—configure the default password in the grafana/config.monitoring file), then you should be able to go to the dashboards (go to Dashboards > Manage), and click on the 'internet connection' dashboard.
It could take 5-10 minutes for statistics to start populating; be sure to refresh the dashboard (or turn on auto-refresh) to see the metrics start coming in.
SSH to the Pi through a tunnel
So the monitoring was one half of the task; the other part is being able to log into the Pi remotely and view Grafana from my home.
To do that, I was going to set up autossh, to configure up a persistent SSH connection from the Pi to a server under my control outside the local Starlink network. However, I noticed that plain old ssh can be used in the same fashion, when paired with a properly-configured systemd service.
Exchanging SSH keys
The first thing I did was create an SSH key on my Pi under the pi user account using the following command (using all the defaults when prompted):
ssh-keygen -t ed25519 -C "pi-starlink"
After the key is generated, run cat ~/.ssh/id_ed25519.pub to see the public key. Copy that key and paste it in a new line in the ~/.ssh/authorized_keys file on the remote host under your control that you'll use for the persistent tunnel.
Once it was added, I tried to connect to the remote host from the Pi using an SSH tunnel:
/usr/bin/ssh -NT -o ExitOnForwardFailure=yes -o ServerAliveInterval=60 -o ServerAliveCountMax=3 -p 22 -R 6666:localhost:22 -i ~/.ssh/id_ed25519 [email protected]
See an explanation of this SSH command from explainshell.com.
I was prompted to accept the host key the first time I connected, so I entered yes, and then was connected to the server (there was no output or prompt, it just hangs on the terminal until you press Ctrl-C to close the connection).
So I know the connection from my Pi to my remote host works, yay!
Connecting back to the Pi through the remote host
Next, I created another key to connect from the remote host back to the Pi. I did the same thing as earlier—created a key on the remote host under user geerlingguy with ssh-keygen, copied out the contents of the .pub file, and pasted them into the end of the .ssh/authorized_keys file in the pi user account on the Pi.
Now, on the remote host, I can ssh into the Pi through the local tunnel (assuming it's still running from the Pi):
ssh -p 6666 [email protected]
You can press Ctrl-C to quit out of the ssh tunnel on the Pi at this point.
Set up the SSH tunnel on boot
With that done, the next step is to make sure the tunnel is configured to run at system boot, and to reconnect if the connection is dropped for whatever reason.
To do that, I used a systemd service, which is created by adding a file like so:
sudo nano /etc/systemd/system/ssh-tunnel.service
With the following inside:
[Unit]
Description=SSH tunnel for Raspberry Pi remote access.
After=network-online.target

[Service]
User=pi
ExecStart=/usr/bin/ssh -NT -o ExitOnForwardFailure=yes -o ServerAliveInterval=60 -o ServerAliveCountMax=3 -p 22 -R 6666:localhost:22 -i ~/.ssh/id_ed25519 [email protected]
RestartSec=5
Restart=always

[Install]
WantedBy=multi-user.target
Make sure you change the ports, username, and server from the above example to match your own values.
Enable and start the service:
sudo systemctl daemon-reload
sudo systemctl enable ssh-tunnel
sudo systemctl start ssh-tunnel
At this point, the tunnel should be running, so confirm it is by connecting to the Pi from the remote host again:
ssh -p 6666 [email protected]
If it's not working, check what went wrong with systemctl status ssh-tunnel.
View the Internet Monitoring dashboard remotely
Being able to log into the Pi via SSH remotely is nice, but as a final step, I wanted to be able to view the Internet connection monitoring dashboard in my browser remotely as well.
First I manually started a tunnel between the Pi's port 3030 and the remote host, with the command:
ssh -NT -o ExitOnForwardFailure=yes -o ServerAliveInterval=60 -o ServerAliveCountMax=3 -p 22 -R 3030:localhost:3030 -i ~/.ssh/id_ed25519 [email protected]
I left that running, then on my local workstation, I created a separate tunnel to the remote host:
ssh -A -t [email protected] -L 3030:127.0.0.1:3030 -N
Then I accessed http://localhost:3030/ in my browser and voila! There was Grafana!
When finished, I was sure to press Ctrl-C in my local tunnel, as well as in the remote tunnel on the Pi. Then I disconnected from the remote server and all was well!
Rebooting the Pi every night for fun and profit
The last thing I did on this Pi was added an automatic reboot every night at 2 a.m. It might be online for days or weeks where someone wouldn't be able to log in locally and reboot it, so I wanted to be certain if any really weird things happened, it could reboot itself and get back into a mostly-happy state on its own.
This is a form of percussive maintenance that I wish I didn't have to do, but it's easier this than driving the distance to reboot the thing by hand if I need to.
I ran sudo crontab -e to edit the root user's cron file, and added the line:
0 2 * * * sudo shutdown -r
This reboots the server at 2 a.m. every day, and uses shutdown -r with no argument, which is a little more polite than reboot or shutdown -r now, because it emits a warning to any logged in users that the reboot is imminent.
Conclusion
I'll be testing out this setup for the next few months. If there are any things that need changing or end up not working so well, I'll be sure to update the post!
Comments
Very Nice!
You could consider setting up a wireguard tunnel instead of all the ssh setup. It works very good on raspberry.
Cheers!
I definitely considered it... I just don't have as much experience with wireguard as SSH, so wanted to stick to something I know this time around. At some point I'm going to try to build something more robust and maybe even build a little automation (Ansible playbook and/or mini k3s setup for it) so I can deploy more quickly.
NB! It's easy to setup Wireguard with PiVPN - https://pivpn.io. It works like a charm and it's fast and secure.
or Tailscale also works pretty convenient
Yes, I use Tailscale on a whole bunch of Pi's, scattered around various sites. I can connected from my desktop, phone or tablet to any of the Pi's as if they are on my local network. Tailscale is a wrapper around WireGuard that deals with all the key-exchange.
This is great! Thanks for sharing!
Why not expose an MQTT server and have the pi push to that for forwarding to a DB at your house?
This idea is OK, until you: -
1. want to record/measure downtime - where does that get logged, if the endpoint is unreachable?
2. are trying to lock-down the MQTT service, for security purposes; because the Starlink users' traffic is so egregiously NATed (https://en.wikipedia.org/wiki/Carrier-grade_NAT). I suppose it's inevitable that they do this (for the masses), as an IP per subscriber would likely be untenable - especially as their network is kinda... mobile & disparate; currently, their inter-satellite laser-transit, isn't operational/live, so the traffic patterns are from subscriber CPE, UP to the satellite overhead & in range, back DOWN to an uplink/base/ground-station also in range of the same satellite, then either straight out to the internet (probably not?), or via a substantial central/core network, with a large router (and/or layer3 switch) & internet feed(s) & likely some peering relationships (https://en.wikipedia.org/wiki/Peering) with the big players (Google/YouTube/Netflix/farcebook/twitter/large-CDNs (https://en.wikipedia.org/wiki/Content_delivery_network)/etc), which means that traffic to their services never has to go through the internet (saving everyone's internet bandwidth, at the source). The response traffic/packets have to then flow in the reverse direction, but there's a decent chance that the response traffic comes back from the destination service, to the Starlink ground-station & gets NATed back to the subscriber UP to whichever satellite is now overhead, then DOWN to the subscriber's Dishy McFlatFace.
To be honest, I'm not sure that I would be able to do it in a non-NAT fashion, without the inter-satellite-laser-transit operation; certainly not in a scalable fashion!
OMG I love the internet!
It is surely doable without NAT if they used a pure-IPv6 network, with IPv4 translators housed somewhere.
Hi Jeff, would Zerotier simplify this process?
https://www.zerotier.com/
Thanks for the great content as always
Yeah, I have used ZeroTier for a while now - it was extremely helpful when our small business was consumed by a larger entity & I was likely to lose access to the remote servers I was managing (outbound ssh was only opened on request & I didn't fancy jumping through those corporate hoops, just to do my job).
Nice work! Hey, did you know about ssh-copy-id? You can do this, instead of catting the new ssh public key, then copying & pasting it into .ssh/authorized_keys: -
% ssh-copy-id [email protected]
Also, I recently learned that you can do cool (lazy) stuff like adding a line to your crontab, to start something on boot: -
% crontab -l | grep reboot
@reboot /usr/local/bin/bitcoind -daemon
Love your content & delivery. Recently made redundant, and enjoying doing my own thing, while the world disintegrates around me.
Peace.
Jeff,
I follow all your videos and recently discovered your blog. I followed this wonderful tutorial without any issues and got the dashboard up and running. My only concern is, my PI is heating up to eighty degrees celsius after I run the docker images. Any tips on what can be done to cool it down?
Yikes! Can you check with
docker statsto see if one of the containers is maybe using a lot of CPU? They should be pretty low usage for the most part, only spiking now and then when a reading is taken.Also, are you running the Pi in an enclosed case? Does that case have an aluminum heat sink or a fan? If not, if it's a Pi 3, 3+ or 4, you should probably invest in a better case as just using a Pi minimally will eventually lead to throttling with no extra cooling.
Should this work on a Raspberry Pi Model B Plus Rev 1.2? I gave it a go (after having upped COMPOSE_HTTP_TIMEOUT from 60 to 200 to avoid some timeouts). The load on the pi got so great that ssh (and everything else) stopped responding and I had to power cycle the poor thing (it was only running pihole prior, to load has historically been low).
It looked as though the containers internet-monitoring_nodeexp_1 and internet-monitoring_ping_1 were continually restarting. Furthermore, I never managed to access the grafana interface on port 3030, even though that container appeared to be up.
Would I be better off running it from a newer pi (the other one I have to hand is a Pi 3 Model B)
Yeah, this setup would probably not run that well on the older original B/B+, or even on a Pi 2.
The Pi 3 would be about the minimum Pi where these containers should run okay. I'm running it on a Pi 4 model B with 8 GB of RAM (though it would work fine with 512 MB or 1 GB too).
Thanks Jeff, a note to folks who run into an issue with speedtest docker image restarting continuously, you need to update the version of libseccomp2. You need a updated version of libseccomp2, 2.4.3-1 or higher. It is currently not available for Raspberry PI OS, but it is for Ubuntu.
To install on Pi simply do:
wget http://ftp.us.debian.org/debian/pool/main/libs/libseccomp/libseccomp2_2…
sudo dpkg -i libseccomp2_2.5.1-1_armhf.deb
Jeff, I've followed the installation, and while the website checks are working, the Speedtest ping, upload and download all fail silently and aren't updating in Grafana. How can I debug this?
thanks, Jason.
You may need to give it 30 minutes to an hour for data to appear in all the gauges.
Same issue here, and waited for like 3 hours, I do set it at 55m interval. I'm connect the pi through wireless because hotspot doesn't have the ethernet plug, wonder if the speedtest only go through eth0? how do I troubleshoot this?
there is a small problem with docker corporate management, i don’t quite remember, but they sold their enterprise unit, so they need to enroll users in some system that provides an income. that might be part of the problem, so new people to Docker might look to either Podman (open-source container engine) or LXC (Linux) and there are other alternatives too.
i am building this internet gateway:
How to Install a VPN Router https://www.youtube.com/watch?v=gL2qbWdLZig&t=444s
(by Rob Braxman) that sports a TOR/VPN/regular router. this doesn’t address wifi triangulation, but it’s a start.
i would like to make a housing like a rack mount system, but just to make it look professional functional and rugged like some of your stuff.
i was thinking of using a regular modular computer PSU like you did in a live pi graphics card video, but you were talking about using so little power compared with the 700 watts it is capable of that it might damage the PSU, so maybe i should use a heavy duty laptop PSU with home made step down converts for the 5 and 12 watts rails. i think the pi can run on 12 watts? or is that volts. it must be volts. i have to go back and research what am doing.
i was thinking of running a 2GB pi 4b as my router and internet monitor. i didn’t understand the compute module accepted PCIe X1, can you run boot drive through the PCIe slot?
i think you can on the pine pro 64. chris did this on Linux Unplugged with 2 m.2 drives, as i recall. i think the pine SBC might be a better choice for my project but i think software is interchangeable at this level. i assume these are m.2 SATA, is it key B? and i want to use NVMe, key M (i hope i have key letters correct) because for me NVMe is 50% cheaper than SATA III. i am disappointed that they are ‘forcing me’ to use expensive out dated drives, or can i use another adapter, SATA llI to NVMe? i don’t care if the pi can’t use the speed, i just want my hardware to be future proof to some degree so now i have to buy new outdated m.2 SATA drives that i can’t use on other projects. but i’ll use the heck out of this one, so it’s not so bad, i guess.
your projects are really cool, thanks for posting them. i am learning so much and they are so relevant.
Just downloaded it and installed on a fresh system
Internet connection fails;
Annotation Query Failed
undefined is not an object (evaluating 'e.to')
There's an error in your script :
TypeError: undefined is not an object (evaluating 'data.series[0].fields') (Check your console for more details)
digging deeper - 9090/targets shows
shelly plug tries to reach to Get "http://172.17.0.1:9924/metrics": dial tcp 172.17.0.1:9924: connect: connection refused
starlink
"http://172.17.0.1:9817/metrics": dial tcp 172.17.0.1:9817: connect: connection refused
speedtest
Get "http://speedtest:9798/metrics": dial tcp: lookup speedtest on 127.0.0.11:53: no such host
Want to start with s big THANK YOU for a great channel! :)
I know no more then what I have learnt from You Jeff about Grafana and Promethisus(never gets it right!! ;) ), and I also got this error message (on both RPIOS and Ubuntu running on Pi4):
Annotation Query Failed
Cannot read property 'to' of undefined
I just use it for internet monitoring, and everything still works, its just my OCD thats gets a little bit triggered by it... ;)
Just wanted you to know, regards Rikard
Any update on this issue please?
great dashboard.
Im getting this same error. any idea what i need to look at to get it fixed?
thanks
Darren
Same comments as the most recent feedback. A fresh install has several errors, and starlink has updated the stats and debug URL locations with the most recent build so those links all fail now as well
http://192.168.100.1/network/statistics is the new stats
http://192.168.100.1/support/advanced/debug is the new debug data location
Hey Jeff,
Can this be done on 4GB PIs or should I move up to the 8GB variant?
Thanks,
Steve
Any model Pi 4 would work great—I run it on a 2 GB Pi!
Jeff,
Can this work with a DHCP IP from the Internet provider? I do not have static IPs with my service.
Steve