This article will explain how to design and assemble bluescreens, greenscreens and backdrops for photos and video, as well as how to easily and inexpensively build a portable frame to support these backdrops (or other things like quilts, etc.) out of PVC pipe or metal conduit. (NOTE: Please be sure to read some of the extra notes at the bottom of this guide for optimal performance).
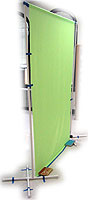
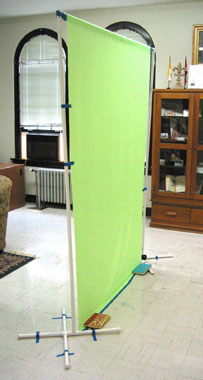 Backdrop stand set up... |
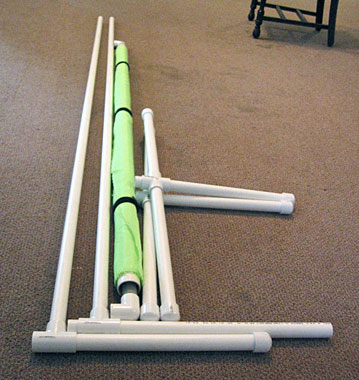 ...and taken apart for portability. |
For amateur or hobbyist photographers and video producers, coming up with the money for a nice, $200 (and up!) backdrop and the expensive stands and hangers required to help support it isn't very easy. Rather, they need a way to make a nice-looking background that is both good looking and easy to transport.
In this article, I will show you how you can make a great portable backdrop frame that allows you to transport your backdrops and hang them at any height and width you would like—all for under $50, using parts from your local fabric and hardware stores. Getting a good chromakey, depends on more than only the background, and requires other equipment and computer software (Click here to see how to do it in Photoshop).

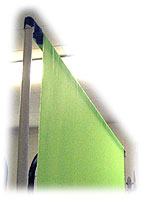
An example of a picture using the greenscreen.
For more discussion and information on the practice and methods of chroma keying (greenscreening), I'd highly recommend one of the following books:
- Greenscreen Made Easy: Keying and Compositing Techniques for Indie Filmmakers
- The Greenscreen Handbook: Real-World Production Techniques
Buying Parts for the Frame and Support
First of all, you need to decide what materials you will need for a stand or hanger for your backdrop. If you plan on using it outdoors, you will need to use a very strong material (like metal) that won't blow over easily. If you only need an indoor solution, you can use cheaper and more portable PVC piping. There are different grades of PVC conduit (the most popular are 'Schedule 40' and 'Schedule 80') and metal pipe. In my example, I use shedule 40 PVC conduit because it costs less and is very lightweight (for portability).
You can purchase all the required parts for a stand or hanger at Lowe's, Home Depot, Handyman hardware, or some other local home-supply store. Look in the plumbing or electrical supply aisles to see the selection of different pipes and conduit. Following is a list of all the parts I used in my sample frame.
Items needed for the frame (with prices from Lowe's as of 5/28/2005):
- 3/4"x10' Sch. 40 PVC Pipe ($1.69 each section) - 4 (at least)
- 1 1/4"x10' Sch. 40 PVC Pipe ($3.59 each section) - 1 (or more, for more background fabrics)
- 3/4" Sch. 40 PVC Elbow ($0.18 each) - 2
- 3/4" Sch. 40 PVC Cap ($0.27 each) - 8
- 3/4" Sch. 40 PVC Coupling ($0.14 each) - 2 (at least)
- 3/4" Sch. 40 PVC T-Connector* ($0.27 each) - 2
- 3/4" Sch. 40 PVC Cross Connector*($1.17 each) - 2
- TOTAL COST: $16.03
*You could skip the 2 T-Connectors and Cross Connectors and buy this 5-way Cross PVC fitting from Amazon—but it seems to only be available in 1" PVC, so you'd need to buy 1" sizes for everything else. (Thanks to John Hinton in the comments for this tip!)
Tools You May Need:
You will need either a hacksaw or a PVC pipe cutter to cut the PVC pipe (illustrations below), scissors to cut fabric and/or other things and tape, velcro or another adhesive to cut and secure the fabric to the frame.
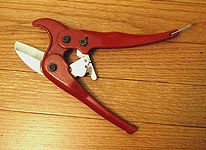
PVC Pipe Cutter ($10 on Amazon) |
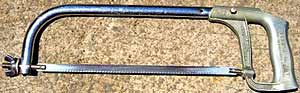
Hacksaw ($12 on Amazon) |
Fabric Options for Backgrounds/Backdrops and Chromakeying
In researching on the Internet, I have found many different opinions as to which fabric is the best to use for backdrops, which fabrics are best for greenscreening and bluescreening, and what fabrics last longer with or without paint, etc.
In my experience, it is easiest to go to a fabric store (or a store with fabrics in it, such as Wal-Mart) with some ideas in mind, and look through all the different fabrics to find something that suits your purposes. If you want a plain and simple background, there are many solid color backgrounds; if you want something more radical, you could get one of the many cartoon character backgrounds, a 'clouds' background, etc. Prices for different fabrics vary widely (especially depending upon the width of the fabric), and I usually like narrower (around 48") fabric, because it's easier to manage (and it fits in my car for portability better!).
But I will offer my advice on a few specific types of backgrounds and what fabric/thickness works best for them. Also, when selecting a fabric, you must keep in mind how the lights you use (whether they be $30 halogen worklights or $500 soft boxes) reflect off the fabric. If you need to, ask for a sample of the fabric (these are usually free) and take some pictures of it under different lighting conditions.
Fabric types/backgrounds:
- Muslin is a strong, sturdy fabric for painting on, or as a simple white or tan-colored backdrop. You can use acrylic or oil paints (found at art supply stores) or paints you can find at home-supply stores to make professional-looking backdrops for portraits and the like. The only problem with muslin is that it is prone to wrinkling (but this may not matter if you paint it. Be sure to wash the muslin right after you buy it and iron it to get out as many of the wrinkles you can. Make sure you buy PVC or metal piping that is sturdy enough to hold some of the thicker muslins. Do a Google search for 'paint muslin backdrop' to find out more.
- Cotton, one of the more common fabrics found in a fabric store, is fairly easy to keep clean, but not so easy to paint on. Cotton is best for solid dyed colors. Make sure you wash and iron the backdrop before rolling it, or the wrinkles may be very hard to remove!
- Rayon is a very lightweight fabric that can be had for a low price and is easy to transport, roll, and keep wrinkle-free. However, because it is so thin, you have to be careful when lighting it (sometimes lights behind the screen will make the lighting very uneven).
- Polyester is a very low maintenance fabric, and is relatively easy to keep wrinkle-free. Simply make sure you've washed and dried it, then take it out as soon as you can to avoid wrinkles. Light reflects off polyester a little brighter than most cottons, so make sure you account for that when lighting backdrops. You can purchase polyester in many different thicknesses (and many different prices); make sure your backdrop support frame is sturdy enough to hold it.
- For Compositing: Professionals usually have access to professional-quality blue and green paints and fabrics for building high-quality backdrops. However, the average photographer or videographer does not have so much money. In my experience, the 'greenest green' or 'bluest blue' you can find will work fairly well (especially for photographs which you'd like to edit in Photoshop).
Once you get your fabric, follow the steps below to make your backdrop support frame and attach your fabric to it.
Step-By-Step Instructions
First, we'll make the supporting base for the backdrop stand:
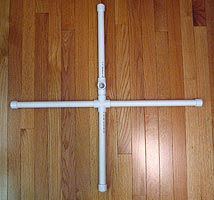
Supporting Base |
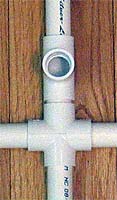
Detail of Middle |
- Cut eight pieces (using a PVC cutting tool or a hacksaw—see illustrations above) of 3/4" pipe about 1 1/2' in length, and put a cap on one end of each.
- Now, cut two pieces of 3/4" pipe about 2" in length, and firmly stick them into one hole on each of the cross connectors (they look like a + sign). Caution: Always make sure you securely tighten each joint every time you use or move the stand*.
- Stick the T-connectors on the 2" pieces of pipe, and stick one of your 1 1/2' cut pipe sections into the other end of the T-connector (the top of the T will be for the actual frame).
- Stick your other 1 1/2' pipe sections into the other open holes on the cross connectors, so you have two large "+'s," with a T-connector on the same side of each.
Next, we'll work on the rest of the PVC pipe frame:
 |
 |
- Cut two of the other 3/4" pipe pieces to whatever size you'd like (these will determine the height of your backdrop stand). Make sure the height is low enough to not hit the ceiling if you'll be using the stand indoors, but high enough so the backdrop will cover the whole frame of your pictures/video.
- The length of your 'crossbar' (the top piece of PVC pipe) depends on how wide the fabric you have is. Since I had 48" fabric, I cut my 3/4" crossbar pipe about 6" wider than my fabric (54" total). REMEMBER: when you push the pipe together, you lose about 3/4" at each connection.
- Now, take the two side support pipes and stick a 90° elbow on one end of each one, then stick the crossbar pipe into the two elbows.
- Finally, stick the two side support pipes into the tops of the T-connectors on your base, and see how your backdrop stand looks. (But we're not finished yet!).
- If you want, you can simply use this frame and clamp on your backdrop with clamps that can be found at any local hardware store. Otherwise, read on for an easy, wrinkle-free way to store, transport and hang different backdrops.
Finally, we can install the fabric you purchased onto the backdrop support:
- Make sure the fabric is as wrinkle-free as possible; depending on the fabric, you can do different things to remove wrinkles, such as putting the fabric in a dryer or ironing it (follow the directions for the specific type of fabric you have, or you could burn your fabric!).
- Secure one end of the fabric to the 1 1/4"-diameter PVC pipe (the one slightly larger than the typical frame PVC pipes using duct tape or another suitable adhesive. Alternatively, if you have circular fabric clips that fit your pipe and hold the fabric on, you may use them.
- Now, roll the fabric onto the pipe on a flat surface, making sure to keep the fabric smoot as you roll it onto the pipe.
- Wrap Velcro strips, rubber bands, or a piece or two of tape around the rolled-up fabric. You should now have a PVC pipe with the fabric rolled tightly and securely on it.
- Take off the crossbar pipe from the frame, then take the 1 1/4" pipe and slide it onto the crossbar.
- Reassemble the frame with the crossbar and fabric pipe on it, then roll down the fabric to your desired height. To make sure the fabric doesn't roll right off the pipe, slowly let it down while holding onto the pipe, and tape the larger pipe to the crossbar (I use Blue painter's tape) before it is all the way unraveled.
- That's it! You're finished!
Tips for Adjusting/Modifying/Transporting Your Backdrop Support Frame
- If you would like to raise your backdrop's height a little without cutting new pieces of PVC for the sides, you can use one coupler on each side support and add another piece of PVC (making sure both sides are raised an equal amount). Caution: You can't raise it too much (usually more than 2'), or the whole thing might become unstable and fall down.
- You can put different fabrics on your frame by simply slipping on different PVC pipes with the other fabrics attached. If you have fabrics of different widths (48" is not always ideal), you can make another crossbar that is long enough to hold any width of fabric (just make sure you don't compromise the sturdiness of your frame; if it's too weak, it could fall over).
- It is easy to transport this frame; simply disconnect all the PVC pieces and go! I usually leave the bases put together, and leave the two 90° elbow pieces on the crossbar (to hold the backdrop-holding pipe on during transport). You can carry all these parts with one arm; just be careful to not hit things with them!
- I also received a few tips about the fabric backdrop and how to attach it to the stand from a kind reader Barry. He says:
- You can make a "hem-pocket" (similar to the sort you'd find on simple curtains) by folding over a portion of one edge of the cloth, and using straight pins to form a "pocket" for your support-rod to slide through.
- If you don't want to go the route of making a pocket, try this, instead. In making your support stand, you'll probably have a bit of extra PVC pipe left over. Take this pipe and - with a hacksaw - slice it into as many quarter-inch rings as you can safely manage.Next, take the aforementioned hacksaw and slice each of the rings so that it is no longer a full ring - it's a ring with a break in it. Now, you have your "clips".
Take a sample of your fabric to the nearest Home Remodeling store (Home Depot, Lowe's, etc.) and go to the paint section. Get them to "scan" your fabric, and duplicate the color in a quart of paint. Won't cost you more than ten or fifteen dollars. Use the paint, and paint your clip-rings to match your fabric. Voila!
Extra Notes
This portable PVC setup is only a small beginner's method for simple chroma keying. There is a reason professionals will buy portable chromakey setups worth well over $10,000. This setup is meant to help film enthusiasts and home users who might want to do a small special effect or two to do that.
There are many other ways to do chroma keys - for a larger background, or for full-body keying, buy some seamless chromakey blue or green paper from EEFX, a great chromakey and green screen company (note: some people have been complaining about EEFX's customer services, so buyer beware). There are always cheaper green screens like this one from Amazon, but EEFX has a little higher-end fabric.
Another note: This guide is meant to help teach you how to build the backdrop support stand - if you want to learn lighting for chromakeying (and what equipment you'll need for that), search Google.
A final note: A lot of people have been sharing this how-to as a guide for building a quilting stand (or quilt stand? I'm not sure what the term is, since I'm not much of a seamstress—er, seamster. If you're going to put heavier fabrics on the stand, you might want to reinforce it with some glue in certain joints, use metal instead of PVC pipe, or insert thinner copper pipe inside PVC (these tips come thanks to some great suggestions in the comments!).
Comments
I just opened up comments today, though I posted this article a few years back, as people sometimes offer very good insights into how they customized this idea on their own.
Thank you so much for this information - I was able to construct the frame today with ease and hope to purchase the material tomorrow. I can't wait to start using it for my photographs. Thanks again,
Jo
You're quite welcome!
Thank you so much for the information. Your about to save me a ton of money. I'm on my way to buy the supplies as we speak.
No problem; glad I could be of help!
what are the finished dimensions?
It's about 8' tall x 6' wide (at least, the one I made).
Thank you very much.
I just want you to know I have read several pieces that you have written and all I can say is Thank you for your attention to detail. It really shows your passion.
You're quite welcome! I hope I can continue to impress :)
Jeff, u r a star ! It works perfectly and was good fun to size and assemble. Keep thinking of more such good ideas.
AWESOME! My only suggestion for your supplies list: You need 1" elbows, coupling, cross connectors, t-connectors and caps to fit on the end of 3/4" PVC pipies. As listed now, the connectors are the same diameter as the PVC pipes. This was confusing because I didn't know if I needed a smaller pipe or larger connectors (I went with the larger connectors)
It always helps to check things out at the hardware store to make sure the connections are tight, of course... but 3/4" connectors should go along with 3/4" pipe, I think. I don't know why you had to buy different sizes to get them to go together :-/
Kiddo you inspire me. I am an old man and still learning how to type on my Mac. I thought I was doing good back in 88 with the new fangled word processors. Still learning and loving it. Thanks so much for your forum.
I am a commercial beekeeper and am trying to transition into educating others on how they can keep bees without using chemicals and in the 21st century. Keeping bees is simple compared to what you are doing. I am trying to learn and am amazed at your knowledge base on video and audio. I know this is a pretty open ended question but I am going to ask anyway hoping that I can get even more good info from you. Here goes: Where did you learn all this stuff? Specifically, video and audio.
Thanks and keep doing what you do. I now have you on my bookmark bar.
Dann
Thanks, Dann! I'm glad you like what you've found. I'm pretty much self-taught, but I was lucky to be able to work at a radio station for a few years, and have a dad who was very much into electronics. Then, I've been using still cameras for many years, and have learned a lot about light from that. Lighting + good sound is the first step towards making good video, no matter what kind of camera you're using.
This is really good. My son is always trying to come up with videos where he needs to use a greenscreen. He usually gets green shirts and set them up...not very professional...he's only 14. I like the way you did yours. Thanks for the detailed and easy to follow tutorial. I like it also because it can be disassembled for storage when not in use.
I just made this, and I would highly recommend using a larger diameter PVC or if they make a more solid 3/4" PVC that I'm not aware of. I used 3/4" schedule 40 PVC, and this ended up being very flimsy after I put it together. Mine is about 8 & 1/2 feet wide by 7 & 1/2 feet tall, and it doesn't have enough strength to hold the screen, let alone stand without wobbling. I'm going to have to retry this with maybe 1 & 1/2 " for the base and use a 2" or so to hold the fabric.
Thanks for your note! It depends a lot on what kind of fabric you're using, and the height of the stand; for my purposes (some pretty lightweight material), this diameter of pipe worked perfectly. Results may vary :)
Of course, you can always take the smaller-diameter pipe and make a few flags or other things with it...
I used to use PVC to build Halloween pneumatic props and when I needed strength, I'd slip a piece of copper pipe inside the PVC. A piece inserted into the cross piece would add to the cost but not that much and it really handles the extra weight.
That's a great option for reinforcement, and one I didn't think about; I think mostly because the small diameter pipe I've been using would require something like 1/4" copper pipe, which wouldn't be worth it for the limited reinforcement (vs. using metal pipes overall). However, being creative will definitely pay off!
Would you recommend a more sturdy pipe for a vinyl backdrop or do you think this would work? It's only a 6 ft by 52 in drop so I wouldn't have to make it quite so high.
I would go with maybe 1" PVC, or buy metal pipe, for vinyl (vinyl is usually a bit thicker than nylon (what I was using in my setup).
However, for 6' tall, the 3/4" pipe may be fine. If nothing else, the thin PVC isn't too expensive, so you could always go back and get better pipe.
Hi Jeff, I was wondering did you use anything to glue the pipes together? Or just connect them with the elbows/etc.? Thanks :]
I just connect them and take them apart (to make the setup more portable...).
However, for better rigidity (while not sacrificing too much portability), you could at least glue the base pieces. Those parts are more prone to becoming loose over time.
Thanks!!
I’m Looking For a
Tripod Projector Screen
Matte White and Silver Matte fabrics will be seamless in all sizes.
Do you have this screen in any sige with green and blue not Matte White? I need it for
Taking Pictures. Can you tell me where I can get one?
Moments in Time Photography
[redacted]
Tim Adams
I'm not too sure where you can find the particular screen you need, but I have a link in the body of the text above to a company you could ask directly. Also, try searching B&H or Adorama.
Thank you for this information. I have been looking for some thrifty way to make a display wall for quilting. This will work perfectly using a flannel sheet for the fabric. Much better than paying $140.
I've noticed a lot of interest on Pinterest for this tutorial. I didn't know there were so many quilters looking for something like this! I hope it helps you, and anyone else needing a large stand with which to display their beautiful creations!
I have a mobile spa party business and want to have a photo back drop for the moms to take pics of their little ones for the princess parties. I am going to attempt to make this. Wish me luck :)
Hi! I hope to hear back from you asap, i do need this for outdoor shoots, which is what i specialize in. I was wondering if you could give me some more info on how to make this with the metal piping instead, and if it would still be portable. I need something extremely portable that will fit into my small-ish honda insight, and will be sturdy enough for constant use outdoors.
The main thing is going to a hardware store and simply experimenting with different size pipes. Half-inch may be adequate for a metal rig, if it's not too big. Also, since you'll be outdoors, the backdrop can simply turn into a huge windsail if you're not careful. Make sure to sandbag or otherwise weigh down the legs.
Finally, the backdrop itself may need to be secured much more strongly, using clamps and weights on the bottom.
was wondering on step 2 where it says to cut 2" if that is 2'
ooops....read it wrong...sorry
Just an update on eefx - I bought from them and they have terrible service. Here's some other people who had the same problem. http://www.trustpilot.com/review/www.eefx.com
I got the same foam backed backdrop at another vendor. You might not want to recommend them anymore! They also had a F rating on the BBB. If you search on google you will see all the bad reviews they have.
Thanks for your report! It's been over two years since I last dealt with EEFX, and at that time, they were pretty helpful—perhaps things have gone south since then :-/
Wow! Thanks ever so much for posting this. I hope to start making this in the next few weeks.
So does anyone have any idea of what would be the best material that would be sturdy to make a backdrop stand 30ft wide x 15ft tall i shoot hd music videos and im looking to build something portable so that i can take with me for when i have to shoot a greenscreen video with cars or suv's in it and take the background out and so forth.... the backdrops that im using are made of thin muslin type material so there not heavy at all. Thanks Erik
For a screen that large, you'd definitely need to cross-brace it. Either by making a grid with some T-connectors and vertical braces, or finding a 45° connector that lets you put in a few more pipes going from corner to corner. But, I think it could be done; make the thing with the PVC, then use hardware clamps to affix the muslin onto the piping.
U R WONDERFUL...THANKZ...
I found this off of Pinterest, and it was very helpful! Instruction were very easy to follow. Put it together with my dad in NO TIME! We made ours bigger (8'x8') and the smaller pipe doesn't work as well. If you use the 2'' pipe it makes it much sturdier. VERY VERY VERY Awesome! Thank you!
Not a builder or a photographer, but rather a Bride-To-Be REALLY hoping this will be our cost effective compromise for a DIY photo booth at our up coming reception!!! We can't afford the $800-$1000 it cost to rent a photo booth, but I think this could be the ticket!!! I guess we'll see! THANKS
you can purchase a 5 way PVC pipe fitting, http://www.amazon.com/5-way-Cross-PVC-Fitting-Connector/dp/B003VM680U/r…
this is for 1" pipe this is not a standard fitting and cannot be found locally but online only. but it's there if you need one from . thru Amazon.com
Great find! I've never seen a 5-way connector in the store, so I was unaware they even existed. I've added a note in the article. Thanks!
they have different sizes which might be better after reading some of the comments above you could use the larger 5 ways and they have other fittings also the 1" 5 way is about 3.10 us.
Ohhhh, Yayyy, I've had my eBay store for about a year now and have slowly been upgrading my whole system of doing things (mannequin, backdrop, lighting method, etc.) and I just couldn't bring myself to buy one of those manufactured backdrop stands because it seems the base take up far to much space. I am so glad you showed in detail how to do this so I can customize it the way I need. I think I will make it a little taller, put three T joints on the top and just attach all three (White, Black and Green) screens to their own bar so I can just flip them to the one I need. Then make a thin heavy base so it doesn't tip over. Thank You, Thank You, Thank You!
I'm glad I could help! For eBay products, I usually use either a wood table or a much smaller setup, sometimes just taping some fabric to the wall, and draping it down to the table. As long as you can get good lighting, you can take some great product shots!
Fill "x" base's with sand and you won't need tape!
Found a place that makes the awesome foam-backed screens that eefx used to sell. Here's the place = http://www.chroma-key.com Their customer service is great and their product is way better than what I used to use - no wrinkles like with the fabric I was using. The reviews on them are good too - https://www.trustpilot.com/review/www.chroma-key.com . No more fabric for me - saves me a ton in post! John
Sooo random youtube viewer searching google for greenscreen ideas and... bam, an article from before there was even a blue shirt Jeff. Just want to say, keep being awesome and ah, this sort of DIY content is pretty sweet. I actually used PVC pipe to make a mini spare paint booth the other year. Handy skill to have.
Haha, this was waaaay back when I was doing some of my first YouTube videos—most of which have been removed, sadly, like my 'Printer Error' video.