nginx

Clearing Cloudflare and Nginx caches with Ansible

Since being DDoS continuously earlier this year, I've set up extra caching in front of my site. Originally I just had Nginx's proxy cache, but that topped out around 100 Mbps of continuous bandwidth and maybe 5-10,000 requests per second on my little DigitalOcean VPS.

So then I added Cloudflare's proxy caching service on top, and now I've been able to handle months with 5-10 TB of traffic (with multiple spikes of hundreds of mbps per second).

That's great, but caching comes with a tradeoff—any time I post a new article, update an old one, or a post receives a comment, it can take anywhere between 10-30 minutes before that change is reflected for end users.

I used to use Varnish, and with Varnish, you could configure cache purges directly from Drupal, so if any operation occurred that would invalidate cached content, Drupal could easily purge just that content from Varnish's cache.
Rate limiting requests per IP address in Nginx

Just wanted to post this here, since I've had to do this from time to time, and always had to read through the docs and try to build my own little example of it...

If you're trying to protect an Nginx server from a ton of traffic (especially from a limited number of IP addresses hitting it with possibly DoS or DDoS-type traffic), and don't have any other protection layer in front, you can use limit_req to rate limit requests at whatever rate you choose (over a given time period) for any location on the server.

# Add this to your virtual host config file.
limit_req_zone $binary_remote_addr zone=mylimit:10m rate=10r/s;

# Later, in a `server` block:
server {
    location ~ \.php$ {
        limit_req zone=mylimit;
        ...
    } 
    ...
}

I have had to do this sometimes when I noticed a few bad IPs attacking my servers. You can adjust the rate and zone settings to your liking (the above settings limit requests to any PHP script to 10 per second over a 10 minute period).

Nginx serving up the wrong site content for a Drupal multisite install with https

I had a 'fun' and puzzling scenario present itself recently as I finished moving more of my Drupal multisite installations over to HTTPS using Let's Encrypt certificates. I've been running this website—along with six other Drupal 7 sites—on an Nginx installation for years. A few of the multisite installs use bare domains, (e.g. jeffgeerling.com instead of www. jeffgeerling.com), and because of that, I have some http redirects on Nginx to make sure people always end up on the canonical domain (e.g. example.com instead of www. example.com).

My Nginx configuration is spread across multiple .conf files, e.g.:

Hosted Apache Solr's Revamped Docker-based Architecture

I started Hosted Apache Solr almost 10 years ago, in late 2008, so I could more easily host Apache Solr search indexes for my Drupal websites. I realized I could also host search indexes for other Drupal websites too, if I added some basic account management features and a PayPal subscription plan—so I built a small subscription management service on top of my then-Drupal 6-based Midwestern Mac website and started selling a few Solr subscriptions.

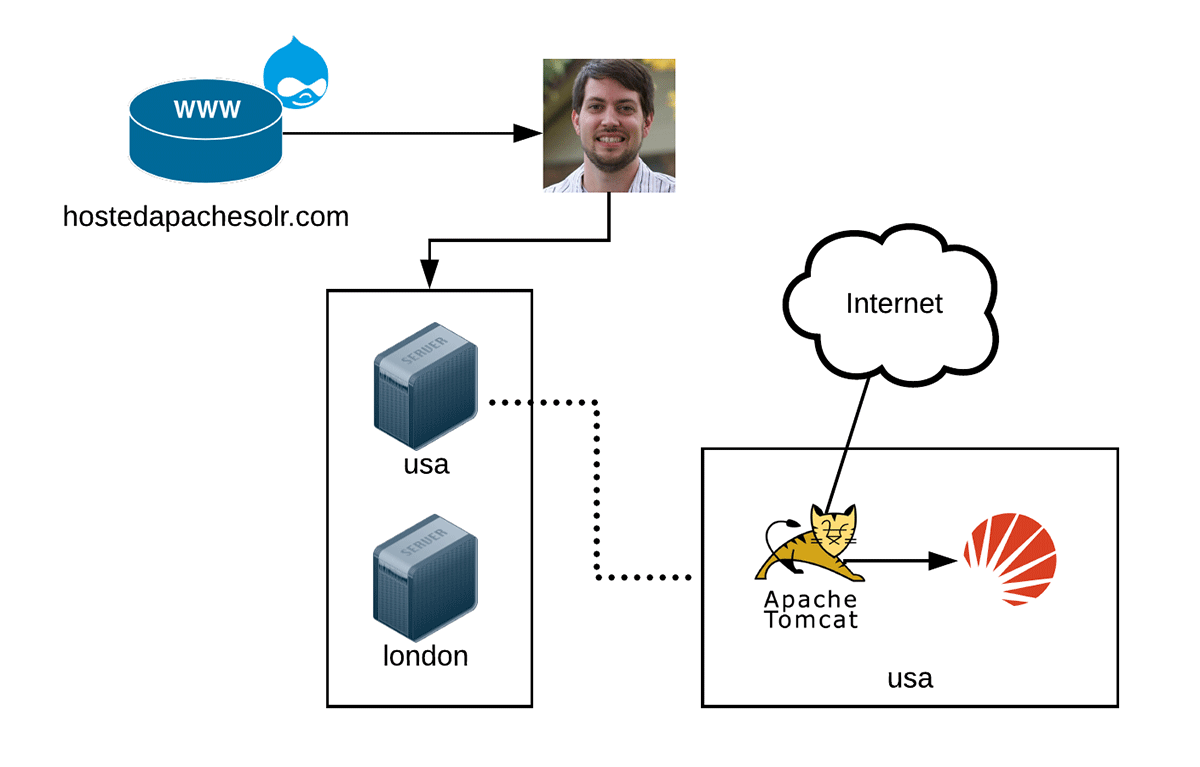
Back then, the latest and greatest Solr version was 1.4, and now-popular automation tools like Chef and Ansible didn't even exist. So when a customer signed up for a new subscription, the pipeline for building and managing the customer's search index went like this:

Hosted Apache Solr original architecture

Original Hosted Apache Solr architecture, circa 2009.

Getting Munin-node to monitor Nginx and Apache, the easy way

Since this is something I think I've bumped into at least eight times in the past decade, I thought I'd document, comprehensively, how I get Munin to monitor Apache and/or Nginx using the apache_* and nginx_* Munin plugins that come with Munin itself.

Besides the obvious action of symlinking the plugins into Munin's plugins folder, you should—to avoid any surprises—forcibly configure the env.url for all Apache and Nginx servers. As an example, in your munin-node configuration (on RedHat/CentOS, in /etc/munin/plugin-conf.d, add a file named something like apache or nginx):

# For Nginx:
[nginx*]
env.url http://localhost/nginx_status

# For Apache:
[apache*]
env.url http://localhost/server-status?auto

Now, something that often trips me up—especially since I maintain a variety of servers and containers, with some running ancient forms of CentOS, while others are running more recent builds of Debian, Fedora, or Ubuntu—is that localhost doesn't always mean what you'd think it means.

Reverse-proxying a SOAP API accessed via PHP's SoapClient

I'm documenting this here, just because it's something I imagine I might have to do again someday... and when I do, I want to save myself hours of pain and misdirection.

A client had an old SOAP web service that used IP address whitelisting to authenticate/allow requests. The new PHP infrastructure was built using Docker containers and auto-scaling AWS instances. Because of this, we had a problem: a request could come from one of millions of different IP addresses, since the auto-scaling instances use a pool of millions of AWS IP addresses in a wide array of IP ranges.

Because the client couldn't change their API provider (at least not in any reasonable time-frame), and we didn't want to throw away the ability to auto-scale, and also didn't want to try to build some sort of 'Elastic IP reservation system' so we could draw from a pool of known/reserved IP addresses, we had to find a way to get all our backend API SOAP requests to come from one IP address.

The solution? Reverse-proxy all requests to the backend SOAP API.

Self-signed certificates via Ansible for local testing with Nginx

Most of my servers are using TLS certificates to encrypt all traffic over HTTPS. Since Let's Encrypt (and certbot) have taken the world of hosting HTTPS sites by storm (free is awesome!), I've been trying to make sure all my servers use the best settings possible to ensure private connections stay private. This often means setting up things like HSTS, which can make local / non-production test environments harder to manage.

Consider the following:

Fixing ERR_SPDY_INADEQUATE_TRANSPORT_SECURITY SSL error in Chrome

Recently, I was upgrading the infrastructure for Hosted Apache Solr, and as part of the upgrade, I jumped from Nginx 1.8.x to 1.10.x, which includes HTTP/2 support. I had previously used SPDY support in my server configuration to help the site run better/faster on modern browsers with SPDY support:

server
{
    listen 443 ssl spdy;
    server_name hostedapachesolr.com;
    ...
}

After the server upgrades, I was getting the following error on Nginx restarts:

nginx: [warn] invalid parameter "spdy": ngx_http_spdy_module was superseded by ngx_http_v2_module in /etc/nginx/conf.d/hostedapachesolr.conf:10

So I switched the configuration to use http2 instead of spdy on the listen line, and restarted nginx.

Everything worked great in Safari and FireFox, but when I tried loading the page in Chrome, I was greeted with the following error:

Streaming PHP - disabling output buffering in PHP, Apache, Nginx, and Varnish

For the past few days, I've been diving deep into testing Drupal 8's experimental new BigPipe feature, which allows Drupal page requests for authenticated users to be streamed and loaded in stages—cached elements (usually the majority of a page) are loaded almost immediately, meaning the end user can interact with the main elements on the page very quickly, then other uncacheable elements are loaded in as Drupal is able to render them.

Here's a very quick demo of an extreme case, where a particular bit of content takes five seconds to load; BigPipe hugely improves the usability and perceived performance of the page by streaming the majority of the page content from cache immediately, then streaming the harder-to-generate parts as they become available (click to replay):

Drupal 8 with Redis, PHP 7, Nginx, and MariaDB on Drupal VM using CentOS

One of the motivations behind Drupal VM is flexibility in local development environments. When you develop many different kinds of Drupal sites you need to be able to adapt your environment to the needs of the site—some sites use Memcached and Varnish, others use Solr, and yet others cache data in Redis!

Drupal VM has recently gained much more flexibility in that it now allows configuration options like:

  • Choose either Ubuntu or CentOS as your operating system.
  • Choose either Nginx or Apahe as your webserver.
  • Choose either MySQL or MariaDB for your database.
  • Choose either Memcached or Redis as a caching layer.
  • Add on extra software like Apache Solr, Node.js, Ruby, Varnish, Xhprof, and more.

Out of the box, Drupal VM installs Drupal 8 on Ubuntu 14.04 with PHP 5.6 (the most stable release as of December 2015) and MySQL. We're going to make a few quick changes to config.yml so we can run the following local development stack on top of CentOS 7:

Drupal VM - Drupal 8 status report page showing Nginx, Redis, MariaDB, and PHP 7

Configure Drupal VM

To get started, download or clone a copy of Drupal VM, and follow the Quick Start Guide, but before you run vagrant up (step 2, #6), edit config.yml and make the following changes/additions: