AKA "Supercharged Windows-based Drupal development"
tl;dr: Use either PhpStorm or a Samba share in the VM mounted on the host instead of using a (slow) Vagrant synced folder, and use Drupal VM 4.4's new
drupal_deployfeatures. See the video embedded below for all the details!
I've often mentioned that Windows users who want to build modern Drupal sites and apps are going to have a bit of a difficult time, and even wrote a long post about why this is the case (Developing with VirtualBox and Vagrant on Windows).
But for a long time, I haven't had much incentive to actually get my hands dirty with a Windows environment. Sure, I would make sure Drupal VM minimally ran inside Windows 10... but there were a lot of little inefficiencies in the recommended setup process that would lead to developers getting frustrated with the sluggish speed of the VM!
Since a client I'm currently helping is stuck on Windows 7 for the short-term, and can't do internal development on a Mac or Linux (other OSes are not allowed on workstations), I decided to try to set up a project how I would set it up if I had to work in that situation.
Basically, how do you get Drupal VM to perform as well (or better!) on a Windows 7 machine as it does on a Mac, while still allowing a native IDE (like PHPStorm or Notepad++) to be used?
After a couple days of tinkering, I've found the most stable solution, and that is to build Drupal VM 'outside in'—meaning you build your project inside Drupal VM, then share a folder from Drupal VM to Windows, currently using Samba (but in the future, SSHFS might be a viable option for Windows too!).
Here's how I used Drupal VM to run and develop an Acquia BLT-based project locally on Windows 7:
Contents
- Install required software
- Create an SSH public/private key pair
- Set your SSH key to run inside Pageant
- Build Drupal VM
- Set up BLT inside the VM
- Use PhpStorm to work on the codebase
- Configure a reverse-mounted shared folder
- Conclusion
Install required software
To make this work, you will need to install the following software:
- VirtualBox
- Vagrant
- PuTTY (used for Pageant)
- Powershell 4.0+ (if on Windows 7)
- Cmder ('full' download)
Create an SSH public/private key pair
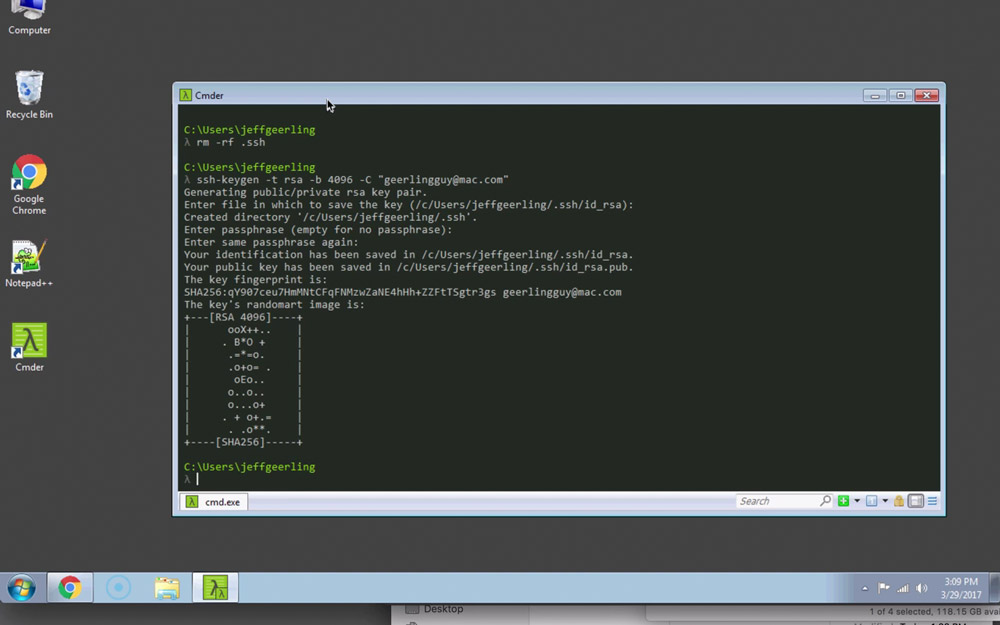
Before doing any work with a project with code hosted on GitHub, Acquia Cloud, Redmine, or elsewhere, you need to create an SSH key pair so you can authenticate yourself to the main Git repository.
- Open Cmder (right click and 'Run as Administrator')
- Create an SSH key in the default location:
ssh-keygen -t rsa -b 4096 -C "[email protected]"- Press 'enter' three times to accept the defaults.
- Print the contents of the public key:
cat C:\Users\[youraccount]\.ssh\id_rsa.pub - Copy the entire contents (from
ssh-rsato the end of your email address). - Add the copied key into GitHub under Profile icon > Settings > SSH and GPG keys.
- Also add the key into any other relevant service (e.g. Acquia Cloud under Profile > Credentials).
Set your SSH key to run inside Pageant
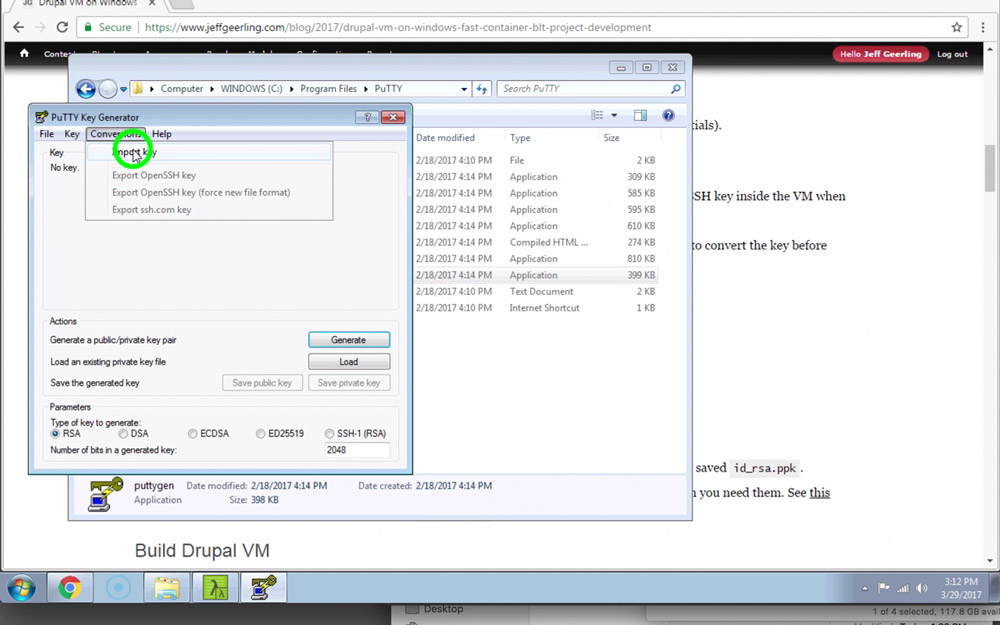
Due to a bug in the current version of Vagrant, you need to use Pageant to allow Vagrant to use your SSH key inside the VM when running commands like vagrant up and vagrant provision.
Also, Pageant requires a specially-formatted version of your key, so you'll need to use puttygen.exe to convert the key before loading it into Pageant.
- Install PuTTY.
- Open
puttygen.exe(insideC:\Program Files\PuTTY). - Select "Conversions > Import key".
- In the 'Actions' section, click "Save private key".
- In the save dialog, save the file as
id_rsa.ppkwith type "PuTTY Private Key Files (*.ppk)". - Close
puttygen.exe. - Open
pageant.exe(this opens a taskbar item). - Right click on the Pageant item in the taskbar, and choose 'Add key', then navigate to where you saved
id_rsa.ppk. - You should also ensure Pageant runs on system startup to ensure keys are always available when you need them. See this guide for further instructions on how to have
pageant.exestart on boot.
Build Drupal VM
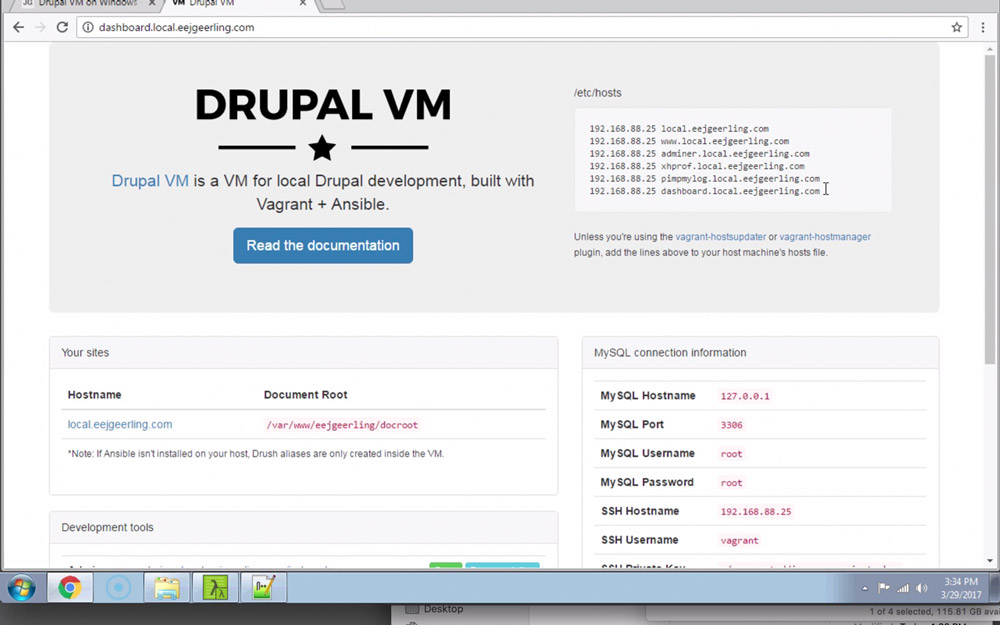
At this point, we're ready to build a local development environment with Drupal VM.
Note: In the rest of this guide, substitute
projectnamefor your project's own machine name.
- Open Cmder (right click and 'Run as Administrator')
- Run
start-ssh-agent(so your SSH key is loaded and can be used in the VM).- When using Pageant this is not strictly required, but once this bug is resolved, you won't need Pageant at all, and you can just use
start-ssh-agent.
- When using Pageant this is not strictly required, but once this bug is resolved, you won't need Pageant at all, and you can just use
- Clone a copy of Drupal VM to your computer:
git clone https://github.com/geerlingguy/drupal-vm.git - Change directories into Drupal VM:
cd drupal-vm Create a shell script to create your project's directory and set it's permissions correctly:
touch examples/scripts/setup.shOpen your editor of choice (e.g. Notepad++) and edit
setup.sh(be sure to use Unix line endings!):#!/bin/bash mkdir -p /var/www/projectname chown vagrant:vagrant /var/www/projectname
Create a
config.ymlfile:touch config.ymlOpen your editor of choice (e.g. Notepad++) and edit
config.yml(be sure to use Unix line endings!)—also make sure thedrupal_deploy_repovaraible is set to the correct GitHub repository you want to use as youroriginremote:--- vagrant_synced_folders: [] vagrant_synced_folder_default_type: "" vagrant_hostname: local.projectname.com vagrant_machine_name: projectname vagrant_ip: 192.168.88.25 drupal_deploy: true drupal_deploy_repo: "[email protected]:github-username/projectname.git" drupal_deploy_version: master drupal_deploy_update: true drupal_deploy_dir: "/var/www/projectname" drupal_deploy_accept_hostkey: yes drupal_core_path: "{{ drupal_deploy_dir }}/docroot" ssh_home: "{{ drupal_deploy_dir }}" drupal_build_composer: false drupal_composer_path: false drupal_build_composer_project: false drupal_install_site: false firewall_allowed_tcp_ports: - "22" - "25" - "80" - "81" - "443" - "4444" - "8025" - "8080" - "8443" - "8983" - "9200" # For reverse-mount Samba share. - "137" - "138" - "139" - "445" # Run the setup script. pre_provision_scripts: - "../examples/scripts/setup.sh" # BLT-specific overrides. vagrant_box: geerlingguy/ubuntu1404 drupal_db_user: drupal drupal_db_password: drupal drupal_db_name: drupal configure_drush_aliases: false # Use PHP 5.6. php_version: "5.6" php_packages_extra: - "php{{ php_version }}-bz2" - "php{{ php_version }}-imagick" - imagemagick nodejs_version: "4.x" nodejs_npm_global_packages: - name: bower - name: gulp-cli drupalvm_user: vagrant nodejs_install_npm_user: "{{ drupalvm_user }}" npm_config_prefix: "/home/{{ drupalvm_user }}/.npm-global" installed_extras: - adminer - drupalconsole - drush - mailhog - nodejs - selenium - xdebug # XDebug configuration. # Change this value to 1 in order to enable xdebug by default. php_xdebug_default_enable: 0 php_xdebug_coverage_enable: 0 # Change this value to 1 in order to enable xdebug on the cli. php_xdebug_cli_enable: 0 php_xdebug_remote_enable: 1 php_xdebug_remote_connect_back: 1 # Use PHPSTORM for PHPStorm, sublime.xdebug for Sublime Text. php_xdebug_idekey: PHPSTORM php_xdebug_max_nesting_level: 256 php_xdebug_remote_port: "9000"Back in Cmder, run
vagrant up- Wait for Drupal VM to complete its initial provisioning. If you get an error, try running
vagrant provisionagain.
Set up BLT inside the VM
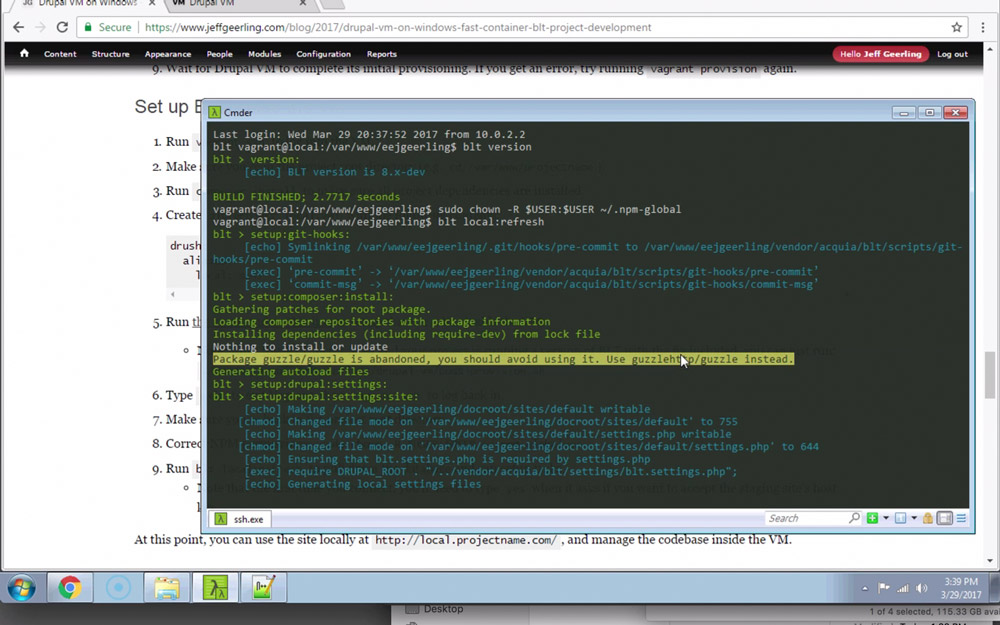
- Run
vagrant sshto log into the VM. - Make sure you're in the project root directory (e.g.
cd /var/www/projectname). - Run
composer installto make sure all project dependencies are installed. Create
blt/project.local.ymlwith the following contents:drush: aliases: local: selfRun the command on this line to set up the
bltalias inside the VM.- Note: After this BLT bug is fixed and your project is running a version of BLT with the fix included, you can just run:
./vendor/acquia/blt/scripts/drupal-vm/post-provision.sh
- Note: After this BLT bug is fixed and your project is running a version of BLT with the fix included, you can just run:
- Type
exitto exit Vagrant, thenvagrant sshto log back in. - Make sure you're back in the project root directory.
- Correct NPM permissions:
sudo chown -R $USER:$USER ~/.npm-global - Run
blt local:refreshto pull down the database and run setup tasks.- Note that the first time you connect, you'll need to type
yeswhen it asks if you want to accept the staging site's host key.
- Note that the first time you connect, you'll need to type
At this point, you can use the site locally at http://local.projectname.com/, and manage the codebase inside the VM.
Use PhpStorm to work on the codebase
For speed and compatibility reasons, this method of using Drupal VM to run a BLT project is done 'outside in', where everything is done inside the VM. But if you want to edit the codebase in a native Windows-based editor or IDE, you need access to the project files.
PhpStorm is a fully-featured PHP development IDE from Jetbrains, and is used by many in the Drupal community due to its speed and deep integration with PHP projects and Drupal in particular. You can download a free trial, or acquire a license for PhpStorm to use it.
One benefit of using PhpStorm is that it can work directly with the project codebase inside Drupal VM, so you don’t need to configure a shared folder.
- Open PhpStorm.
- Click “Create New Project from Existing Files” (if you are in a project already, choose File > “New Project from Existing Files…”).
- Choose the option “Web server is on remote host, files are accessible via FTP/SFTP/FTPS.” and then click “Next”.
- For “Project name”, enter
Projectname - Leave everything else as default, and click “Next”.
- In the ‘Add Remote Server’ step, add the following information:
- Name:
Drupal VM - Type:
SFTP - SFTP host:
local.projectname.com - Port:
22 - Root path:
/var/www/projectname - User name:
vagrant - Auth type:
Password - Password:
vagrant - Click ‘Test SFTP connection’ and accept the host key if prompted.
- Ensure the “Web server root URL” is correct (should be “http://local.projectname.com”).
- Name:
- Click “Next”
- Click on the “Project Root” item in the “Choose Remote Path” dialog, and click “Next”.
- Leave the ‘Web path’ empty, and click “Finish”.
- PhpStorm will start ‘Collecting files’ (this could take a couple minutes).
- Change the Deployment configuration in the menu option Tools > Deployment > “Configuration…”
- Click on ‘Excluded Paths’ and add deployment paths containing things like Composer and Node.js dependencies:
- “/vendor”
- “/docroot/themes/custom/project_theme/node_modules”
- Enable automatic uploads in menu option Tools > Deployment > “Automatic Upload”
From this point on, you should be able to manage the codebase within PhpStorm. You can also open an SSH session inside the VM directly from PhpStorm—just go to the menu option Tools > “Start SSH Session…”
PhpStorm might also ask if this is a Drupal project—if so you can click on the option to enable it, and make sure the Drupal version is set to the proper version for your site.
Note: If you perform git operations on the codebase running inside the VM, or other operations like configuration exports which generate new files or update existing files, you need to manually sync files back to PhpStorm (e.g. click on project folder and click menu option Tools > Deployment > "Download from Drupal VM". At this time, only automatic upload of files you edit within PhpStorm is supported. See the issue Auto Refresh of Remote Files for more info and progress towards an automated solution.
Note 2: If you encounter issues with CSS and JS aggregation, or things like Stage File Proxy showing logged errors like
Stage File Proxy encountered an unknown error by retrieving file [filename], you might need to manually create the public files folder inside the project docroot (e.g. inside Drupal VM, runmkdir fileswherever the public files directory should be.
Configure a reverse-mounted shared folder
If you don't have a PhpStorm license, or prefer another editor or IDE that doesn't allow working on remote codebases (via SFTP), then you can manually create a Samba share instead. In this case, we're going to use Samba, which requires the TCP ports listed in the customized config.yml file above to be open (137, 138, 139, and 445).
- (Inside the VM) Install Samba:
sudo apt-get install samba Add the following contents to the bottom of
/etc/samba/smb.conf:[projectname-share] comment = projectname path = /var/www/projectname guest ok = yes force user = vagrant browseable = yes read only = no writeable = yes create mask = 0777 directory mask = 0777 force create mode = 777 force directory mode = 777 force security mode = 777 force directory security mode = 777Restart the Samba daemon:
sudo service smbd restart(sudo systemctl restart smbd.serviceon systems with systemd).- Set Samba to start on boot:
sudo update-rc.d samba defaults(sudo systemctl enable smbd.serviceon systems with systemd). - (Back on Windows) Mount the shared folder from Windows Explorer:
\\local.projectname.com\projectname-share - You can now browse files from within Windows just as you would any other folder.
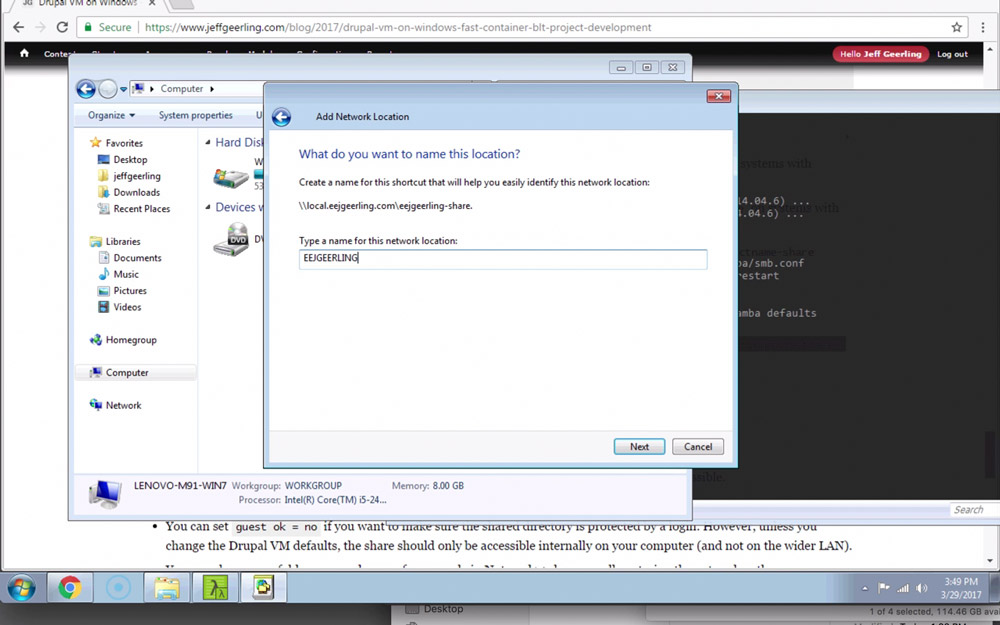
- If you'd like, you can 'Map a new network drive' for more convenient access:
- Right-click while browsing 'Computer' and select "Add a network location"
- Go through the wizard, and add the shared folder location you used above (
\\local.projectname.com\projectname-share). - Save the new network location with a descriptive name (e.g. "BEAGOV").
- Now, you can just go to Computer and open the network location directly.
Notes:
- You can only access the network location when the VM is running. If it is offline, files are inaccessible.
- You should always use Unix line endings in your editor to prevent strange errors.
- You can set
guest ok = noif you want to make sure the shared directory is protected by a login. However, unless you change the Drupal VM defaults, the share should only be accessible internally on your computer (and not on the wider LAN). - You can also open a folder as a workspace, for example in Notepad++, by manually entering the network path (
\\local.projectname.com\projectname-share). - Global operations (e.g. project-wide search and replace) are going to be very slow if done on the Windows side. It's better to do that either in the VM itself (using tools like
greporvim), or on another computer that can work on the files locally!
Conclusion
Using this 'outside in' approach makes it so you can get near-native performance when building Drupal sites locally on Windows 7, 8, or 10. It requires a little extra effort to get it working correctly, and there are still a couple small tradeoffs, but it's a lot faster and easier to set up than if you were to use normal shared folders!
Hopefully the SSHFS issues I mentioned earlier are fixed soon, so that the reverse shared folder will be easier to configure (and not require any manual steps inside the VM!).
Also, note that you could use the vagrant-exec plugin to run commands inside the VM without first logging in via vagrant ssh.
Comments
This didn't work at first for me with my VM that I've been working in. Once I completely disabled the firewall in the VM it worked fine, though. This is by far the best way for Windows users to work on a BLT project.
To get even more speed on windows I use the "Tools->Deployment" options of PHPStorm.
I have a local clone of the repo on my normal filesystem, which I work on. This makes search/replace/edit native fast.
Any and all changes are automatically (enable through options) synced to either a samba share (either from a VM or from a remote server) or via SFTP (again, to a VM or a remote server).
https://www.jetbrains.com/help/phpstorm/2017.1/deployment.html
@JvE - very helpful tip! I think some other IDEs have similar options, too, like Coda. Also, if you use an app like Transmit (Mac-only, but there are similar apps for Windows), you can 'mount' a folder like a disk just using SSH.
Reverse Samba share is the most performing solution for now !
Drupal vm is certainly the best solution for Drupal ready virtual lamp server.
Thank you Jeff !
Hello.
Thank you for a great article and DrupalVM.
I`m currently using DrupalVM on windows machine (Surface Pro 3, i5, 8GB RAM) in a bit different setup.
I tried a lot of different solutions to increase I/O performance coz it is obviously the weakest part on windows machine and found that the vagrant plugin "vagrant-winnfsd" works fast and stable for me.
I take default DrupalVM configuration and add only one line to Vagrantfile:
config.vm.network "private_network", type: "dhcp"
Then run vagrant up under administrator (actually, I`m running PHPStorm under administrator to avoid file access issues).
No issues so far except the git under vagrant machine (we have custom composer bash scripts on our projects so it should be called under guest machine). Git is a bit slow in this setup.
Also, I tried to use http://docksal.io/ which is based on docker and it works fast too, but the setup of the new project is slower then DrupalVM and I miss useful tools like mailhog, adminer, etc.
Hope that SSHFS issues will be fixed soon and I`ll definitely try it and check performance of that setup.
Hi Jeff,
probably I'm asking a stupid question, but what needs to be inside the git repository which you specified in the config.yml file?
I've tried a lot of different approaches but none of them worked.
It would be great if you could give me some additional help on this.
Thank you
Am I correct in (like the poster above) assuming that this REQUIRES you to have a BLT project in a repository already to get your BLT project running on the Drupal VM?
I can get this to work except my repo is empty - I am just starting the project.
Is there an alternative path to these instructions where the BLT project could be created from scratch entirely on the Drupal VM?
Excellent write up Jeff. :)
I had to use
path = /var/www/drupalvm
rather than
path = /var/www/projectname
Hi Jeff,
I am a newbie to the world of Drupal and VM and blt. I am trying to get an existing drupal project running on my local Windows 10 machine. I am running into some issues one is that I cannot get blt to alias.
When I run $ composer info acquia/blt
name : acquia/blt
descrip. : BLT
keywords : automation, deployment, drupal, template, testing
versions : * 9.2.8
When I run $ composer run-script blt-alias
> blt blt:init:shell-alias -y --ansi
The system cannot find the path specified.
[warning] Drupal VM is locally initialized, but is not running.
[warning] Could not find your CLI configuration file.
[warning] Looked in ~/.zsh, ~/.bash_profile, ~/.bashrc, ~/.profile, and ~/.functions.
[warning] Please create one of the aforementioned files, or create the BLT alias manually.
I cannot figure out how to create the BLT alias manually.
Any help appreciated.