I made the switch from Aperture to Photos
tl;dr: ~600 GB photo library, took ~3 weeks to migrate, some things are awesome (access to all my photos everywhere, on any device), some things less so (faces don't get synced, no loupe, no five-star rating system, no pro-level editing/batch workflows). All-in-all, I wish Apple didn't ditch Aperture... but it's not the end of the world moving to Photos.
There are many, many photographers who were disappointed Apple decided to discontinue Aperture development. Aperture was by far my favorite tool for both organizing and manipulating RAW photos taken with my DSLRs. It was fast, it had tons of great organizational features, and was highly adaptable.
Photos, more the successor to iPhotos, is a consumer-oriented tool, with a decent toolset, but very little workflow customization and limited photo adjustments and inspection tools. Things like the loupe tool and star ratings are missing entirely, and adjustment sets and workspace layouts are present but weak. Even things like switching quickly between editing and browsing photos are annoying, since there's a mandatory animation that takes an extra 1/3 second every time I flip between photos!
Some pros decided to go all-in to Adobe Lightroom. I have a license for Creative Cloud, so I kicked Lightroom's tires, but found it to be clumsy and bloated (like many of the other CC apps nowadays...), and worst of all—even slower than Photos for my batch sorting and editing workflow!
After doing some tests with Lightroom and Photos, I chose to finally ditch Aperture and switch to Photos because:
- Aperture compatibility with Sierra and future macOS versions is getting worse and worse (since it's not maintained anymore).
- Photos offers iCloud Photo Library, which allows me to store all my photos in the cloud, and have 'light' copies of my library on my Macs and iOS devices where space is a concern.
- Photos (somewhat) seamlessly syncs all my RAW photos between Macs and iOS devices.
- Photos has 90% of the features I regularly used in Aperture.
So I finally did it. I abandoned my loupe, my tens of thousands of star ratings and labeled 'face' data, and started the process of moving all my photos from six separate Aperture libraries into one Photos library, synced to my iCloud Photo Library. I had to bump my iCloud plan to a 1TB plan, since my entire consolidated photo library (with 40,000+ 20-40 MB RAW files, JPEGs, and short video clips) is a hair shy of 600 GB. As long as Apple doesn't screw up the library or have frequent downtime, I'm okay with the $9.99/month for this service.
Since this is a somewhat longer post, here's a handy table of contents:
- Migrating from Aperture to Photos 1. A Note on Videos 2. Getting People/Faces recognized 3. Ensuring the upload doesn't slow down your home Internet connection
- Manipulating Photos like a pro
- Backing up the entire Photos library 1. Used Mac mini as dedicated backup computer
- Open problems
- Summary
Migrating from Aperture to Photos
There's no way around it—this process is painful. There's no automated "click here to import an Aperture library" button in Photos. I was expecting more from Apple, especially since Adobe built a rudimentary plugin for migrating from Aperture to Lightroom.
Here was the process I followed (for each Aperture library):
- Open an Aperture Library.
- Create folders to stick albums of 3,000-5,000 photos inside (I liked doing small batches instead of one giant export in case of issues... some TIFFs and PSDs threw errors, and it was easier to not have it be 'file 28,029 of 59,294' or something like that).
- Select all the photos in the folder, and choose "File > Export > Original..."
- Choose to export all IPTC metadata/keywords (this way Face data is preserved, with one keyword per face in the picture) with the pictures1.
- Choose a folder on an intermediary disk (I had a 500 GB SSD plugged in via USB 3 for this purpose—fast and not on my main drive to preserve space during the upload process). Export the files (this took quite a while for each batch).
- Drag the batch of photos into Photos, and wait for it to import.
After you do that like 20-30 times, you just need to wait days and days for all the photos to upload. It's a good idea to not be doing crazy things with your photo library on any other devices until the library is fully synced.

Sweet victory! It only took a couple weeks :)
1 The faces will not be converted into People in Photos—you still have to relabel all the people in your library—but at least some name-like metadata will stick with the picture through the transition!
A Note on Videos
If you're uploading a large number of videos, you'll likely notice your fans going crazy as your CPU surges to 100-200% activity whenever you're not doing something in Photos. Don't worry, Apple just chose to offload the huge task of encoding smaller versions of all your videos to your computer instead of Apple's servers (how nice of you, Apple!)... so your Mac will merrily chug along re-encoding a medium and small version of every uploaded video, then upload all three copies to the iCloud Photo Library (meaning more upload bandwidth/time required on your end). At least Apple doesn't count the space used by the derivative copies of the video against your storage allotment!
Note that you'll probably see some of the following services consuming 90-200% of your Mac's CPU for at least a few days during and following the initial upload process:
com.apple.photos.VideoConversionService- Service to re-encode smaller derivatives of all your videoscloudd- General iCloud sync tasksphotolibraryd- iCloud Photo Library sync tasksphotoanalysisd- Photos facial and object recognition service
Getting People/Faces recognized
One thing that was unclear to me was why Photos seemed to take its time trying to scan my library for faces. I relied heavily on faces in Aperture, and always had faces as keywords on all my photos, so it was really sad to lose that data when moving to Photos (the keywords remain, but Photos is rescanning everything for its own 'People' section).
But before you can start labeling 'People' Photos identifies, you have to wait (and wait, and wait) for Photos to scan your library for faces. You can start tagging as the scanning is happening (e.g. if it's only scanned 5,000 of a 10,000 photo library), or you can wait for the scanning to finish. During the whole process, there's a photoanalysisd process that runs in the background (and only while Photos is quit) if your Mac is connected to a power source.
One major issue with People/Faces in Photos (at the time of this writing): People are not synced between Macs and iOS devices. Well, sort-of. On iOS, you can search for People you've labeled on a Mac, but the following are not possible/working:
- People label syncing between Macs
- Tagging/labeling People on iOS devices
I'm hoping this is just an omission from the current Photos for macOS/iOS feature set, and not a permanent problem... but as it is, I'm only able to work on labeling People on one of my Macs, and that data isn't as helpful as I thought it would be on other devices/Macs :(
Ensuring the upload doesn't slow down your home Internet connection
If you don't regularly upload giant files over your home Internet connection, you might be surprised to find that (at least in most cases), uploading lots of data will cause all Internet access in your house to slow down considerably. Depending on the router and modem you use for cable or DSL, you might end up with your home internet feeling more like dial-up during the upload process. See this StackOverflow answer for more details on the why.
There are a couple ways you can combat this problem:
- You can your Mac behind a router or proxy server that limits the upload bandwidth to something around 80% of what you get if you test on Speedtest.net.
- You can use Apple's 'Network Link Conditioner' System Preference pane to limit the upload speed internally on your Mac.
To install Network Link Conditioner, you can download for Mac OS X <= 10.11 as part of the Hardware IO Tools for Xcode 7.x, or as part of the 'Additional Tools for Xcode 8' for 10.12+.

Apple's Network Link Conditioner can save your home network during the arduous upload process (if you don't have QoS settings on your router).
Since the upload could take days or even weeks depending on your upload bandwidth (I have 5 mbps up and it took a week and a half 24x7 to upload a few hundred GB of pictures and videos), it pays to prepare—either make sure your router has QoS settings, or use Network Link Conditioner to limit the upload bandwidth.
Or drive to a local university or somewhere else with gigabit Internet and see if you can upload your library there :)
Manipulating Photos like a pro
One thing about Aperture that was incredibly awesome was entirely-keyboard-driven workflows. Any time I touch the mouse, my creative flow gets interrupted.
Here are a few of my keyboard-based workflows, Photos-style:
Selecting photos as favorites:
I generally do this as part of other workflows, but if I'm just running through and picking 'selects' (i.e. photos that I want to tag for sharing or quickly promoting to an album, or just toss into the 'Favorites' album), I will either use arrow keys when browsing all photos, or open one photo full screen, then:
- Press . (period) to favorite/like a photo.
- Press arrow keys (back/forward) to advance to another photo.
I really wish Photos maintained the 'five star' rating system I loved and used in Aperture—it's much more fine-grained than "heart" or "no heart"... but in my average non-pro usage (e.g. when I only have <100 photos in a batch), favorites are adequate. If I still did pro photography—when I'd end up with 300-800 photos from an event—I would need to either use Lightroom for the initial batch sort, or I'd probably tear out my hair using Photos. Keywords are not a replacement for star ratings and flags.
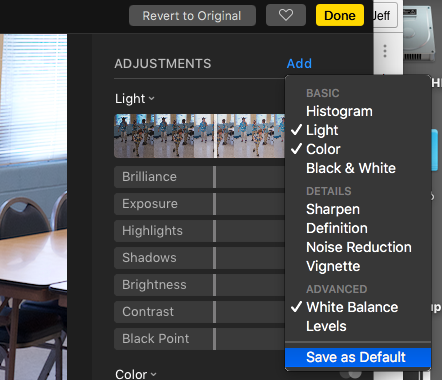
You can save the Adjustment set you use most often as a Default.
Batch cropping and making adjustments to just-imported photos:
- Double-click the first photo in the 'Last Imported' album to open it up full size.
- Press c to open the crop adjustment, make crops, then c or return to exit the crop tool (keeps you in adjustments mode).
- Press return to toggle between browser view and adjustments view (I usually just stay in adjustments).
- Press a to enter adjustments. 1. You can add 'Advanced' (pfft! I use the White Balance adjustment quite often!) adjustments by clicking 'Add' and choosing which ones you want to see. 2. Save your favorite/most-often-used 'adjustments set' as default (so you don't have to always add in adjustments) by clicking 'Add' then choosing 'Save as Default'
- Use the sliders to adjust things with your mouse.
- Go to the next photo (right arrow) and rinse and repeat until you hit the last photo.
There are a few other workflows and keyboard-based tricks I'm still ironing out, and if I get time, I'll come back and update this post with them. In the mean time, check out Apple's list of Keyboard shortcuts in Photos.
Backing up the entire Photos library
One of the headline features of iCloud Photo Library is that it backs up all your photos in 'the Cloud'. But there are two reasons why I still prefer having a local backup of all my digital assets:
- To hedge against any systemic issues with iCloud Photo Library (remember the iTools/.Mac/MobileMe era, when data loss was one of the features? /s).
- To have full, unfettered access to all my media if needed (in case of major Internet outages, or if I need to grab a large set of photos quickly and don't want to wait for hours for it to download.
Therefore I determined I would need a full local backup of my entire library—and in addition, it should be a snapshot backup, so in case photos ever go missing from iCloud, I can restore them from an older backup.
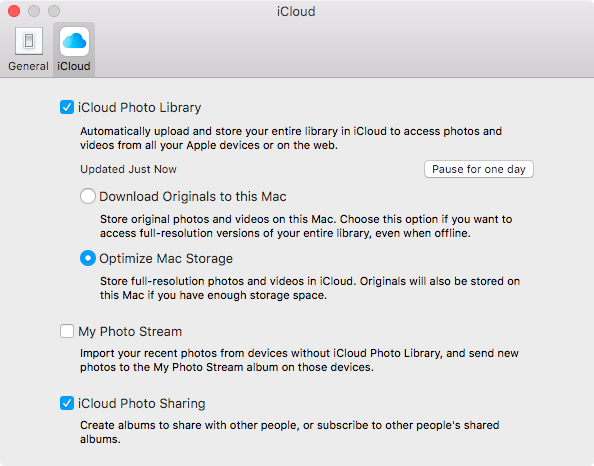
Unfortunately, since my photo library is 600 GB and growing, there's no way to fit it entirely on my MacBook Air's internal SSD, and storing it on an external drive is quite annoying, since I would need to carry that drive with me anywhere I wanted to view or manage my photos! One of the best things about iCloud Photo Library is the fact that I can set 'Optimize Mac Storage' and have access to my entire photo library even on my paltry MacBook Air's 256 GB SSD, anywhere I have an Internet connection!
One of the best features of iCloud Photo Library — access to all my photos on my laptop, anywhere I have an Internet connection!
Used Mac mini as dedicated backup computer
The only way to grab a full (and always-updated) backup of all the photos and videos in your iCloud Photo Library is to have one of your devices set to 'Download Originals'. Realistically, if you have a reasonable collection, that won't be possible on an iOS device which maxes out at 128 or 256 GB total storage. Plus, trying to recover images from a damaged photo library on an iOS device would be awkward at best.
So the only real solution is to have a Mac running somewhere that would always be downloading original files to a local hard drive. And then to preserve history (photos that were deleted, etc.), you would also need to have something akin to a Time Machine backup on the local hard drive, so you could go back in time and find old files.
Many people aren't as paranoid as I am... but I was willing to drop $300+ on Aperture (I think I bought it twice—once a long time back, then again on the Mac App Store), and I'm willing to pay cash to ensure my huge photo library—with both family memories and thousands of photos that I was paid to produce and need archived—is safe and secure in any eventuality. Therefore I did the logical thing and purchased the following items to build myself an always-on, headless backup Mac:
- Mac mini: I bought a used mid-2011 i5 model with 8GB of RAM
- 1 TB Mushkin Reactor SATA SSD: To be installed in the mini as the system drive / where my iCloud Photo Library and iCloud Music Library lives
- 500 GB Muskin Triactor SATA SSD: To be installed in the mini as the secondary drive / where my wife's iCloud Photo Library lives
I already had the following on hand (repurposed from other uses):
- 1 TB WD My Passport USB 3.0 Hard Drive: To be used as an external Time Machine drive, backing up the system drive.
- 500 GB WD My Passport USB 3.0 Hard Drive
- 4TB Seagate USB 3.0 Hard Drive: Used for larger video project archives and giant file storage.
And here's a picture of everything as it runs today:
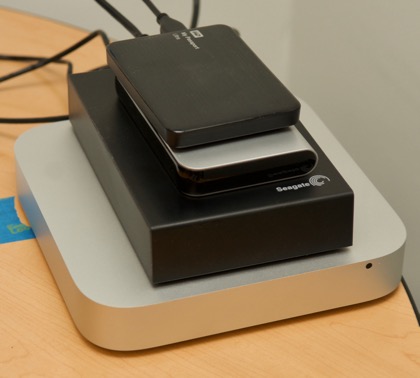
I bought a used Mac mini, and stuck a bunch of SSDs and HDDs in/on it, and it backs up my entire digital life.
The Mac mini is set to download all originals from the iCloud Photo Library (this runs in the background), and it also has iTunes running, and set to download new media files whenever available (that way I have backups of all the music and movies I've purchased or stored in my iCloud Music Library as well... and with Home Sharing enabled, I can access my entire music and video library on the local network without having to download anything through the Internet!
I have it running 'headless' (no monitor, keyboard, or mouse plugged in), and I can remotely connect via Back to My Mac, either with screen sharing or just as a file server. Since I'm plugged into my Gigabit wired network, I can transfer files at 50-100 MB/sec from any of my computers—even wirelessly, since the AirPort Extreme supports 802.11ac, which I've clocked at near-Gigabit speeds!
For completeness, I also have my Dropbox configured on this Mac mini, so I have an extra Time Machine'd backup of all my most important documents and projects (about 120 GB worth) that are stored in Dropbox. (For my Dropbox files, that means I have 7 separate complete backups, 3 with snapshots, and 2 that are remote (not in my house)... so unless there were a countrywide EMP attack or the worst stroke of coincidence ever, I'm sure I'll never lose files stored in my Dropbox!
I really wish there were a way I could backup my iCloud data on Linux—that way I could do all the backups on a much more power-efficient (and space-efficient!) Raspberry Pi. I'm setting one up for my other cloud data backups under the Backup Raspberry Pi Server project. Sadly, since iCloud Photo and Music Library interaction is only possible through Macs and iOS devices for now, I have to have an always-on Mac of some sort running to back up the data.
Open problems
There are a number of small wrinkles (some of them more annoying than others) that remain to be worked out. I submitted feedback to Apple for some of them already, other ones aren't annoying enough that I would bug Apple's support team about them...
- People/Faces aren't synchronized between devices—at least not in a way that lets me name one identified person on my Mac and then see those pictures associated with the same person on my iPad (or another Mac, or my iPhone). I understand that because of Apple's stance on privacy and security each device does it's own facial recognition... but the tagging/labeling of People should be able to be synced, just like album associations and other photo metadata. Hopefully this is added soon—though I wonder how it will work if people mislabel someone on one of their devices.
- How can I get the same local backup setup working for my wife's photo library (a complete, local data backup of iCloud Photo Library)? Since only one iCloud Photo Library can be associated as the 'system' library for each macOS user account, I can't have both mine and my wife's libraries backed up under one logged-in account on the Mac mini. I could create a separate user account for my wife and manually switch logins every week or something... but this is (a) not automated and (b) would introduce periods where photos wouldn't be backed up!
- What happens if iCloud nukes a photo due to some bug or misconfiguration? This is not unprecedented (see: iTools, .Mac, and MobileMe issues of old); and it's the primary motivation of a complete separate local backup plus a Time Machine backup of that backup. But I would also like to have a long-long-long-term automated archival of the entire library, just like Aperture's 'Vault' feature afforded. Maybe I'll set up some sort of script that runs monthly or yearly and dumps the entire library off to Amazon Glacier or something...
Summary
After punting on the decision for a couple years (the writing has been on the wall for Aperture since at least 2014), I finally decided to migrate my 600+ GB library of photos and short video clips from Aperture to Photos. The decision wasn't easy, and if there was any way I could continue using Aperture, I would. Lightroom offers a lot of compelling features, but feels much like Photoshop and other Creative Cloud apps—bloated, sluggish, and annoyingly complex.
So I exported everything from Aperture (this took a few days), uploaded everything to my iCloud Photo Library (this took a few weeks), then set up a robust full local backup solution with hourly snapshots that stores an archive going back about one year.
The most painful aspect of the change is the fact that my tens of thousands of 'Faces' I labeled in Aperture didn't migrate (except as IPTC keywords) to Photos. And my editing and batch processing workflows aren't as optimal as I'd like. But the convenience of having my entire photo library available anywhere (as long as I have an Internet connection), along with Photos' simpler but mostly-adequate editing tools, means I'm not as disappointed as I thought I would be at the outset.
I hope this story helped you if you're one of the thousands of photographers considering the switch from Aperture to either Lightroom or Photos!
Comments