networking

macOS Finder is still bad at network file copies

In what is becoming a kind of hobby for me, I've just finished testing another tiny NAS—more on that tomorrow.

But as I was testing, I started getting frustrated with the fact I've never been able to get a Raspberry Pi—regardless of internal storage speeds, even with 800+ MB/sec PCIe-based storage—to consistently write more than around 100 MB/sec write speeds over the network, with either Samba or NFS.

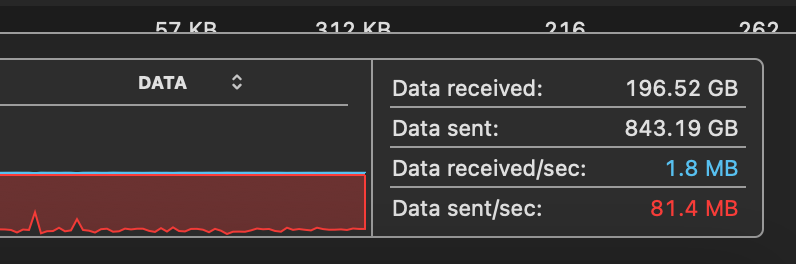
NFS would be more consistent... but it ran around 82 MB/sec:

NFS file copy to Raspberry Pi 5 stalled at 80 MB per second

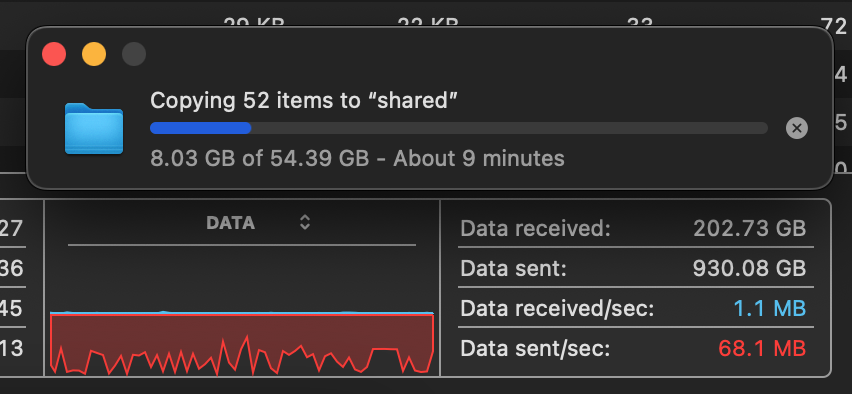
Samba would peak around 115 MB/sec, but it was wildly inconsistent, averaging around 70 MB/sec:

Samba file copy to Raspberry Pi 5 wild undulations

I have a problem: I use macOS1.

Set a static IP address with nmtui on Raspberry Pi OS 12 'Bookworm'

Old advice for setting a Raspberry Pi IP address to a static IP on the Pi itself said to edit the /etc/dhcpcd.conf file, and add it there.

But on Raspberry Pi OS 12 and later, dhcpcd is no longer used, everything goes through Network Manager, which is configured via nmcli or nmtui. If you're booting into the Pi OS desktop environment, editing the IP settings there is pretty easy.

But setting a static IP via the command line is a little different.

First, get the interface information—you can get a list of all interfaces with nmcli device status:

$ nmcli device status
DEVICE         TYPE      STATE                   CONNECTION         
eth0           ethernet  connected               Wired connection 1 
lo             loopback  connected (externally)  lo                 
wlan0          wifi      disconnected            --                 

In my case, I want to set an IP on eth0, the built-in Ethernet.

Setting up a Mikrotik 10 Gbps Switch the first time

Since I've done this four times now... and each time it's just a session of reading the docs, searching the forums, etc. until I get everything configured just so, I thought I'd document how I bring up a new MikroTik switch.

Mikrotik Cloud Router Switch CRS309-1G-8S+in

I personally love the CRS309-1G-8S+IN, and have three of them running in my homelab. They're less than $250, with 8 10 Gbps SFP+ ports, a 1 Gbps RJ45 port, and a serial console port.

But the best thing for my home use is they are fanless. Blissful silence, outside of a couple beeps the first time you plug it in.

Configuring wifi headless with connmanctl on LibreELEC via SSH

Because I love doing things quite backwards, I found myself in a predicament: I had only a wired direct connection between my laptop and the Raspberry Pi where I was running LibreELEC. Using mDNS I could connect to it directly connected at LibreELEC.local, and that's great...

But I wanted to join it to a WiFi network, and I only had a not-great 6-button remote control to plug into the Pi, so entering in long passwords via the UI (if that's even possible without a keyboard?) was not something I wanted to attempt.

Since I could ssh [email protected], I figured I'd connect to the available WiFi network, so it would be more convenient to update the device and put more content on it. Not to mention it expands Kodi's capabilities if you give it an Internet connection!

Enter ConnMan

LibreELEC uses ConnMan to manage network interfaces, and setting WiFi is a little strange, but doable:

While logged into the LibreELEC machine, enter connmanctl to get into the ConnMan shell.

Then do the following:

Testing 10 GbE throughput on Windows - iperf3 is outdated

iperf3 only showing 4.5 gbps in Windows

Recently I upgraded my AMD-based PC on a livestream, and I installed an Innodisk EGPL-T101 10 Gbps M.2 NIC (link to Innodisk product page).

Under Linux, I could get through 9.4 Gbps using iperf3 between the PC and my Mac Studio. But under Windows, I could only get up to about 4.5 Gbps (tested around 1h 27m into the stream)!

Testing iperf through an SSH tunnel

I recently had a server with some bandwidth limitations (tested using scp and rsync -P), where I was wondering if the problem was the data being transferred, or the server's link speed.

The simplest way to debug and verify TCP performance is to install iperf3 and run an iperf speed test between the server and my computer.

On the server, you run iperf3 -s, and on my computer, iperf3 -c [server ip].

But iperf3 requires port 5201 (by default) to be open on the server, and in many cases—especially if the server is inside a restricted environment and only accessible through SSH (e.g. through a bastion or limited to SSH connectivity only)—you won't be able to get that port accessible.

So in my case, I wanted to run iperf through an SSH tunnel. This isn't ideal, because you're testing the TCP performance through an encrypted connection. But in this case both the server and my computer are extremely new/fast, so I'm not too worried about the overhead lost to the connection encryption, and my main goal was to get a performance baseline.

Getting to 1.5 Gbps WiFi 6E on the Raspberry Pi CM4

In the pursuit of doing crazy things on a Raspberry Pi, my latest endeavor was to see if I could consistently pipe more than a gigabit per second of traffic through WiFi using a Raspberry Pi.

Raspberry Pi Compute Module 4 IO Board with Intel AX210 on M.2 adapter card

In the past, I had some faltering attempts where sometimes things would work—sort-of—using WiFi 6 (802.11ax, 40 MHz bandwidth, 2x2) using an Intel AX200 M.2 card on the Raspberry Pi Compute Module 4.

An easier way to find an ASUSTOR NAS to set it up

I have a few ASUSTOR NASes at my house, and I don't like installing a custom application just to identify the NAS so I can visit it's web UI the first time.

The official ASUSTOR getting started guide recommends installing ASUSTOR Control Center, which does a good job of identifying ASUSTOR devices on your network. And that's about it.

But behind the scenes, it's likely just scanning your network and matching any MAC addresses in Asustek's range. Which is easy to do without a third party app.

In my case, I can just run the following nmap command in the terminal and it spits out a list of all ASUS/ASUSTOR devices on my network:

Monitoring my ASUS RT-AX86U Router with Prometheus and Grafana

I've been running my Internet Monitoring Pi for a year or so, and it's nice to collect data on Internet performance from inside my network.

But my router—currently an ASUS RT-AX86U—also tracks its own metrics for inbound and outbound traffic, among other things:

ASUSWRT-Merlin System Status Dashboard metrics

Sometimes having the raw data from the router that's on the edge of the network can tell a different story than measuring things behind the router. So I want to grab this data and put it into Prometheus.

Benchmarking DNS on my Mac with Pi-Hole

After watching Level1Techs' THE FORBIDDEN ROUTER II - DIAL-UP BY DAWN video, I wanted to do some DNS benchmarking on my local network.

Since I run Pi-hole locally, and rely on it for local DNS resolution, I wanted to have a baseline so I could compare performance over time.

In the video, Wendell mentioned the use of Gibson's Windows-only DNS Benchmark tool. But that's Windows-only. Or maybe Linux under WINE, but definitely not a native / open source tool that's easily used across different platforms.

I looked around and settled on bulldohzer—for now, at least—as it's easy to install anywhere Node.js runs. I have Node.js installed via Homebrew on my Mac, so I just ran:

npm install --location=global bulldohzer

Then I could run a benchmark against Google and my own local DNS resolver (Pi-Hole):